Repairing a damaged fiberglass truck hood is a crucial skill for fleet managers, truck owners, and operators in construction and logistics. Damage to truck hood fiberglass can compromise vehicle aesthetics and functionality; therefore, understanding the proper repair process can lead to significant cost savings and prolong vehicle life. This guide details meticulous preparation steps, effective reinforcement techniques, and final finishing processes, equipping professionals to restore truck hoods to their original condition. The following chapters will explore the necessary preparation for a successful repair, the techniques to reinforce damaged fiberglass, and the finishing methods that ensure a high-quality aesthetic and durability.
From Bare Fiberglass to a Seamless Finish: Mastering Prep for Repairing a Fiberglass Truck Hood
A fiberglass truck hood presents a unique blend of strength and fragility. It can take the rough edge of road debris and the months of sun and weather, yet when damage happens, the repair begins long before any resin sees the surface. The quiet art of preparation is what separates a temporary fix from a repair that withstands the miles. This chapter walks through the careful, methodical prep work that underpins a durable, professional-looking restoration. It begins with nerve and intent—removing what stands in the way of a clean bond—and it proceeds through shaping and cleaning the surface so that every subsequent step clings to the hood with confidence. If the preparation is done with care, the repair that follows—whether the patch sits on a crack, a gouge, or a dent—will wear more like the original skin than a hastily slapped-on patch. The goal is not merely to fill holes or level surfaces; it is to re-create a smooth, continuous surface that can receive adhesive, resin, and paint without wrinkling, pinholes, or weak adhesion. The difference is visible in the long run, when the sun shifts across the hood and the color matches in the light, and you realize the repair was coaxed into life, not forced into place.
The process begins with a clean slate. Before any repair materials touch the fiberglass, the hood must shed every trace of its recent life—the decals, trims, and any emblem that might tempt a rough hand or linger in the repair zone. Decals and trim are not just cosmetic; they can trap heat, oils, and paint solvents that distort bonding. A heat gun, used carefully, softens adhesives so a plastic scraper can lift them away without tearing the fiberglass beneath. The careful removal of these elements is less about aesthetics and more about creating an unblemished patch that will accept resin and matting. In practice, this means taking the time to heat, lift, and peel with even, deliberate pressure, pausing whenever the surface shows signs of strain to prevent micro-tears in the fiberglass. For the broader context of prep strategies that support lasting repairs, a visit to the Master Truck Repair blog can provide additional perspectives on how prep choices ripple through the rest of a project. mastertruckrepairllc.com/blog/
With decals and trim out of the way, the hood is placed back on the vehicle to gauge the scope of damage. A misaligned hood can mask the true extent of cracks or delamination, so this step is not a parade of eyes but a careful, functional check. The hood’s alignment with the fenders and grille matters. It tells you where the surface has separated from the underlying structure or where a dent has pulled at the laminate. It also helps you avoid surprises once you begin to grind and sand; an ill-fitting hood might reveal new gaps after initial work, creating a mismatch that is difficult to fix later. This stage is also the moment to observe any areas where the gel coat is lifting, or where the finish reveals an underlying void. The alignment check sounds simple, but its implications reverberate through the subsequent steps because a true repair must maintain the hood’s original geometry and fit as well as its appearance.
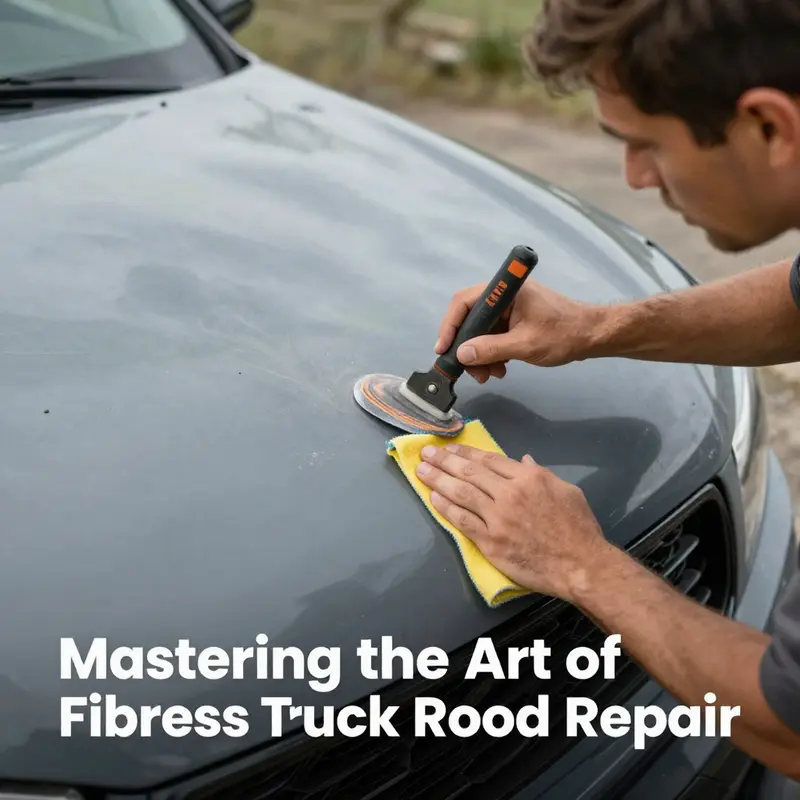
Sanding is next, and it is where the repair begins to reveal its bones. The most direct route to a solid bond is to give the surface a mechanical key—a texture that allows resins and fillers to cling rather than slide. Coarse grit comes into play here: block sanding the entire surface with 80 to 120 grit sandpaper creates a uniform texture, removes any old paint, and exposes clean, bare fiberglass. This stage also serves another practical purpose: it helps verify that the surface is free of waxes, oils, and silicone residues that could sabotage adhesion. The texture is not merely roughness; it is a bridge between the original fiberglass and the materials that will rebuild it. As you work across the hood, you should switch to brighter light periodically to catch any shallow scratches or pinholes that remain. Those imperfections, if left, will become the first places where primer and paint fail to lay down evenly. The goal is a satin, consistent backdrop for the next steps, not a glossy, uneven layer that hides deeper problems. For readers seeking a broader treatment of prep textures and why they matter, the same blog resource mentioned above offers additional examples of how surface texture controls bond strength and post-repair aesthetics.
Once the surface has a uniform key, you assess for imperfections with the kind of bright, raking light that makes flaws pop. This inspection is not a single moment but a process that may lead you back to the sander for touch-ups. Here you’re looking for scratches that break the surface, faint blisters that indicate trapped air, or small chips where fibers remain exposed. Those issues are not cosmetic nuisances; they are potential failure points once resin and fillers are applied. If you find a shallow pit or a small crack, you prepare for a targeted repair. These are not simply “surface fixes.” They are the foundations of a repair that will hold under years of heat and sun. In the case of deeper damage, a more deliberate approach is required, one that increases the bond strength between the damaged area and the new materials being applied. The repair kit for fiberglass often includes an epoxy resin and a hardener designed to cure into a tough, durable layer that won’t simply peel away with flexing. You mix according to the manufacturer’s directions, apply a thin coat directly onto the sanded area, and then place a small piece of fiberglass mat into the resin. A spreader forces out any trapped air and helps saturate the mat fully. Cure times vary with temperature and humidity, but a general rule is to let the initial layer set before adding the next. The objective is to wet out the mat completely, leaving no wrinkles or dry spots. If air is visible or if the mat appears dry in areas after spreading, a gentle additional layer of resin is applied and smoothed. This careful layering is essential to prevent delamination later on, when the repair must handle the same stringency of weather and road conditions as the rest of the hood. The first layer cures into a thin, strong base that the subsequent layers anchor into, ensuring a continuous surface that integrates with the hood’s original laminate rather than sitting on top of it.
Deeper damage, such as cracks or holes that have cut through more than the outer gel coat, requires a broader rebuild. In these cases, you need a two-part filler designed to structurally rebuild the damaged area. You apply a thin coat of filler to the damaged zone, feathering the edges into the surrounding fiberglass so there is no visible seam once finishing begins. After the filler cures, you sand it smooth, always returning to a fine, controlled flatness that makes the repaired patch indistinguishable from the rest of the hood when viewed at normal distances. The feathering is not just a trick of finish; it minimizes stress concentration at the borders of the repair. Without feathering, a rigid patch can behave like a fault line under thermal cycles or flexing. The feathered edge distributes stress more evenly and promotes a seamless transition that can accept primer and paint without creating ridges or ridges that catch light awkwardly.
With the structural work accomplished and the surface prepared, a final cleansing step removes any sanding dust, oils, or residues that could hinder the adhesion of primers and paints. A degreaser followed by isopropyl alcohol is a reliable pairing for fiberglass. The degreaser dissolves and carries away oils and residues, while the alcohol evaporates quickly and leaves a clean, ready surface for bonding. In industrial settings, cleanliness is not a luxury; it is a prerequisite. After this cleaning, the hood is ready to receive primer. The primer’s job is to build a uniform base color and texture that accepts paint evenly. The primer adheres best to a surface that has already been cleaned and abraded to provide a mechanical key. It also helps to control the appearance of the final color and protects the repair from moisture ingress by sealing the repair layers beneath.
The final act in preparation is to consider the finishing materials and the environmental conditions that will govern curing. The type of resin used—whether polyester, epoxy, or a two-part system—will influence the cure time and the heat tolerance of the repair. In most professional repairs, a UV-resistant gel coat or clear topcoat is recommended to shield the repair from sun exposure and weathering. The choice of finish is not merely cosmetic; it also affects the hood’s resistance to moisture, UV degradation, and eventual color-matching when the topcoat is applied. Even the curing environment matters. A warm, dry space promotes efficient curing and reduces the risk of moisture entrapment or solvent blush. The manufacturer’s instructions provide the baseline for working temperature and humidity, but practical experience suggests a stable environment around a comfortable workshop range is ideal. Temperature and air flow can change the thickness of resin layers as they cure, which can influence the final smoothness. An orderly, controlled curing process also minimizes dust settlement on the wet surface, which would otherwise necessitate another round of sanding and refinishing.
As the preparation concludes, you begin to frame a narrative of what comes next: priming and painting. The surface, now free of old paint and clean of contaminants, accepts primers that bond to fiberglass and smooth the micro-structure into an even plane. The primer lays down the foundation for the color coat, helping to eliminate color drift and ensuring that the final finish matches the vehicle’s original appearance. The color coats follow, layered with caution so that any imperfections beneath can be corrected with subsequent light sanding and re-application. A UV-resistant topcoat or gel coat seals the finish and provides a weatherproof shield that helps prevent fading, chalking, or cracking over time. With proper curing and a careful assembly of the layers, the repaired hood can match the rest of the truck’s finish, both in color and in texture. The end result is not a patched surface but a renewed skin that carries the vehicle’s appearance and utility forward rather than a repair that shouts for attention.
Finally, it is worth noting that the preparation phase not only determines the patch’s immediate success but also influences how smoothly the project progresses into the painting stage and beyond. The steps described—removing decals, rechecking fit, abrading to create a mechanical bond, inspecting for hidden flaws, performing targeted repairs for surface or structural damage, cleaning thoroughly, and planning for primer and paint—form a cohesive, interconnected workflow. Each step supports the next, and skipping any stage tends to complicate or compromise the final finish. The discipline of prep translates into longevity: a repaired hood that resists peeling, that handles heat and moisture without warping, and that retains a uniform color once the topcoat is applied. It is the quiet, patient work that makes a fiberglass repair endure. For readers who want to explore prep strategies further or discover related repair practices, the linked blog resource offers insights into broader maintenance workflows and how preparatory choices intersect with subsequent steps in the repair process.
External resource note: A detailed discussion of repair and painting steps for fiberglass hoods is available at an external reference. This additional guide can provide complementary perspectives on mix ratios, curing times, and topcoat selection, further supporting the practical techniques described here. https://www.autobodyrepair.com/repair-paint-fiberglass-hood/
From Bevel to Bond: A Cohesive Guide to Strengthening and Repairing Fiberglass Truck Hoods

Repairing a fiberglass truck hood is less about quick fixes and more about rebuilding a skin that can withstand sun, wind, heat, and road debris. The hood is a critical barrier, a component that needs to flex with the engine bay yet stay rigid enough to protect what lies beneath. When damage happens, the goal is to restore both function and appearance without introducing weak points that will fail again. The path from a blemish to a durable, cosmetically seamless repair begins with thoughtful preparation, precise layering, and careful finishing. The sequence is deliberate, and it rewards patience with a patch that behaves like the surrounding laminate rather than a separate, brittle patch that wrinkles or lifts over time. To truly understand the value of the technique, imagine the hood as a lightweight composite plate. Its strength comes from the way the resin and reinforcement fabric work together to distribute stress. When we repair, we try to recreate that synergy, not just fill a hole or cover a dent.
The first step is preparation, and it matters as much as the repair itself. Any decals or paintwork near the damaged zone must be removed or masked so the repair can extend cleanly beyond the edges. This removal prevents a seam line from forming where the new material meets old paint, a seam that can trap moisture or fail to bond properly. Then the edges around the damage are prepared with a careful bevel. Using 150-grit sandpaper, you create a 45-degree bevel along the edge of the damage. The radius you choose—about 100 millimeters for cracks or holes, or 50 millimeters for surface dents—establishes a broad, tapered junction between old and new material. This bevel is not just cosmetic; it is a mechanical handshake in which the new fiberglass resin system can anchor itself more deeply, reducing the likelihood of a peel or lift. The work is intimate and detail-oriented, because every little ridge or burr can trap air or create a stress riser that undermines the patch later on.
After beveling, the area must be pristine. Dust, grease, and residue are the enemies of adhesion. A silicone remover or isopropyl alcohol is used to wipe away any particles and ensure the surface is clean and dry. If the area hasn’t seen attention to contamination for a while, consider giving it a second wipe after a brief air-dry. The goal is a surface that is perfectly receptive to the resin and fabric that will follow. This isn’t just about sticking a patch on a dent; it’s about laying down the groundwork for a robust laminate that will bond as if it were part of the hood from the original manufacture.
The reinforcement strategy is straightforward but effective. Cut three pieces of fiberglass mat, each typically 12 to 15 inches long, and plan their placement to overlap the damaged zone. The idea is to create a layered patch that has enough thickness to bear the load without becoming overly stiff or prone to cracking at the edges. For deeper damage—cracks that extend into the core, or holes—the repair begins with a thin layer of resin applied directly to the sanded area. While the resin is still workable, place the smallest piece of fiberglass mat into the resin and use a plastic spreader or squeegee to force the resin through and through the mat. The spreading action bubbles out trapped air and ensures full wetting of the fabric. This wetting-out is critical; dry spots within the mat create voids that will later become failure points when the hood flexes in the wind or at temperature extremes.
Patience becomes a virtue at this stage. Allow the first layer to cure slightly before adding the next layers. The subsequent layers—the second and third pieces of mat—are laid in with similar resin saturation. Each layer should be fully saturated and smoothly laid to avoid wrinkles, dry spots, or air pockets. Wrinkles act like tiny cracks under load, especially in an automotive environment where vibrations are constant and temperature swings are common. The layers must be coaxed into a seamless bond, with no air entrapment or misalignment that could undermine the patch’s integrity.
When the final reinforcement layer has cured to a handling stiffness, attention turns to finishing. The entire repaired area is sanded with P120 grit until it is flush with the surrounding surface. The intent is not to sand away the patch entirely but to create a subtle transition—an invisible seam where the repair fades into the original hood. The sanding process is iterative and patient; it’s not about removing material aggressively but about achieving a level, smooth surface that can be primed and painted without showing a transition line. After this initial smoothing, a clean wipe removes any sanding dust, ensuring the area is ready for the finishing steps.
Priming and painting are the final cosmetic acts, but they are essential to long-term durability. The surface must be cleaned again, removing any residual dust or oil that could compromise adhesion. Priming prepares the repaired area to accept paint and helps to unify the color and texture with the rest of the hood. The painting step should aim for a finish that matches the original, not only in color but in gloss and texture. In many cases, a UV-resistant gel coat or clear topcoat is employed to shield the repair from sun and weathering, extending the life of the patch. The resin-matrix and fiberglass skin have already created a strong bond, but protecting that bond from UV degradation is a practical, proactive measure. Following the resin’s manufacturer instructions for mixing and curing is non-negotiable; it ensures the chemical reaction occurs correctly and that the patch achieves its designed strength. A warm, dry environment accelerates curing and helps avoid moisture entrapment, a common pitfall when repairs are performed in a damp or cool setting.
The narrative of repair extends beyond the steps of sanding and layering. The beveling and wet-out techniques discussed here are not merely ad hoc tricks; they are the practical application of the fundamental principle that automotive composites succeed when every layer contributes to a cohesive laminate. The bevel creates a gradual transition that invites the new resin and cloth to merge with the old surface rather than meeting it abruptly. The mulch of resin and mat functions as a miniature structural sandwich, where the outer resin encases the fabric and shares in the load-bearing duties. In a broader sense, this is the same logic that governs reinforced composites in other applications: evenly distributed reinforcement, complete saturation, and thoughtful finishing that protects the bond from environmental assault. When you layer three mats with full saturation, you’re essentially building a tiny laminate that can resist impact, flex, and stress in a way a single piece of material never could. This is reinforcement in action, turned into an automotive repair technique that you can rely on.
For those contemplating deeper structural concerns or larger damage zones, the same guiding principles apply with adjustments. If the damage has compromised the underlying core or structural ribs, the repair should extend to these features, ensuring that the patch has a solid foundation. Where core materials exist, they must be assessed for integrity and, if necessary, replaced or backed with additional reinforcement. The principle remains the same: create a bond that distributes load, avoid traps for moisture, and maintain a surface that accepts finish evenly. If you encounter such complexities, plan for a slightly more extensive repair and consider environmental controls to ensure the resin cures without distortion. While the average hood patch may end up with three plies of reinforcement, professional repairs might call for additional layers or a different resin system, depending on the depth of damage and the exposure the hood will endure in service.
From a maintenance standpoint, the repair should be viewed as part of the hood’s life cycle. The repair process itself becomes a learning curve for future maintenance, guiding how to spot early signs of damage, how to handle decals or graphics before repair, and how to keep the surface protected after painting. The adhesion of the new laminate to the existing surface is a crucial factor in longevity. Any failure at the bond line will often manifest as a corner lift or a seam crack in the months following repair. Therefore, the careful bevel, the meticulous wetting out, and the controlled curing environment are more than just steps; they are preventative strategies that reduce the likelihood of recurrence.
In terms of practicality, this method demands patience, but it also offers a pathway to a repair that is nearly indistinguishable from the original panel. It avoids the temptation to over-fill the defect or to rely on surface fillers that may crumble under heat and vibration. The emphasis on multiple, saturated layers helps ensure that the repair is not simply a cosmetic patch but a real, load-bearing restoration of the hood’s integrity. The final finish—carefully sanded, primed, and painted to match—completes the transformation and returns the hood to a state where it can be trusted again on busy highways and rugged backroads alike.
For readers who seek a broader frame of reference about reinforced composites and the philosophy of fabricating durable laminates, some parallel concepts can deepen understanding, even if the applications differ. The idea of saturating fabric with resin to eliminate air pockets and create a continuous, resin-rich surface is a core principle shared across many fiberglass repair contexts. In a different application, this same approach underpins how structural fibers reinforce concrete elements, with the emphasis on proper cut, spacing, and joint treatment to ensure a clean, continuous bond. While the specifics differ—metallic or polymer-grade rebar in concrete instead of woven fiberglass cloth in a truck hood—the underlying logic remains: ensure clean interfaces, provide mechanical interlock, and cure in controlled conditions to maximize bond strength. Readers who want to explore these broader principles can refer to related technical resources that discuss GFRP reinforcement in concrete structures, including installation practices, cutting, spacing, protective cover, and joint treatment. This broader view can illuminate why the hood repair process emphasizes beveling, wet-out, and careful layering.
As you work through the repair, keep in mind a few practical reminders. Never skip the surface preparation. Skipping cleanliness is a fast path to adhesion failure. Do not rush curing or expose the repair to moisture during the initial set. Temperature and humidity influence resin behavior, and a good cure improves long-term performance. Avoid creating wrinkles in the cloth, which can become deliberate stress risers under load. Take your time to align each mat section so that the overlaps are intentional and the final patch presents a uniform laminate. Finally, after the paint cures, a light polish and a UV shield can help to preserve the finish and minimize chalking or fading, but the structural bond should be the repair’s core strength, and that comes from the careful layering, thorough wet-out, and proper curing.
If you want to explore broader maintenance concepts that support reliable repair outcomes, consider how routine maintenance planning and budgeting can set the stage for successful field repairs. A structured approach to upkeep helps ensure that any future impacts on the hood are detected early and handled with the same care that this chapter emphasizes. For further reading on routine maintenance planning, you can explore related content that discusses budgeting for routine truck maintenance. This internal resource offers practical guidance on scheduling, cost estimation, and proactive care that keeps critical components in good order, including body panels and skins that rely on consistent upkeep. Budgeting for Routine Truck Maintenance
For readers who want a broader technical grounding in reinforced composites while staying focused on automotive repair, there is a wealth of material on fiber-reinforced polymer systems and their uses in structural contexts. An external resource that provides a technical foundation for reinforcement strategies across composites—beyond auto repair—offers valuable context on wet-out, ply layering, and curing dynamics. See the GFRP Rebar Installation Guide for a thorough look at how reinforcement materials are designed and installed in concrete structures, including cutting, spacing, joints, and protective cover. While the application differs, the principles of proper fabrication, clean interfaces, and controlled curing are universal to successful laminate work. GFRP Rebar Installation Guide: https://www.fibercon.com/resources/gfrp-rebar-installation-guide
With these techniques and ideas in hand, repairing a fiberglass truck hood becomes a disciplined craft rather than a rushed fix. The process described here—cleaning, beveling, saturating with resin, layering reinforcement, careful curing, and a final, matched finish—offers a reliable path to restoring both the look and the structural performance of the hood. It is a testament to how thoughtful material science meets practical automotive repair, turning a damaged panel into a durable, long-lasting interface between the engine compartment and the road ahead. And as you gain experience with these steps, you’ll see that the repair is less about patching a surface and more about rebuilding a resilient laminate that travels with the vehicle for years to come.
From Rough to Radiant: Finishing Touches That Complete a Fiberglass Truck Hood Repair
The final finishing stage of repairing a fiberglass truck hood is where the repair moves from functional to flawlessly integrated. It is the part of the process that determines whether the hood looks like a factory panel or a patched surface, no matter how solid the underlying repair may be. A careful, methodical approach to sanding, priming, and painting, followed by a light polish and protective topcoat, produces a seamless transition between the repaired area and the surrounding paint. When done correctly, this stage not only restores aesthetics but also contributes to long‑term durability, weather resistance, and the value of the vehicle. The art and science of finishing hinge on three intertwined goals: achieving a perfectly smooth, flush surface; ensuring the new material bonds strongly to the old surface; and delivering a color and gloss that match the rest of the hood with precision. The steps that follow—though precise and somewhat meticulous—are built to deliver predictable results and to minimize future maintenance needs. In that spirit, the finishing chapter should read as a single cohesive practice rather than a checklist of isolated tasks. Each action supports the next, and the overall outcome depends on maintaining clean conditions, patient timing, and consistent technique throughout the process.
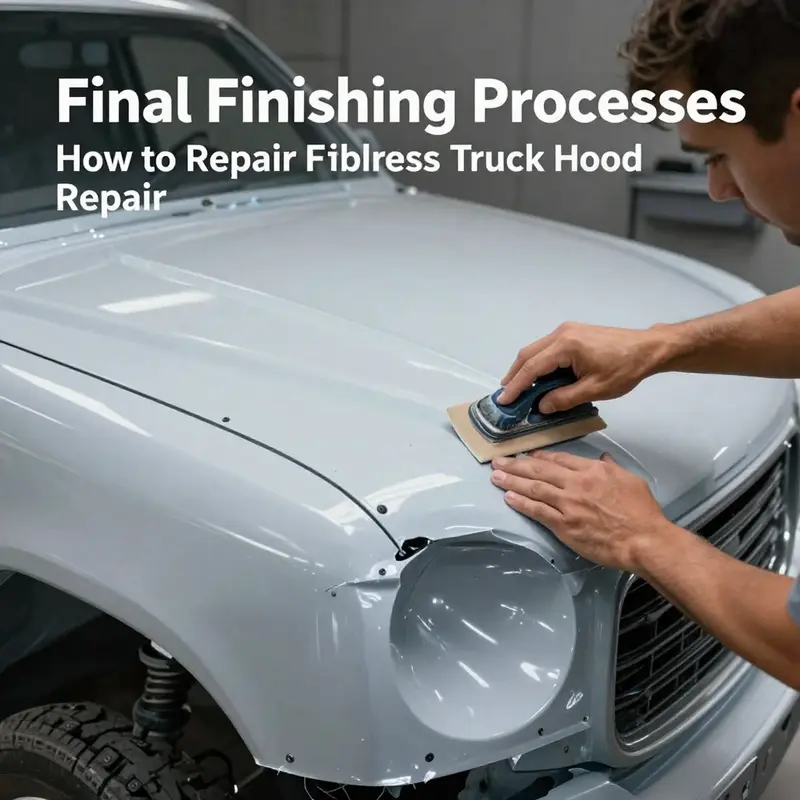
Sanding begins the moment the body filler has properly cured. The cured filler forms a hardened barrier that must be sculpted to the factory contour. Start with a relatively coarse grit, around 80 to 120, to knock down any high spots and to level the surface with the surrounding panel. The goal here is not to remove material aggressively but to establish a true plane. A steady hand and firm but even pressure help prevent creating new low spots or gouges. As high spots are reduced, the surface should begin to resemble the adjacent hood area in both shape and texture. The next stages of sanding are where the finish really starts to take shape. Progress gradually through finer grits—first 150, then 220—and finally to 320 or 400. The intent of this progression is to erase the scratches left by the coarser papers while preserving the smooth contour that makes the repair invisible to the eye. Wet sanding is highly recommended in these later stages. A damp sponge or a spray bottle keeps the surface cool and minimizes dust, while also preventing dry, embedded scratches that could complicate later steps. A clean, dry surface is critical, so after each sanding pass it is essential to wipe the area with a tack cloth or a solvent such as isopropyl alcohol to remove the fine dust produced by the sanding action. If trapped dust remains, it can show up as small specks through the primer and paint, creating an uneven finish rather than a seamless blend.
The priming stage is where the repair’s mechanical integrity and its long-term moisture resistance are anchored. A high-quality primer designed for fiberglass and body filler is applied in thin, even coats. The primer acts as a moisture barrier, a key adhesion layer, and a surface that accepts paint evenly. The goal with primer is a thin, level coat that featheredly blends into the existing factory paint without creating a visible ridge. After each coat dries completely, typically at the manufacturer’s recommended temperature and time, the surface should be lightly scuffed with 400 to 600 grit paper. This light abrasion helps the next coat of primer—or the topcoat itself—bond effectively. Over-priming can lead to a milky appearance or an overly thick edge that catches light differently, so restraint matters. The feathered edge is the concept to master here: the primer should graduate smoothly into the original paint, minimizing any visible line or edge. A clean, dust-free environment is crucial during priming, and avoidance of humidity spikes or temperature swings helps the primer cure evenly, which in turn improves your topcoat’s gloss and durability.
Painting represents the moment when the repair gains its visual identity. Begin by ensuring the hood’s color match with the vehicle’s color code. If a color match is not perfectly exact, plan for a light blend at the edge to prevent a harsh boundary. The paint itself should be of high quality and compatible with the primer used, whether the system requires a base coat and clear coat or a single-stage finish. The application technique matters as much as the product. Spray in light, overlapping passes at a distance of about six to eight inches from the hood. This distance helps achieve an even distribution and reduces the chance of runs. Multiple thin coats are preferable to a single heavy coat, as they dry more evenly and minimize sagging. In most scenarios, two to three thin coats will provide sufficient color depth and evenness. Allow each coat to flash off according to the product’s instructions before applying the next. The flash time is not just about speed; it’s about allowing solvents to evaporate so the subsequent layer bonds properly without trapping moisture. Between coats, a short, controlled drying phase is essential for the topcoat to cure with the right gloss and hardness.
A clear coat is often the finishing touch that seals the color and adds depth and protection. The clear coat gives the paint a high-gloss finish and creates a durable shield against UV exposure, weather, and road debris. Clear coats are especially important on exterior panels that endure sun exposure and temperature fluctuations. The application should be light and even, with several coats built up to achieve the required clarity and protection. When using a clear, it is recommended to follow the same principles of spray technique and drying time—thin layers, even coverage, and careful handling of edges to prevent pooling near panel seams or repair edges. Some technicians opt for a gel coat or a UV-resistant topcoat to further extend the repair’s longevity, particularly on fiberglass surfaces that can be more prone to chalking and weathering than metal. If a gel coat is chosen, it should be compatible with the base paint system and cured in conditions within the manufacturer’s guidelines to prevent wrinkling or hazing. The final decision between a standard clear coat and a UV-protective topcoat will depend on the local climate, exposure levels, and the rest of the hood’s finish.
The finishing phase also includes the subtle but important final touches that elevate the repair from good to exceptional. Once the paint has adequately cured, a light polish can remove minor imperfections and enhance clarity and shine. Polishing should be performed with care, using a mild abrasive compound and a clean polishing pad. The goal is to refine the surface without erasing the delicate edge feathering or introducing new swirl marks. If a machine polisher is used, set the speed to appropriate, manufacturer-recommended levels and keep the pad flat to the surface to avoid burning the paint. Hand polishing can be effective for small areas or for technicians who prefer a slower, more controlled approach. In either case, the work should be performed in stages: a gentle pass to address any remaining micro-scratches, followed by a finishing pass for maximum gloss. A final wipe-down with a clean microfiber cloth ensures no residue remains that could dull the final appearance.
Curing and care after finishing are as important as the finishing steps themselves. The paint and clear coat require time to attain full hardness and adhesion. Plan for a cure window of at least 24 to 48 hours before washing or exposing the hood to the elements, if environmental conditions allow. This period may extend in cooler or more humid environments, so always follow the product’s spec sheet. During cure, protect the hood from dust, debris, and moisture. A clean, dry, and warm environment will help the finish reach its true potential. After curing, a routine care regimen can maintain the repaired finish’s integrity. Gently washing with appropriate automotive soap and water, avoiding harsh abrasive cleaners, helps preserve the gloss. When drying, a soft microfiber towel will minimize micro-scratches. For maintenance, a light, occasional polish can keep the surface looking fresh, while avoiding aggressive compounds that could wear away the clear coat and primer edge prematurely.
Along the journey from patch to pristine, there is also a broader lesson about finishing that applies beyond fiberglass: attention to detail in the early stages strongly influences the final look. The bevels created during the initial repair, the cleanliness of the surface prior to priming, and the careful control of film thickness all influence the final degree of color match and contour accuracy. If any step is rushed, the risk of visible seams or an uneven finish rises. The integrative nature of finishing means that practitioners must respect the entire sequence—sand, prime, paint, clear, polish, cure—to realize a result that endures. The repair is not merely about making the hood look right; it is about restoring the hood’s structural continuity and weather resistance so it behaves like the original panel under sun, rain, and road salt.
The chapter’s practical guidance also invites reflection on how finishing practices fit into a broader philosophy of vehicle maintenance. Finishing is the last line of defense against moisture intrusion and micro-cracking in a composite material. It is where the repair demonstrates its longevity, not just its immediate aesthetic appeal. The proper primer and compatible topcoat act as a barrier that helps prevent moisture from migrating into the repair layer, which could eventually lead to delamination or surface deterioration. The careful feathering of edges reduces optical discontinuities and helps the eye read the hood as a single, continuous surface. The result is not simply a hood that looks repaired; it is a hood that reads as a seamless, well-integrated part of the vehicle, with the same level of protection and resilience as the surrounding panels.
For those who want to keep expanding their understanding of finishing, a broader resource can offer additional context and step-by-step guidance. The journey from rough repair to refined finish is a craft, and the best results come from patience, steady hands, and a willingness to revisit and refine. If you are seeking a more expansive, externally authored guide that complements these methods, one reliable reference provides a detailed, step-by-step approach to fiberglass hood finishing. You can explore that external resource to deepen your technique and confirm best practices in a structured format: https://www.autorepairhelp.com/repairing-fiberglass-truck-hood-step-by-step-guide/.
Within the practice of finishing, it can also be valuable to connect with a community of fellow enthusiasts and professionals who share insights on finishing techniques and color-matching nuances. A good way to keep ideas fresh and to troubleshoot unusual challenges is to consult a vehicle repair blog that covers a wide range of topics, including hulls and panels for trucks. For those who want a centralized hub for ongoing learning and practical tips, the Master Truck Repair blog offers a repository of guidance and case studies that readers can explore for broader context and complementary strategies. The blog serves as a bridge between the hands-on finishing steps described here and the practical realities of daily truck ownership, maintenance, and repair. Engaging with that resource can provide additional perspectives on how finishing decisions influence long‑term performance and appearance.
In summary, finishing a fiberglass hood repair is a precise dance of smooth surfaces, strong bonds, and accurate color work. It begins with disciplined sanding that respects the original contour and continues through primer bonding, color application, and protective coating. Each stage builds on the last, and the work culminates in a surface that not only looks right but behaves well under the elements. The finishes we apply, the gloss we savor, and the way the hood sheds water and resists fading all reveal the care that went into the repair. The result speaks to a broader truth in automotive restoration: when you treat finishing as a deliberate craft rather than a hurried step, you create parts that stand up to time and travel, and you restore confidence in the vehicle’s overall integrity. For readers seeking additional guidance that complements these techniques, the chapter invites you to explore related resources and community insights, all aimed at helping you achieve finishes that are durable, beautiful, and true to the vehicle’s original character.
Final thoughts
In summary, understanding how to repair a fiberglass truck hood involves meticulous preparation, expert reinforcement techniques, and careful finishing processes. Each step contributes to a robust solution that not only restores the vehicle’s functionality but also enhances its visual appeal. By following these established methods, fleet managers and operators can ensure the longevity of their vehicles and maintain their investment effectively. Regular training in repair techniques will further streamline processes, reduce downtime, and keep operational costs manageable.

