Addressing a hole in a truck frame is vital for maintaining safety and performance in any fleet operation. Fleet managers and trucking company owners should understand the importance of thorough inspections and meticulous repair processes. This guide details a structured approach to repairing frame damage, focusing on assessment, preparation, fabrication, welding techniques, and final inspection to ensure long-lasting repairs that uphold the integrity needed for commercial vehicles. Each chapter contributes a vital component to a holistic repair strategy, ensuring that operators can manage their maintenance effectively.
Reading the Frame’s Signals: A Comprehensive Assessment Before Repairing a Hole in Your Truck Frame
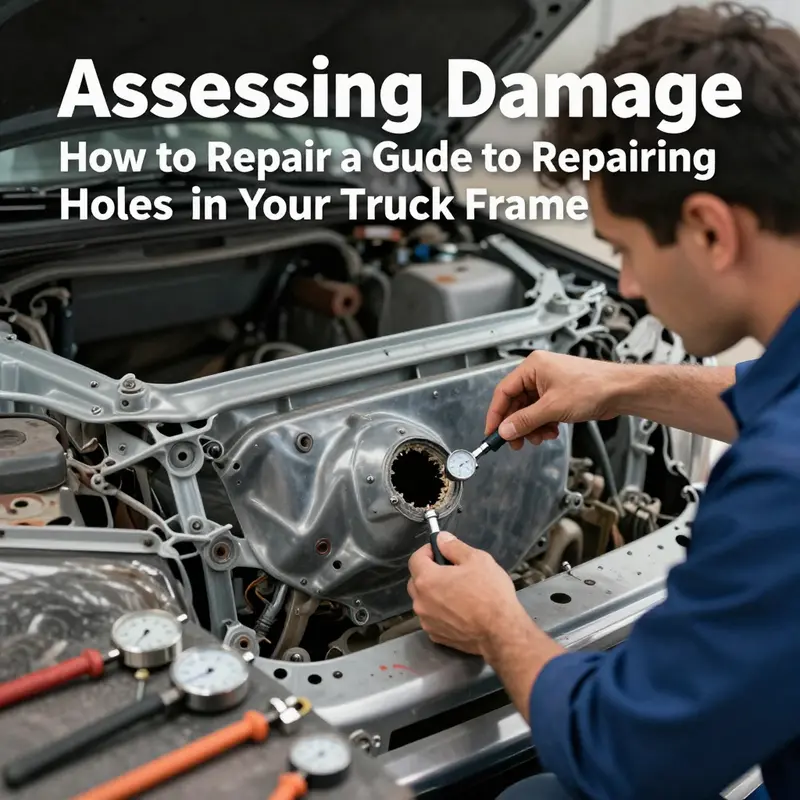
The frame of a truck is the backbone that carries every weight, every vibration, every road irregularity. When a hole appears in that backbone, the instinct to patch it quickly can be strong, but the safer, smarter move is to start with a careful assessment. A thorough reading of the frame’s signals sets the foundation for a repair that restores strength rather than masking weakness. Before you touch a wrench, ensure the vehicle is solidly supported on jack stands or a lift, and, for safety, disconnect the battery. This is not cosmetic work; the frame bears loads, and any mistake can propagate through critical systems under load. The hole itself is only the visible symptom. What matters is its size, its location, the material of the frame, and the underlying condition that produced it. Size is easiest to categorize in practical terms: a tiny puncture, a larger opening, or a widespread area where metal has thinned or rusted away. Location matters just as much. A hole near a suspension mount, a crossmember, or a weld joint—points where the frame experiences high stress—demands a repair that restores or even enhances stiffness. A hole in a relatively quiet stretch of rail might be approached differently, but never with complacency. Material compatibility is another critical factor. Heavy-duty trucks often use high-strength steel, sometimes alloys or aluminum, each requiring different welding approaches and post‑treatment. Welding aluminum, for instance, is a different discipline from welding steel, and it changes the choice of filler material, heat input, and even the cleanliness standards you must uphold. The extent of damage reveals whether corrosion is the root cause or if an impact has created a localized breach. Corrosion, left untreated, suggests deeper weakness. Here the first rule is blunt: rust must be removed until you reach solid, clean metal. Patching over rust is not a remedy; it is a temporary veneer that fails as soon as moisture and stresses resume. When you begin this assessment, you should map the frame’s architecture in your mind. main rails run the length of the vehicle; crossmembers provide anchor points and resist bending. Holes near or inside these crucial zones carry much higher consequences for safety and performance. If you find a hole near a critical joint, the repair approach must address both the void and the way loads transfer through the joint. The very location informs the method: patching a small, isolated void near a non‑structural surface might be feasible with a plate and reinforcement from the inside or a robust adhesive system, while a large breach in a load-bearing rail will almost certainly require replacing a section or fabricating an equivalent panel that matches thickness and strength. In the early hours of assessment, you weigh material compatibility and structural intent. A frame that is aluminum or an alloy will not tolerate the same welding approach as a traditional steel frame. For aluminum, a careful, controlled process is essential, with the appropriate filler alloy and corrosion protection, because dissimilar metal contact can lead to galvanic corrosion. This is one of those moments where it pays to pause and consider whether a repair is a patch or a reconstruction. If the damage is truly extensive—large holes, craters, or a chain of deteriorated metal along a rail—patches start to look insufficient. In those cases, a section of the frame may need to be cut out and replaced with a matching piece of frame material, then welded in with precision to preserve alignment and strength. Even when the hole is small, the assessment must include a check for cracks emanating from the hole or from the edges of the removed material. Hairline cracks can compromise the integrity of a weld zone or the surrounding metal, sowing fatigue that grows with time under load. A practical, measured eye will search for signs of prior repairs, misaligned seams, or areas that show heat discoloration from previous welds. These observations help you decide whether a simple patch will do or if the entire structure needs reinforcement. Documentation matters as much as the physical repair. Note the hole’s size, measured edges, exact location, the material family, the presence of corrosion, and the surrounding condition. This record is not just about the current fix; it informs future inspections and helps you monitor for any signs of movement, cracking, or rust progression. If your assessment indicates the hole is in a high-stress area or that corrosion is extensive, the safest path is to plan for a replacement section. The work typically begins with careful surface preparation: removing paint, rust, and debris to expose bare metal. In some cases, you may need to cut away damaged sections using a plasma cutter or an angle grinder, crafting clean, straight edges with a bevel to create a robust weld joint. The bevel is more than a technical nicety; it gives the weld a mechanical grip and helps distribute stresses more evenly. As you prepare, you choose a replacement patch or section that matches the frame’s thickness and strength. It should be fabricated from the same or equivalent material, such as frame-grade steel meeting appropriate standards. Dry-fitting the patch before welding ensures proper alignment with adjacent rails and crossmembers; pre-drilling holes in the patch for alignment pins or bolts can help with accurate positioning. When you weld the repair, begin with tack welds to hold the patch in place, then proceed to continuous welds along the joint. For thicker steel, multiple passes with adequate cooling between passes prevent warping and cracking. A backer plate on the inside of the frame can provide added support and reduce the risk of burn-through on the inner surface, especially in enclosed inside cavities where heat can become trapped. After welding, the surface must be finished to reduce stress concentrations. Grind flush to create a smooth transition between old and new metal, then inspect for porosity, cracks, or incomplete fusion. Non-destructive testing methods, such as dye penetrant inspection, can be informative when available, especially for joints in critical locations. If defects appear, they must be addressed before continuing. Reinforcement may be advisable in high-stress areas; inside ribs or brackets can distribute loads and reduce the likelihood of localized failure. The finish is not cosmetic alone. A thorough anti-corrosion strategy protects the repair from moisture, salt, and road grime. You should sand the repaired area, apply a corrosion-inhibiting primer, and finish with a topcoat designed for durability and resilience against the elements. Even a well-welded repair can fail if moisture penetrates through unprotected edges. The finishing stage ties the repair into the vehicle’s broader protection strategy, including undercoating and chassis protection where appropriate. The decision to pursue a DIY repair or engage professionals depends on multiple factors, including the hole’s size, location, material, and the presence of corrosion. A practical rule of thumb from industry practice is that any hole larger than a small puncture, or located in a high-stress area, or resulting from notable corrosion, should be handled by a qualified professional. This is not about mistrusting your skills; it is about recognizing the frame as a safety-critical structure whose failure can have catastrophic consequences under load. If you feel uncertain at any point, seek guidance from a certified frame repair specialist. For those pursuing a careful, well-documented approach, the process described here forms a coherent pathway from initial assessment through final protection. A legitimate repair balances structural integrity, proper material selection, precise fabrication, and rigorous inspection. It also respects the vehicle’s long service life and the safety of its operator. If you want to explore a practical, maintenance-oriented perspective on related topics, you can explore in-house maintenance strategies that align with the approach outlined here in a resource such as the Turnage Sons in-house truck maintenance guide. Such references can offer context on routine inspections, reinforcing behaviors, and preventative measures that keep frames healthier longer. For additional standards and training guidance, consider consulting authoritative industry resources like the ASE, which provide validated procedures and best practices that reinforce the discipline of safe and durable frame work. In the end, the blueprint for assessing and repairing a hole in a truck frame is not a fast fix but a careful, methodical plan that respects the frame’s role as the vehicle’s backbone. A well-executed assessment leads to a repair that not only closes the hole but preserves, and perhaps enhances, structural integrity for the miles ahead.
Foundations First: The Preparation That Makes or Breaks a Hole-in-Frame Repair
Repairing a hole in a truck frame isn’t just about patching metal; it’s about restoring structural integrity and ensuring the vehicle can carry loads safely. The best repairs begin with disciplined preparation that places safety, fit, and long-term performance at the center of every decision. Preparation starts long before any metal is cut or welded: you adopt a mindset of restoration, not a quick fix, and you set the stage for controlled, repeatable work.
Safety is the first frontier: disconnecting the battery, securing the vehicle on solid jack stands on a flat surface, chocking wheels, and engaging the parking brake. The work area should be well lit, clean, and free of flammable material. PPE is mandatory: respirator, safety glasses, and heat-resistant gloves to manage sparks, dust, and metal shards. You bear responsibility for everyone who will use the vehicle after the repair, and stepping away without proper protection can invite hidden risks later.
Cleaning and inspection form the next line of defense. The goal is to expose bare, sound metal around the hole so you can accurately judge depth and extent. Rust must be removed, paint stripped, grease flushed out, and any coating that masks the metal must be removed with brushes, grinders, or light sandblasting. A clean surface ensures the weld bites properly and that corrosion won’t hide under the repair and reappear later. As you scrub, you evaluate geometry, check for thinning, cracks, or ripples that betray structural compromise. These observations guide whether a simple patch suffices or a larger replacement is required.
Material choice follows. For small holes in less-stressed areas, a patch plate welded over the defect can work, but larger holes or significantly thinned areas may require replacing the segment with a frame-grade piece of equivalent thickness and alloy. Deburr all patch edges to avoid sharp points that could nick tools or injure through handling. Ensure the patch matches the original frame’s yield strength and ductility and that it preserves the frame’s profile and load paths.
Cutting and fitting demand precision. When removing damaged sections, use a plasma cutter or angle grinder to achieve clean, straight edges with an appropriate bevel (commonly around 45 degrees) to create a generous welding surface. Dry-fit the replacement piece or patch; confirm alignment before any heat is applied. If alignment pins or bolt holes are used, pre-drill them so the patch can be anchored during welding.
Fabrication and assembly require attention to overlap and thickness. The patch should extend beyond the hole by at least 1.5 times the hole width on every side to ensure coverage and load transfer. Deburr the patch and verify thickness matches the original frame. A dry run helps catch misalignment before welding. Bolt the patch if needed for alignment prior to welding, ensuring a smooth surface with no step that could trap moisture or create a stress riser.
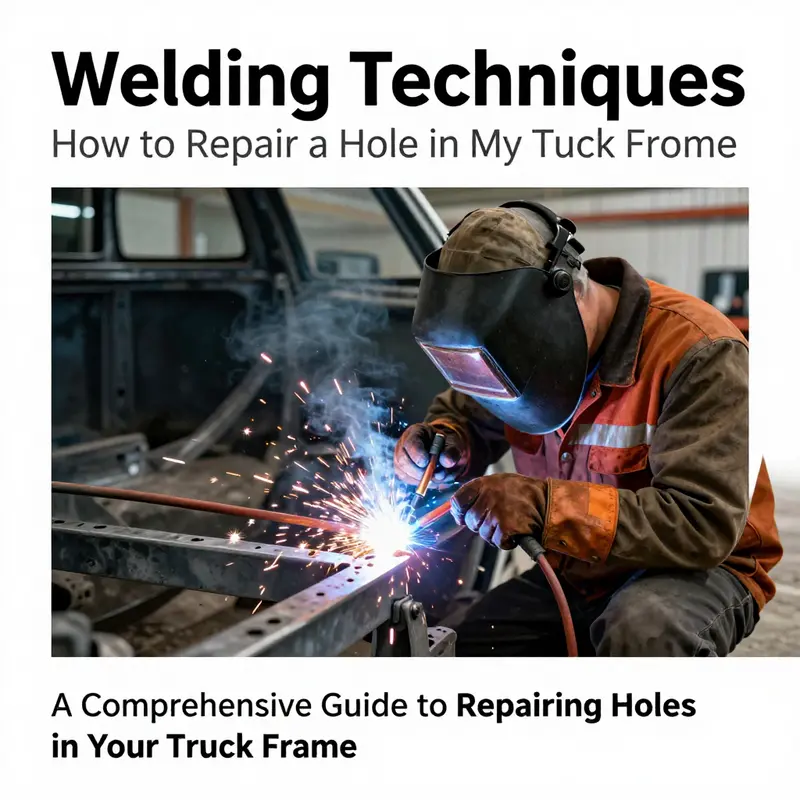
Welding is the culmination of preparation. Begin with tack welds to confirm fit and geometry from multiple angles. When ready, perform controlled welds using the appropriate process: MIG for speed and tolerance, or TIG for precision and heat control. In thicker sections, multiple passes may be required with cooling intervals to minimize warping. A backer plate can prevent burn-through on the far side and improve weld quality. After welding, grind flush to restore a uniform surface and inspect for convexities or gaps that can trap moisture.
Inspection and reinforcement are essential. Visually inspect for cracks or misalignment, and use penetrant testing if available to reveal hidden defects. In high-stress regions, add reinforcing ribs or brackets to distribute load and reduce stress concentrations. The reinforcement decision should align with the vehicle’s expected duty cycle and loads.
Finish and protection close the loop. Apply rust-inhibiting primer and a durable topcoat, with attention to seam sealing in cavities to prevent moisture ingress. Thorough surface preparation aids long-term corrosion resistance. Document the repair in the vehicle’s maintenance log and schedule follow-up inspections to verify continued integrity after road testing and use.
Throughout the process, follow manufacturer guidelines and seek professional help when needed. Frame repairs involve critical safety factors; when in doubt, consult a certified welder or structural repair specialist, especially for commercial or heavy-duty applications. For readers seeking deeper technical grounding, refer to the official standards and reputable technical references that discuss material behavior, welding parameters, and inspection methods used in professional practice.
Fabricating a Replacement Frame Section: A Safer Repair Path
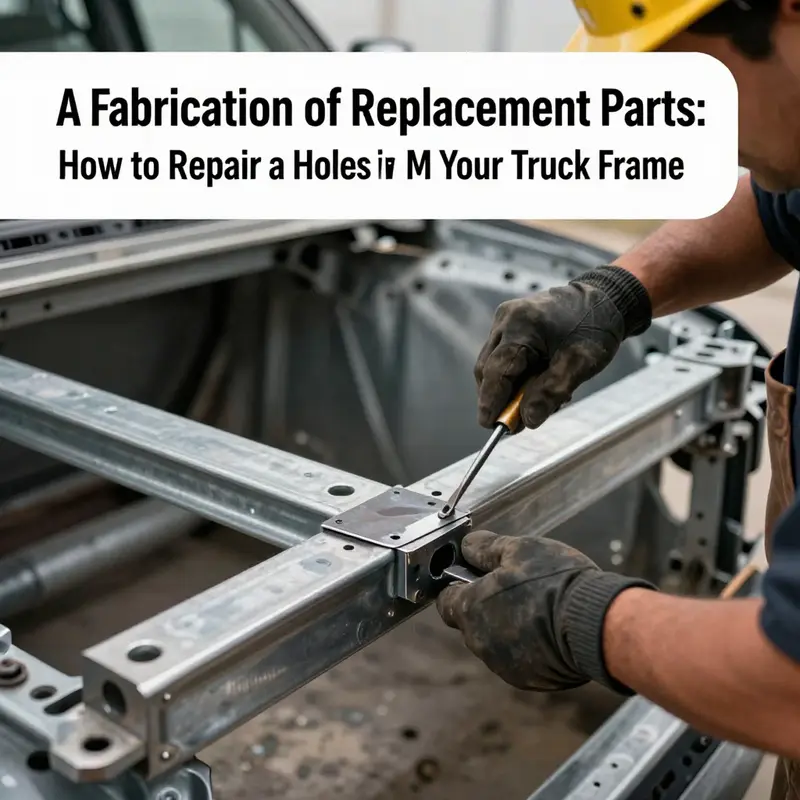
Repairing a vehicle frame by patching a hole in a high-load region can compromise safety. When loaded performance and crash integrity are at stake, fabricating and installing a replacement section that matches the original geometry and material properties is the preferred path. The decision depends on hole location, size, and how the cut affects load paths. Holes near suspension mounts, pivots, or rails can alter stiffness, alignment, and vibration if addressed with a patch instead of a proper replacement. Material compatibility is non-negotiable: the patch must be the same grade and thickness as the frame, to preserve strength and uniform load transfer. In practice, follow the OEM specifications or industry standards when selecting material and heat treatment considerations.
A high-level repair plan typically includes: precise removal of the damaged section; fabrication of a replacement piece with careful attention to fit and joint geometry; jigging or alignment tools to hold the patch true during fitting; and a welding approach that minimizes distortion while achieving full joint integrity. After welding, post-weld inspection and corrosion protection are essential to ensure long-term durability. Non-destructive testing or surface inspection helps verify weld quality and detect hidden flaws before the vehicle returns to service.
Finally, document the repair and obtain any required approvals or welding procedure specifications. A correctly engineered replacement section restores structural continuity, preserves intended load paths, and maintains safety margins far more reliably than a patch repair in critical frame areas.
Bevels, Braces, and the Frame’s Backbone: A Cohesive Path to Repairing a Hole in Your Truck Frame
Repair work on a truck frame, especially a hole that compromises structural continuity, demands more than just welding skill. It requires a careful blend of assessment, precision, and long‑term thinking about how the repair will behave under load, vibration, and the harsh environments a heavy vehicle endures. This chapter follows the practical arc laid out in the welding-focused chapter, but it looks deeper at how to preserve the frame’s integrity after the weld—how to choose patches, how to reinforce where needed, and how to finish the repair so it becomes a durable part of the vehicle rather than a temporary fix. The goal is not merely to seal a hole but to restore the frame’s backbone, ensuring safety and reliability for the miles ahead.
The starting point is a rigorous assessment. Holes in critical areas such as near suspension mounts, crossmembers, or along frame rails carry different risks than those in milder zones. The geometry of the hole matters too. A small, circular opening may be patchable, but a larger breach or a series of cracks could indicate deeper material loss or fatigue in the surrounding structure. The material itself plays a guiding role. Most modern heavy‑duty truck frames use high‑strength or HSLA steel, whose behavior in heat and stress differs from traditional mild steel. Matching material thickness and grade when fabricating a replacement patch is essential for a harmonious joint that transfers loads without becoming a weak link.
With the damage mapped, the next step is preparation—finding a clean slate on which to weld. Surface cleanliness cannot be overstated. Rust, old paint, grease, and mill scale are adversaries to proper fusion, and leaving them on the metal invites porosity, weak bonds, and future corrosion. The standard approach is to remove all coatings and oxides from the area around the hole until you have bare, bright metal. For larger or more irregular damage, removing additional surrounding material to create a solid edge is wise, because it provides a strong mineralized base for bonding. In practice, this often means cutting away the damaged portion with a plasma cutter or an angle grinder, producing clean, straight edges. A bevel—typically around 45 degrees—on the cut edges improves the weld joint by increasing the surface area for fusion and facilitating multi‑pass welding in thick sections. Bevels are not merely a stylistic choice; they are the anatomy of a dependable weld in substantial steel.
If the damage is localized, a patch can be fabricated from frame‑grade steel that matches the original thickness and strength. The patch should be dry‑fit before any welding begins to ensure precise alignment with the existing frame. Dry fitting also helps identify any pinch points or misalignments that would compromise the seam. In some cases, pre‑drilled holes in the patch support alignment pins or bolts and make the final installation easier and more repeatable. For larger repairs, the options expand to fabricating a replacement section that mirrors the curvature and contour of the frame. The process then becomes a matter of aligning, tacking, and welding the new piece into place so that the frame’s geometry remains true to its original design.
Welding is where the repair earns its strength. Tack welds are the first stage, holding the patch as a provisional bond that preserves fit while you complete the full seam. MIG or TIG welding is generally appropriate for frame repair, with the choice depending on material thickness, accessibility, and the welder’s proficiency. For thicker sections, multiple passes are often necessary to build up full penetration and uniform fusion along the joint. The tempering of heat input is critical: too much heat or prolonged heat cycles can warp the frame or introduce residual stresses that drive cracking later. A controlled cooling approach, with pauses between passes, helps mitigate these risks. A backer plate on the inside can provide support for the weld bead and help control burn‑through on the far side of the joint. Post‑weld treatment is not optional—grinding the excess material down to create a smooth, flush transition reduces stress risers and helps the surrounding metal behave as a continuous plane under load.
Even with clean technique, high‑stress regions require more than a welded seam. Reinforcement is a common and prudent strategy. A reinforcement plate or rib on the inside or outside of the frame can distribute loads around the patch and resist bending moments that would otherwise concentrate at the weld line. In heavy equipment repairs and large mining vehicles, reinforcement is nearly universal because it converts a repaired hole into a patched area that behaves like a genuine portion of the frame. The reinforcement should be carefully shaped to mirror the frame’s curvature, and it should utilize material that is adjacent in strength to the original. In practice, a custom‑cut alloy wear plate or a similarly robust plate is welded over the patch, providing both immediate fill for the gap and long‑term resilience against fatigue. For smaller repairs, a simple patch remains appropriate, but in high‑stress contexts the reinforcement step is essential to prevent future cracking.
The finishing phase ties everything together. After welding and reinforcement, the welds are ground to a smooth transition with the surrounding metal. A clean surface is essential for effective anti‑corrosion coatings. The repair area is then primed with a rust‑inhibiting coating, and a durable topcoat is applied to match the original frame color and weather the corrosive environment of roads, salt, and spray. In some applications, additional protective steps are warranted, such as electrocoating or undercoating with a protective chassis layer, to shield the repaired area from moisture and chemical attack that can initiate rust at the seam. These finishing details are not cosmetic embellishments; they are integral to the repair’s longevity and the safety of the vehicle over its service life.
As with any structural repair, inspection and verification are the final safeguards. A thorough visual inspection should be paired with nondestructive testing when feasible. Dye penetrant testing can reveal surface cracks that might have been missed by eye alone, ensuring the joint is free of hidden defects. It is also prudent to re‑check the alignment of the frame and to verify that no unintended deformations have occurred during repair. In high‑stress areas, additional internal reinforcement and torque‑tested fasteners may be warranted to verify the connection’s integrity under real‑world loading. When the repair involves critical zones—near suspension mounts, frame rails, or crossmembers—the process should be documented and reviewed, and if there is any doubt about structural adequacy, a professional welder or repair facility should re‑evaluate the job. The risks of an improperly executed weld in a structural member are not theoretical; they are geometric and kinetic in nature, affecting handling, crash performance, and long‑term durability.
The practical path from a hole to a dependable repair often benefits from a touch of experienced judgment. In-house maintenance teams, for example, emphasize disciplined sequencing, meticulous fit‑up, and rigorous post‑repair testing. See how these principles translate in real world practice at Turnage‑Sons in‑house truck maintenance, where repair workflows balance speed with structural rigor. Turnage‑Sons in‑house truck maintenance.
Finally, the decision to DIY or seek professional help rests on both the size of the hole and the criticality of the damaged area. Small patches in low‑stress regions may be manageable for a skilled welder with the right tools, but large holes, thick HSLA sections, or holes near mounting points demand professional assessment. High‑strength materials and complex geometries can hide latent vulnerabilities if treated casually. The safety implications are too significant to ignore, and the learning curve for proper welding technique, heat management, and post‑weld treatment is substantial. If you’re unsure, consult a certified welder or a structural repair specialist who can validate material compatibility, joint design, and protective coatings. The return on such professional guidance is measured not just in a finished seam, but in the vehicle’s reliability and safety across thousands of miles of service.
For readers seeking deeper technical detail on welding procedures for heavy vehicle frames, a thorough technical case study and related procedures are available at a professional research resource: https://www.researchgate.net/publication/398147279930ETruckFrameSteeringKnuckleBoreRepairProcess
null

null
Final thoughts
Effectively repairing a hole in a truck frame is not merely a task; it is a commitment to safety, performance, and operational efficiency. By following a methodical approach—ranging from damage assessment to meticulous final inspections—fleet managers can significantly improve vehicle longevity and reduce downtime associated with frame repairs. Emphasizing the integrity of repair methods ensures that trucking operations can proceed safely and efficiently, thereby enhancing overall fleet reliability.

