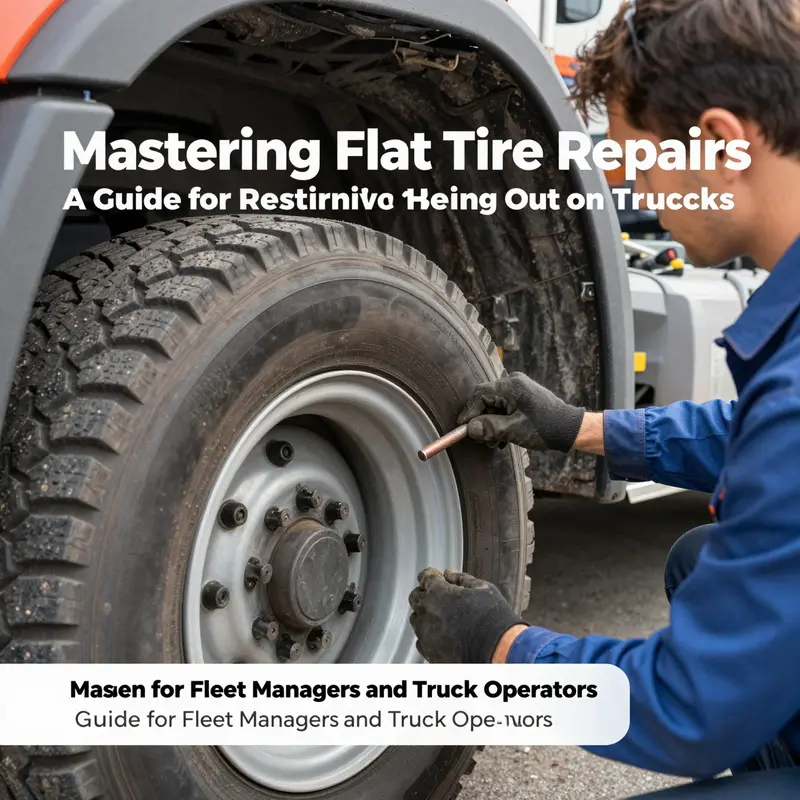
In the demanding world of fleet management and heavy-duty trucking, flat tires can disrupt operations, leading to delays and increased costs. Understanding how to effectively repair flat tires, particularly in trucks, is crucial for fleet managers, logistics providers, and construction operators. This guide will provide actionable insights into assessing tire damage, preparing for repairs, choosing the appropriate repair methods, and prioritizing safety. Each chapter will build upon the last, forming a comprehensive approach to tire maintenance and repair that enhances productivity and safety across your fleet.
Assessing Tire Damage on a Truck: Safe Decisions When a Tire Is Out
A flat tire on a truck can arrive without warning, transforming a routine road moment into a high-stakes test of judgment, safety, and time management. The immediate impulse is often to fix it fast and press on, but the reality of heavy loads and long miles demands a cooler, more deliberate approach. A tire that has gone soft or gone flat is not just a nuisance; it is a structural system whose integrity determines how the vehicle will behave under load, how it will steer, brake, and accelerate, and how the rest of the tire and wheel assembly will respond once you re-enter motion. The choices you make in the next few minutes—whether to repair on the spot, to replace, or to tow for professional service—shape the safety of everyone on board and the integrity of the entire wheel package for the remainder of the journey. This chapter walks through the assessment, the practical steps, and the decision framework that can keep a truck moving safely when a tire fails, without overpromising a repair that cannot withstand the demands of truck operation.
Begin with a calm, methodical assessment, because the decision to repair is always a function of the damage you find. First, inspect the tire for punctures and objects lodged in the tread. Punctures are common and sometimes repairable, but the location matters. Punctures in the tread area are far more amenable to repair than those that sit near the shoulder or crown of the tire, where structural cords and belts are closer to the surface. A puncture that is small, clean, and located in the tread area can sometimes be addressed with a patch or a plug, but if the hole appears jagged, irregular, or has a contaminated edge, that is a signal that the integrity of the tire is compromised in ways that repair may not rectify. The sidewall is a different story altogether. If the damage is on the sidewall or shoulder, do not attempt to repair. Sidewall damage compromises the tire’s ability to carry load and its resilience against internal pressures. Any crack, cut, bulge, or puncture that extends to the sidewall means replacement is the proper course. A tire with a bulge or bubble, or with a deep cut that penetrates into the inner layers, is a sign of cord failure or significant structural compromise. In those cases, repair is unsafe and replacement is the only viable option.
A second factor in the assessment is the size and pattern of the hole or puncture. In tread repair guidelines, holes smaller than six millimeters in the tread area are the zone where repairs might be considered, provided the tire has not been previously damaged and the puncture is not in an area that experiences high flex at the bead or sidewalls. Multiple punctures that are clustered closely together—within an inch or so—are frequently beyond the scope of a safe repair. Even if a single hole seems minor, the tire’s remaining life must be evaluated in light of its age, tread depth, and exposure to road hazards. Another important determinant is the tire’s current condition: any sign of bulging, a crack that goes beyond superficial surface wear, or a deep cut that exposes cords is a red flag. If the tire shows any sign of internal separation, or if the tread exhibits unusual wear that suggests delayed or compromised bonding, a repair should not be attempted. In summary, the assessment is not just about whether a hole can be plugged, but whether the tire can continue to hold air, tolerate the forces of highway speed and heavy load, and maintain structural integrity across the entire circumference.
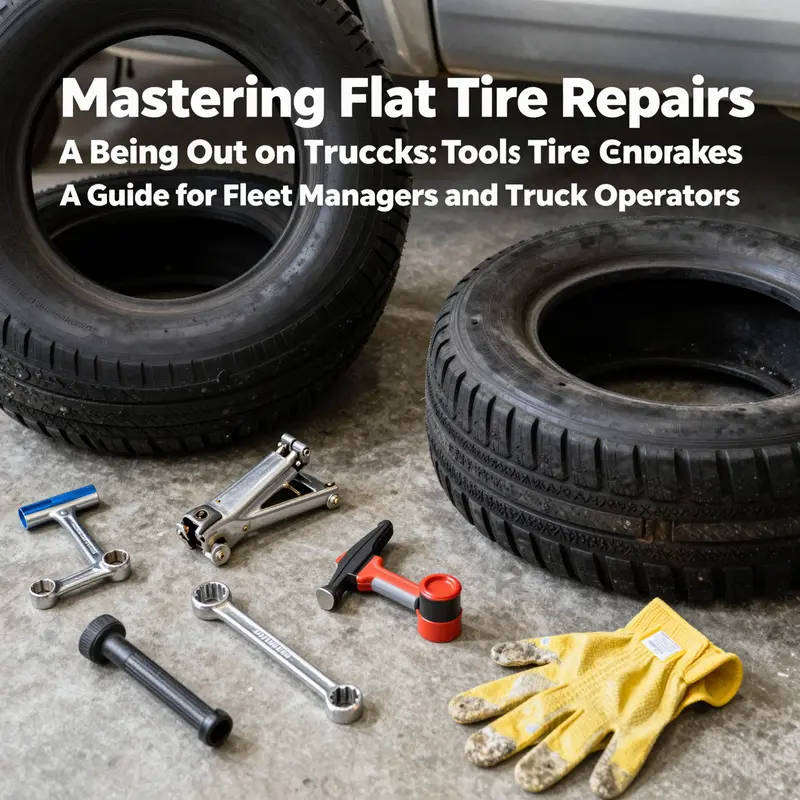
Once you have a clear sense of the damage, move on to preparing the space and gathering the right tools. A safe, level, well-lit area is essential. Engage the parking brake, place wheel wedges behind the tires opposite the flat, and turn off the engine. A flat tire on a truck under load is not a moment to improvise with the wrong tools or in an awkward position. Have a spare tire or a suitable replacement ready, along with a jack, a lug wrench, and a tire repair kit that covers both plugs and patches. Gloves, a flashlight, and a clean surface to lay out removed lug nuts and components help keep the job efficient and reduce the chance of dropping or losing pieces. If you are on a busy highway or an urban street, consider your visibility and traffic conditions. Safety cones or reflective markers can be a practical addition to your setup if the situation allows, though keep in mind that many roadside settings may require you to seek a safer location rather than attempting an on-site repair on a busy road.
With the scene prepared, you can proceed to remove the tire in a careful, methodical sequence. Loosen the lug nuts slightly while the vehicle is still on the ground to avoid the wheel from spinning as you lift the truck. Then lift the vehicle with the jack at the manufacturer’s designated lifting point, until the flat tire is off the ground. Remove the lug nuts completely, take off the tire, and set it aside in a way that won’t injure you or damage the wheel. This stage is where the decision to repair or replace truly crystallizes: if the damage clearly resides on the tread in a small puncture, you may proceed with a repair; if the tire shows sidewall damage, a bulge, or structural compromise, you should stop and arrange for replacement or professional evaluation. The next steps, however, presume you have determined that a repair is in principle feasible and you are proceeding to the internal repair or patching sequence.
There are two primary repair approaches that you might consider when the assessment supports it, but they come with different implications for safety and durability, especially under heavy loads. The first method is the cold patch technique, often described as a plug-patch combination. This method is intended for temporary relief in minor tread punctures and can be a practical stopgap for a local trip or to reach a shop. The process begins with cleaning and roughening the puncture area, then applying an adhesive, and inserting a rubber plug from the interior through the hole so that the plug protrudes on the exterior and can be trimmed flush. The goal is to seal the hole from the inside and bridge the puncture through the tread. It is essential to understand that cold patch repairs have limitations. They are generally considered temporary repairs and are not ideal for high-speed, heavy-load trucking operations. They can hold air for a time if properly performed, but their long-term durability is inferior to a professionally applied repair, especially once the truck returns to highway speeds and subject to heavy torque, heat, and flex. The cold patch approach often depends on the specific tire construction and the exact location of the puncture, and many fleets or jurisdictions may restrict or prohibit using cold patches as a permanent fix on large commercial tires.
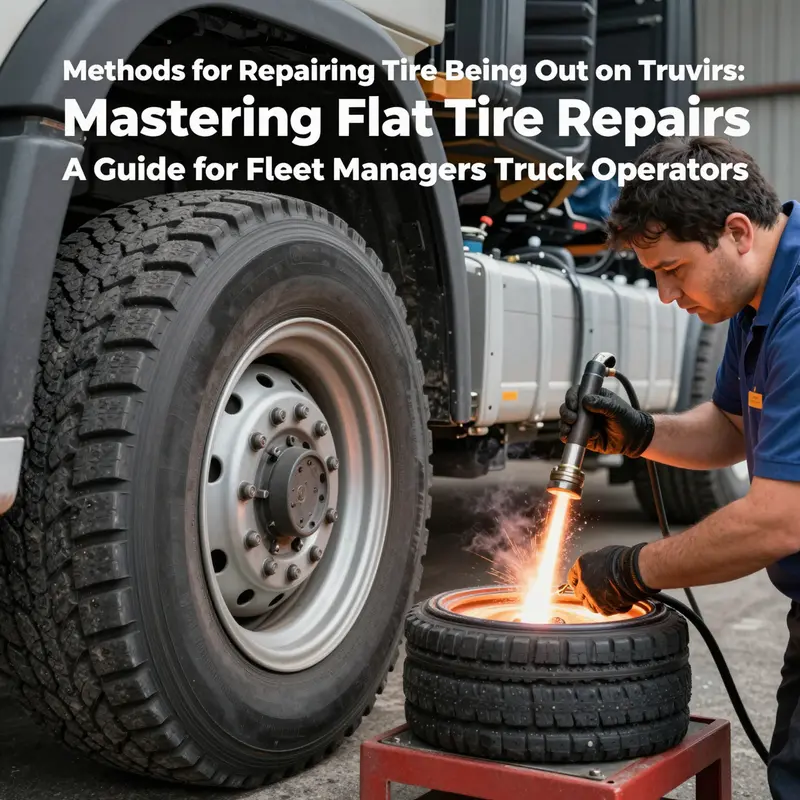
The second method, hot vulcanization, is the preferred repair technique in professional settings for trucks when a repair is appropriate. This method involves removing the tire from the rim to access the damaged area from both inside and outside. A skilled technician grinds or prepares the damaged area, applies an adhesive, places a patch over the inside surface, and then uses heat and pressure to bond the new rubber, creating a durable, seamless repair. The result is a repair that more closely restores the tire’s structural and elastic properties, making it the strongest option for high-load applications. However, hot vulcanization requires equipment, expertise, and proper safety protocols, including ensuring the tire has not been compromised by heat or chemical exposure during the process. In most professional contexts, hot vulcanization provides the most reliable, long-term repair, especially for tires that carry heavy loads or operate at higher speeds. For drivers or fleet operators, the practical takeaway is to recognize that while a cold patch might be a temporary measure to enable a safe drive to a repair facility, hot vulcanization by a trained technician is the preferred repair route when conditions allow.
After the repair—whether a cold patch or a professional hot vulcanization patch—the tire should be reseated on the wheel and reinstalled in place. Hand-tighten the lug nuts, then lower the vehicle to the ground. Once the tire is on the ground, tighten the lug nuts in a star pattern to the specified torque. A careful, methodical approach to torquing helps maintain even clamping pressure around the wheel, which is critical for safe operation. It is prudent to re-check the torque after a short drive, as the wheel area can evolve under load and heat. Once the wheel is secured and the tire is reinstalled, conduct a thorough safety check: verify that the wheel nuts are at the correct torque, confirm that the spare or repaired tire is properly seated, and check the overall condition of the tire. Inflate to the recommended PSI as indicated in the vehicle manual or door sticker, and ensure that the tire reaches a stable pressure. In many cases, a slow, careful drive for the first miles will reveal any anomalies such as vibrations, unusual noise, or a tendency for the vehicle to pull to one side, all of which can indicate an imperfect repair or an installation issue. If anything feels off, it is wise to pull aside and re-evaluate rather than pressing forward with unresolved concerns.
The decision framework that follows repair is as important as the repair itself. A repair does not necessarily mean you should press on for thousands of miles without a second look. The tire’s age, the amount of tread remaining, and the vehicle’s operational demands all factor into whether a repair can reasonably be trusted for continued service. Tires age even when they appear to be in good condition; the rubber compounds deteriorate, and the risk of sudden failure can increase with age. If the tire is past a certain age threshold or shows any signs that suggest diminished reliability, replacement may be the prudent choice, independent of the repair’s integrity. The safety-first approach is to avoid pushing a compromised tire beyond its safe service life, particularly on trucks that routinely carry heavy cargo or operate in varied terrain and weather conditions. In such cases, to preserve overall fleet safety and reduce the risk of failure on the road, consider replacing the tire rather than risking an ongoing repair that could fail under load.
As you weigh the repair-versus-replace decision, align it with broader maintenance practices that govern the fleet. Consider how this incident fits into the long-term plan for tire management, spare availability, and budgeting for routine truck maintenance. Decisions about when to repair and when to replace are not made in isolation; they are part of a larger policy that guides maintenance philosophy, spare strategies, and safety protocols. In a broader sense, this is a moment to reflect on the ongoing balance between cost, safety, and reliability. You can draw from maintenance planning resources, such as those that discuss the relative costs and benefits of repairs versus replacements, to guide future practices. If you want to build a more robust framework for maintenance decisions, a resource on budgeting for routine truck maintenance can offer practical guidance on how to weigh these choices against overall fleet health and budget constraints. Budgeting for Routine Truck Maintenance provides a grounded approach to turning these on-the-spot decisions into a repeatable policy that protects performance, safety, and uptime.
In the face of uncertainty on the roadside, the principle to carry forward is safety and conservatism. If there is any doubt about the tire’s ability to hold air safely under load, if the puncture location or the tire’s condition raises questions about durability, or if the tire shows any signs of structural compromise, the best course of action is to replace or tow for professional repair. This approach reduces the risk of catastrophic failure, which could endanger the driver, other road users, and the cargo. The choice to repair should be grounded in a clear understanding of the tire’s limits and the demands of the vehicle’s service. The decision to replace should be considered not as a loss but as a prudent investment in safety and reliability, ensuring that the truck remains capable of performing its duties without compromising the rider’s or operator’s safety.
Having navigated the assessment, the repair options, and the decision framework, you may feel the weight of responsibility in choosing the right path. The path you take should be guided by the tire’s condition, the mission of the truck, and the environment in which you operate. It is a decision that integrates on-site capabilities with professional service, always with an eye on the road ahead. For readers seeking a deeper integration of maintenance planning into daily practice, you can explore practical guidelines for budgeting and decision making in routine truck maintenance, which provides a structured way to translate these road-side decisions into a sustainable maintenance program that guards against downtime and safety risks. When uncertainty remains, or when the tire has any doubt about its integrity, a cautious approach that prioritizes replacement and professional evaluation is the safest path. In the end, the aim is not simply to fix a tire for the moment, but to restore a tire’s reliability so that the truck can carry its load with confidence and control, mile after mile.
For additional context on tire safety and repair standards, refer to the official guidance on tire safety from the safety authorities. This resource outlines when to repair and when to replace, including considerations for commercial vehicles that operate under heavier loads and more demanding conditions. https://www.nhtsa.gov/vehicle-safety/tire-safety
Grounded for Repair: Building a Safe, Tool-Ready Workspace Before Fixing a Flat Tire on a Truck
When a tire goes flat on a truck, the instinct is to react fast. The road, the weather, and the weight of the load all demand a calm, deliberate approach. But speed without preparation can turn a roadside inconvenience into a dangerous setback. The quiet power behind a successful tire repair is not the fix itself but the space you set up and the tools you choose before you even touch the wheel. Preparation isn’t a layer to be tacked on at the end of the job. It is the foundation that keeps you safe, your work efficient, and the repair durable. This chapter guides you through building a workspace that supports a tire repair with the same discipline you’d bring to any high-stakes maintenance task on a heavy truck. It ties into the broader maintenance mindset that keeps a fleet moving, and it sits beside practical steps for the actual repair itself, so that when you roll away, you’re confident that the job was done right and with safety uncompromised.
The first pillar of a solid workspace is the ground itself. Level, dry, and well-lit ground transforms a loose, improvised repair into a controlled process. On gravel or damp pavement, you’ll spend more energy fighting instability than you will repairing the tire. So, whenever possible, position the truck on a flat, firm surface. If you’re on a highway shoulder or a ramp, exercise extreme caution. Turn on hazard lights, set wheel chocks behind both rear or front tires as appropriate, and place a reflective triangle or bright marker to alert other drivers. The overhead light should illuminate the wheel and the tire interior, ensuring you can clearly see the puncture, the tread, and any signs of damage around the bolt holes and bead area. A clean, dry space is not a luxury here; it is a safety imperative as you handle metal tools, the tire, and potentially warm rubber after a long haul.
Next comes the organization of space—the mental map you’ll rely on while your hands are busy. A well-ordered toolbox is not a mere convenience; it’s a safety feature. Arrange the tools you’ll need near the work zone and in the order you’ll use them. Start with the basics: a sturdy jack that can lift the truck’s weight and a high-quality jack stand to secure the vehicle once raised. Keep wheel wedges at the ready to prevent any accidental movement, especially on sloped surfaces. A reliable flashlight or headlamp is essential for inspecting the tire’s interior and the rim bead area. Gloves protect your hands from sharp edges and hot components, while a clean rag helps wipe rubber residue and oil from the wheel and the bead. A tire pressure gauge, calibrated to the manufacturer’s recommended PSI, becomes your constant companion once the tire is back on the ground. If your shop workbench is nearby, a small container for fasteners and a bin for scrap rubber can reduce searches and keep the workflow smooth. A service manual or digital diagnostic reference should be at hand. If your operation includes more complex drivetrain work or PTO-related service, the same habit of preparing the workspace with dedicated zones for each component will pay dividends in safety and efficiency. In such cases, tools for high-torque applications, alignment gauges, and precision measurement devices may be required, underscoring the value of quality, purpose-built equipment. The right tools are not a luxury; they are a safety and reliability issue. Cutting corners here can lead to improper installation, premature wear, or catastrophic failure under load. This is why the emphasis in professional practice is always on quality tools, kept clean and calibrated, because a single compromised tool can undermine an entire repair.
The third pillar centers on tool selection and the specific needs of truck tires. For a flat that occurs on a heavy-duty vehicle, you will typically need a spare tire or a repair option compatible with a heavy load. The kit should include a robust plug kit or patch kit appropriate for the tire’s tread area, and always ensure you have a re-inflation device or air compressor capable of bringing the tire up to the correct pressure after the fix. Beyond the repair kit, have a torque wrench that is calibrated to the OEM’s lug-nut specification. Attach the proper socket for your truck’s lug nuts and use a star or crisscross pattern to avoid warping the wheel as you secure it. The torque pattern is not a suggestion; it’s a requirement for even clamping pressure around the wheel hub. If you intend to reuse the tire, keep a precise record of the repair and the patch or plug method used. In some cases, especially on trucks carrying heavy loads or on tires with multiple punctures in close proximity, the safest course is to replace rather than repair. The decision to repair versus replace is not a cosmetic choice; it’s a safety decision that factors in the size and location of punctures, sidewall integrity, and the tire’s age.
An honest focus on safety considers the types of damage you may encounter. A puncture within the tread area smaller than about 6 millimeters may be repairable, depending on location and condition. Holes larger than that, or multiple punctures close together, typically require replacement. Sidewall damage and cracks are red flags; any tire with bulges, bubbles, or deep cuts is unsafe and must be replaced. The need for professional intervention is clear when the damage involves structural cords or when the tire has aged beyond six years, as rubber degradation reduces safety margins even when the surface looks sound. In the context of a heavy truck, the consequences of a compromised tire are magnified by load and speed, making a prudent, safety-first approach non-negotiable. The preparation you invest in your workspace translates into a more precise assessment of tire condition, which in turn ensures that you don’t pursue a repair that’s unsafe or illegal in your jurisdiction. For authoritative guidance on the repair-versus-replace decision and tire safety standards, see the tire safety guidance from the national regulator.
As you gather and arrange your tools, you should also tailor your approach to the particular vehicle you’re working with. Heavy trucks can feature specialized driveline components, such as PTO systems, that influence how you prepare and what tools you bring. A common thread across all major truck repairs is the insistence on a well-choreographed workflow: plan the steps, confirm the availability of parts, and reference diagnostic manuals or service bulletins before you begin. This forethought is the backbone of efficiency. It minimizes downtime, reduces the risk of intermediate missteps, and keeps the repair within the safety envelope required for commercial vehicles. In practice, this means reviewing the job plan, mapping out the sequence from disablement to test drive, and ensuring that all required parts and replacement components are on hand before the truck is lifted. A well-run preparation phase also includes a quick check of weather and traffic conditions; adverse weather can complicate a roadside repair and heighten risk, so the plan should adapt to changing conditions with safety as the priority.
Inside this framework, you can begin to connect the preparation phase with the actual repair, knowing that the tools and workspace will support you through the task. Once you have the truck securely supported on jack stands and the wheel chocked, you can proceed to remove the wheel. Loosen the lug nuts slightly while the vehicle is on the ground to avoid the wheel spinning or the truck settling when you lift it. Then lift the vehicle so the flat tire clears the road surface and remove the lug nuts fully. As you take off the wheel, inspect the rim for any damage that could complicate reinstallation or affect bead sealants and air retention. The inspection should also consider the bead area, as debris, corrosion, or a damaged bead can render a tire unsafe even if the puncture is small. If you find damage that compromises the rim or bead, you should stop the repair and escalate to a professional service for rim repair or replacement. The decision tree you apply here—whether to patch, plug, or replace—relies heavily on the quality of your workspace and the care you’ve taken to set up your tools. A sloppy setup invites rushed decisions that can lead to unsafe outcomes.
If the tire can be repaired, there are two main methods to consider. A cold patch or plug approach is commonly used for small tread punctures and can be completed with the tire mounted on the wheel. The process should be clean and controlled: the puncture site must be cleaned, roughened with a file or sandpaper, and treated with adhesive before the plug is inserted from the inside or the patch is applied to the interior. It’s important to understand that cold-patch repairs are typically temporary, and their longevity is not as robust as a professional hot-vulcanization repair. For heavy trucks with high-load demands, hot vulcanization—performed in a professional setting—tresents a more durable solution. This method involves removing the tire from the rim, grinding the damaged area, applying an adhesive, placing a patch, and curing under heat to create a bond with the tire’s rubber structure. The upshot is that hot vulcanization yields a stronger, longer-lasting repair suitable for trucking conditions. However, the best choice depends on the tire’s condition, the location of the puncture, and whether the repair will bear the full weight of a load over long distances. Even when using a temporary cold patch, you should plan for a professional inspection and potential rework, especially if you’re operating in a commercial fleet where safety and compliance are non-negotiable.
Once the repair is complete, whether it’s a patch-and-plug approach or a professional hot-vulcanization repair, you reinstall the tire with careful attention. Put the wheel back onto the hub, and tighten the lug nuts by hand in a star pattern to secure the wheel. Lower the vehicle slowly with the jack, and then torque the lug nuts to the OEM specification using a star pattern to ensure uniform clamping pressure around the wheel. After you have the wheel secured, check the tire pressure with your gauge to confirm it matches the vehicle’s recommended PSI. If you used a spare or a temporary tire, observe careful driving limits and replace with a permanent tire as soon as feasible. A cautious test drive for the first 50 to 100 miles helps verify the integrity of the repair or replacement and allows you to observe any abnormal vibrations or handling changes. After the initial miles, recheck tire pressure and wheel torque to maintain safety and performance.
Beyond the immediate repair itself, this chapter’s focus on workspace and tool readiness sits within a broader maintenance philosophy. The idea is to maintain readiness so that your team can respond quickly and safely to tire incidents without compromising the rest of the vehicle’s systems. Maintenance planning, budgeting for routine tasks, and ensuring that you have the right tooling for the job all play a crucial role in keeping a fleet on the road. The mental model here is straightforward: invest in a prepared, well-stocked toolkit and a clean, well-lit workspace, and you reduce the likelihood of costly downtime due to preventable mistakes. For those who manage fleets or own multiple commercial vehicles, the discipline of preparation carries through to the planning stage as well. It informs how you allocate funds, how you train drivers and maintenance staff, and how you evaluate the risk of downtime in the context of operating costs. In this broader view, the specific steps of tire repair are nested within a culture of safety, predictability, and professional maintenance.
If you want to reinforce this culture of preparation, a practical step is to integrate the tire repair workflow with broader maintenance resources. For example, you may find it valuable to consult budgeting guides that cover routine truck maintenance to ensure you’re allocating funds for high-quality tools, spare tires, and professional services when needed. Linking this discipline to the larger maintenance program helps ensure that tires aren’t treated as an afterthought but rather as a critical component of the truck’s integrity. Budgeting for Routine Truck Maintenance provides a consolidated framework for planning future tire-related repairs and upgrades while maintaining visibility into the overall maintenance budget. This integration helps you balance immediate safety needs with long-term reliability and cost control. See Budgeting for Routine Truck Maintenance for more on aligning tire maintenance with fleet economics, and remember that professional standards and safety guidelines should govern every repair decision.
For those who want to explore external guidelines that reinforce the emphasis on tire safety and proper repair practices, consult the official guidance from the national regulator. The tire safety resource offers detailed recommendations on when to repair and when to replace tires on commercial vehicles, including cautionary notes about sidewall damage, bulges, and the limits of temporary repairs. The focus is not only on the mechanics but on the decisions that determine whether a repair is safe for the vehicle’s next journey. By combining a prepared workspace with rigorous adherence to repair standards, you create a reliable foundation for tire maintenance that withstands the demands of trucking operations. The result is a safer vehicle, a more confident operator, and a fleet that can keep moving with fewer unexpected interruptions.
To connect this chapter to the wider maintenance ecosystem, consider how the immediate practice of tire repair interacts with the other maintenance tasks you perform in the field. The approach you take in preparing the workspace, selecting and maintaining tools, and deciding between patching and replacing a tire mirrors how you handle other high-load components, including driveline elements and power take-off systems on heavy-duty platforms. While a tire repair is a distinct procedure, the underlying philosophy—precision, safety, and thorough preparation—permeates every repair activity and is essential for sustaining vehicle readiness in demanding environments. In the end, the quality of your work is the sum of all these cautious, deliberate choices made before the first wrench turns a bolt.
For additional context and to reinforce the practical steps outlined here, you can refer to the broader resource network on maintenance planning and tire safety, including the official tire-safety guidance linked above. And for a deeper dive into the maintenance mindset and how it translates into everyday practice, you can explore related articles and guides within the fleet maintenance ecosystem. This integrated approach ensures that each tire-repair moment is not just a momentary fix but a step toward a safer, more reliable operation. As you advance, keep in mind that the best tire repair results come from preparation that respects the reality of heavy trucking: load, speed, environment, and the relentless demand for safety. The tools you select, the space you allocate, and the decisions you make all contribute to a repair that you can stand behind—one that keeps wheels turning and crews moving in confidence. For a practical, fleet-focused reminder of how to plan and budget for routine maintenance, see Budgeting for Routine Truck Maintenance, and remember that safety guidelines exist not to complicate work but to protect lives and livelihoods on the road.
External reference for tire safety guidance: For authoritative safety guidelines on tires, consult the official tire-safety resource at the National Highway Traffic Safety Administration: https://www.nhtsa.gov/vehicle-safety/tire-safety
From Flat to Road-Ready: A Practical, Safety-Driven Guide to Cold Patching and Hot Vulcanization for Truck Tires
A loud thud or a sudden drop in air pressure on the highway can turn a routine haul into a tense moment. When a truck tire goes flat, the first impulse is often to react fast, but speed must never trump safety or sound judgment. The decision you make in the next few minutes can influence not only the continuation of the trip, but the long-term integrity of the tire and the safety of everyone nearby. In the world of heavy-duty trucking, a tire is not just a cushion between the wheel and the road; it is a critical load-bearing element that carries weight, traction, and predictable handling. When a tire shows signs of a puncture in the tread, you may have the option to repair it and return to service, but certain damage—especially to the sidewall or shoulder—demands replacement. This chapter walks through the two principal repair approaches used for truck tires in professional settings—cold patching and hot vulcanization—while weaving in safety considerations, decision-making criteria, and practical execution. It aims to give you a cohesive, real-world understanding of how to approach a flat tire with the confidence that you can assess risk, choose the appropriate method, and follow through with a repair that holds up under heavy loads and variable road conditions.
Begin with a clear assessment, because the starting point shapes every subsequent choice. A tire that is deflated can still be intact in the tread area, presenting a puncture that is potentially repairable. The first checks should be visual and tactile: look for an object still embedded in the tread, inspect for damage in the tread area versus the sidewall, and note any bulges, cracks, or unusual wear patterns. Sidewall damage—pits, cuts, or cracks that run along the curve of the tire—is a red flag. If the damage reaches the sidewall or shoulder, do not attempt to repair. The tire’s structural cords and rubber layers beneath the tread have already been compromised, and a repair could fail catastrophically under load. In contrast, small punctures in the tread can sometimes be repaired, provided they are not clustered too closely, and the lesion is not on the inner shoulder. A common rule of thumb used in many professional guidelines is that holes smaller than about 6 millimeters (roughly a quarter of an inch) in the tread area may be repairable. Larger punctures or multiple lesions often require replacement to preserve safety and performance. If you notice a bulge, bubble, or a deep cut anywhere in the tire, that is a sign to replace. A bulge is a sign that the tire’s internal cords have separated, and a repair cannot restore the tire to safe operating strength.
Having established the damage boundaries, the next step is to prepare the workspace, tools, and mindset. The goal here is to create a controlled environment where you can work methodically and avoid introducing new hazards. Park on level ground, away from traffic, and switch off the engine. Engage the parking brake and place wheel wedges behind the tires that are opposite the one you are likely to remove or to stabilize the vehicle while you work. Depending on your setup, you may be dealing with a spare—not just a deflated or flat tire, but a temporary replacement that lets you move to a safer location for a longer-term solution. Gather a spare, a jack, a lug wrench, and a tire repair kit that includes a patch or plug for the tread, plus suitable rags, gloves, and light. When you consider repair versus replacement, remember that the repair itself is not the end of the process. After any repair, you must re-inflate to the manufacturer’s recommended tire pressure, reinstall the tire properly, and monitor performance closely during the initial miles of operation.
The mechanical heart of the matter lies in two broad repair approaches: cold patching and hot vulcanization. Cold patching, often deployed in roadside or quick-turnaround scenarios, involves sealing a puncture with a pre-vulcanized rubber patch and an adhesive system. The cold method is designed to be fast and straightforward. It generally requires cleaning the interior around the puncture, roughening the surface to improve adhesion, applying a rubber adhesive, and then seating a plug or patch through the puncture hole from the inside. The plug creates a seal across the puncture, while the patch ensures that the inside surface remains bonded to the tire structure. The practical effect is a temporary or semi-permanent fix that can enable a return to service in a pinch, particularly for tread-area punctures that are clean and well-defined. However, the cold patch is not a universal remedy. It is typically considered best for small punctures in the tread area and may be limited in its effectiveness under high-speed or heavy-load conditions. The design intention is clear: provide a rapid solution when time and access to specialized equipment are limited, with the understanding that it may not be a long-term, heavy-duty fix. For this reason, many professional guidelines emphasize that cold patch repairs are often temporary and contingent on the tire’s remaining life, the location and size of the damage, and the tire’s age and construction.
Hot vulcanization represents a more robust, permanent repair pathway. This method is usually performed in a shop setting, and it involves disassembling the tire from the wheel, preparing the damaged area by grinding away the compromised rubber, applying a bonding adhesive, and then placing a patch that is integrated with a specialized heat source to cure under pressure. The heat-activated bond created by vulcanization penetrates the rubber with a level of fusion that substantially restores the tire’s structural integrity. The resulting repair is stronger and better suited to the demanding environments of heavy trucking: long-haul runs, varied loads, and high speeds. The process is more time-consuming and demands skilled labor and appropriate equipment. It also requires removing the tire from the rim, which introduces additional steps and considerations but ultimately yields a more dependable restoration of the tire’s load-bearing capability. For commercial fleets and trucks that routinely carry heavy payloads, hot vulcanization is often the preferred option because it aligns with safety standards and regulatory expectations for durable, high-performance repairs.
A practical decision point emerges at this juncture: consider the tire’s location, its service life, and how the vehicle will be used. If the puncture is deep or the damage is near the edge of the tread, or if there are multiple punctures within a confined area, the safer, more durable choice is typically a full replacement. Likewise, if the tire shows signs of aging—rubber hardening, cracking, or a general decline in elasticity—replacement is the wiser course, even if the puncture itself might have been repairable when the tire was younger. The importance of this decision cannot be overstated for trucks, where a tire failure at speed or under heavy load can lead to loss of control or a rollover. The safer long-term strategy often involves factoring in the tire’s age and service life alongside the immediate damage.
In the on-site reality of truck operations, the cold patch method can serve a vital role in emergencies. It offers a window of opportunity to reach a controlled location or a shop, especially when a timely repair could prevent costly delays. If you opt for cold patching, you should be mindful of its temporary status and plan to have the tire professionally inspected and repaired or replaced as soon as feasible. The steps, in brief, involve interior cleaning around the puncture, roughening the surface to improve bonding, applying adhesive, and threading the plug or patch through the puncture from inside to outside so that it sits flush with the tire’s interior surface. After the patch or plug is seated, allow the material to cure, typically for a period of about 30 minutes in many standard formulations, before reinflating to the recommended pressure and reinstalling the wheel. The vehicle should then be driven cautiously for a limited distance at reduced speeds, with close attention to how the tire behaves and any unusual vibrations or changes in handling. This cautious approach helps to mitigate risk while the tire endures the temporary repair.
By contrast, hot vulcanization requires the dismounting of the tire and a controlled heat-setting process that bonds a patch within the tire’s structure. In this scenario, the repair is designed to meet higher demands: it is built to withstand higher speeds, greater heat generation, and heavier loads typical of commercial trucking. The procedure begins with removing the tire from the rim, then performing a careful grinder operation around the damaged area to remove compromised rubber and ensure a clean bonding surface. Adhesive is applied, the patch is placed precisely, and controlled heat is applied so the patch and surrounding rubber fuse together. The aim is to restore the tire’s integrity so that the repaired area behaves as much as possible like the surrounding rubber. The advantage of hot vulcanization is clear: it provides a robust, long-lasting seal that is generally recognized as safer under the demanding conditions of heavy-duty use. The trade-off is the need for specialized equipment, trained personnel, and time, which makes this option less practical for roadside repairs but highly appropriate for station-based tire service.
After any repair, the reinstallation and re-inflation process must be meticulous. Start by placing the repaired or spare tire onto the wheel hub and hand-tightening the lug nuts in a star pattern. This pattern ensures even clamping and seating. Lower the vehicle slowly and then tighten the lug nuts to the manufacturer’s specified torque in the same star pattern. It is essential to verify that the tire is inflated to the recommended PSI, which you can find in the vehicle’s owner manual or on the door jamb sticker. Once the tire is back in service, you should drive cautiously for the first miles, listening and feeling for any abnormal vibrations, noise, or handling concerns. A prudent practice is to recheck the tire pressure after an initial 50 to 100 miles of operation and to re-torque the lug nuts if needed. This step helps confirm that the wheel remains properly secured and that the repair’s clamping force has settled evenly across the wheel.
Even with a repair in place, some situations clearly call for a tire replacement rather than repair. Sidewall damage, bulges, radial or belt separations, or any crack deeper than the cited thresholds should trigger replacement rather than repair. Multiple punctures within a short span of the tread, especially near the same region, can indicate broader radial damage and a compromised structure. Tires older than six years present another area of caution; rubber hardening and cord degradation accumulate with time and heat, reducing resilience. In such cases, replacing the tire is typically the safer course, even if the surface appears visually acceptable. Safety is not just about the patch or the patch’s permanence; it is about the tire’s enduring ability to resist impact, maintain road contact, and support the vehicle’s weight.
Within this broader decision framework, it can be helpful to connect with a credible source of tire safety standards and guidance. For those seeking further authoritative information, the National Highway Traffic Safety Administration offers extensive tire safety guidance that covers repair versus replacement, including critical considerations for commercial vehicles. Keeping a reference handy and applying the guidelines to your fleet operations is part of prudent, responsible trucking practice. If you are unsure about the appropriate course of action in a given scenario, reach out to a certified tire repair shop. The professionals there can assess the tire’s damage in person, confirm whether a repair meets safety and regulatory requirements, and determine whether a replacement is prudent given the tire’s condition and age.
In this context, you may also want to stay connected to a broader base of tire and maintenance knowledge. For those who want to explore related topics, consider browsing the Master Truck Repair blog, which collects practical insights on truck maintenance and on-the-road repairs. The resource is a useful companion when you are mapping out a plan for preventive maintenance, budgeting for routine tire care, or preparing your fleet for long-haul operations. For convenience, you can explore the blog using this link: Master Truck Repair blog. It is a hub where practical, experience-based guidance often complements the more formal repair literature.
Ultimately, the choice between cold patching and hot vulcanization should align with the tire’s condition, the demands of the service, and the availability of professional support. Cold patching can be a lifesaver in the moment, particularly when you need to move the vehicle to a safer location or to a shop. Hot vulcanization stands as the preferred long-term solution for tires that must reliably perform under heavy loads and high speeds. The safety calculus remains consistent: never attempt to repair a damaged tire when there is sidewall injury, a large crack, a bulge, or significant cord separation. Never rely on a patch that would leave the tire vulnerable to failure under load. And always remember that age matters. A tire’s age can erode its ability to endure road hazards, heat, and sustained pressure, regardless of its visible condition.
Concluding this exploration, the central message is that knowledge and prudence should guide your responses to tire deflation. The right repair depends on the damage’s location and extent, the tire’s age and load history, and the degree to which you can access the appropriate tools and expert service. The goal is to return to service with a tire that you can trust to carry a heavy load, maintain traction in changing weather, and sustain the dynamic forces of highway driving. By balancing the immediacy of roadside repair with the long-term reliability of a thorough inspection and, when warranted, a proper replacement, you can keep your fleet safe and on the move. For readers who want to deepen their understanding of tire repair methods, an external resource beyond the industry-specific guidelines offers a complementary perspective on the science and practice of repair methods. You can consult technical resources and standards that outline when cold patches and hot vulcanization are appropriate, and how to evaluate their outcomes in the context of commercial trucking.
External reference: https://www.tirelab.org/technical-resources/tire-repair-methods
Safety-First Essentials: Navigating Flat-Tire Repairs on a Work Truck
When a tire on a work truck goes flat, the risk isn’t confined to the tire itself. The scene combines mechanical hazards, environmental factors, and the high-stakes goal of getting the mission back on track without compromising anyone’s safety. This chapter builds a cohesive, safety-forward mindset for repairing a flat tire on a heavy vehicle, tying together the practical steps with the broader responsibility of protecting people, equipment, and cargo. The sequence isn’t merely a checklist; it is a philosophy of risk reduction that should guide every moment from the first assessment to the final confirmation of roadworthiness. In the field, where conditions shift and time pressure climbs, safety must anchor every decision. The core idea is simple: stabilize the vehicle, isolate energy sources, protect the crew, and verify that every action leaves the truck safer than before. This approach aligns with formal safety standards while remaining practical for on-site repairs, whether you’re on a rural shoulder, a loading dock, or a maintenance bay. To maintain the flow of this chapter, imagine the repair as a singular, continuous process rather than a sequence of isolated tasks. Each step reinforces the next, and the outcome depends on disciplined adherence to safety fundamentals as much as on technical know-how.
Stabilization is the first anchor in any roadside or shop repair. A truck, with its heavy wheels and high center of gravity, can shift unexpectedly if a tire failure interacts with soft ground or uneven pavement. The practical posture is to bring the vehicle to a controlled, level stop and secure it firmly. Park on level ground whenever possible; if the surface tilts, the risk of the jack slipping or the vehicle rolling increases dramatically. Engage the parking brake fully, and place wheel wedges behind and in front of the wheels that are opposite to the one being worked on. This creates a physical barrier to rolling and reduces the chance of a sudden movement that could trap a technician or shift a heavy wheel into a person’s leg. Never rely on hydraulic jacks alone to support the vehicle for under-vehicle work. A jack is a temporary lifting aid, not a structural support. Once the tire is off the ground, deploy jack stands or a professionally rated lift with secure locks and safety pins. If the repair must occur at height or in a constrained space, stable platforms and guardrails become essential to prevent a fall, even for an experienced crew. Stabilization also means preparing yourself and your tools for a controlled, orderly stop rather than a rushed snap to action. The quiet, methodical rhythm of restraint and support reduces the odds of a misstep under pressure.
Energy isolation, or Lockout/Tagout (LOTO), is a critical companion to stabilization. Before any manipulation of the tire, the vehicle’s energy sources must be protected against unexpected startup or movement. For traditional internal combustion trucks, this means turning off the ignition, removing the key, and isolating electrical circuits that could energize the vehicle’s systems. If the truck includes air, hydraulic, or electronic subsystems that could move or re-pressurize, these lines should be depressurized and locked out according to established procedures. In practice, this involves connecting a reliable lockout device to a designated energy source and tagging it with the technician’s information. Verification is essential: test the controls to confirm they cannot be re-energized while the work is underway. For electric or hybrid trucks, the precautions extend to high-voltage components. Only trained personnel with appropriate certification should handle these systems, and the work area should reflect this by clearly identifying the high-voltage zone and using insulated tools designed for such environments. LOTO isn’t an abstract principle; it is a protective barrier against a single, potentially fatal misstep that could occur in the heat of the moment when the tire is off the wheel and the power may still be present in hidden circuits.
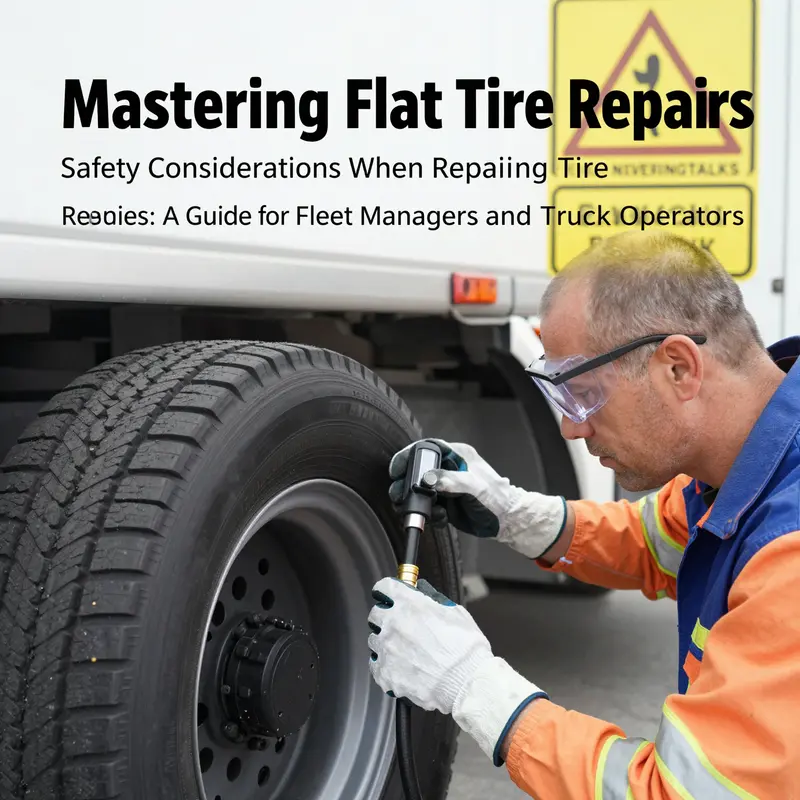
Personal protective equipment (PPE) is the shield that keeps the operator safe from both immediate hazards and long-term exposure. Eye protection is non-negotiable; a simple rock chip or a sudden tire bead pop can send fragments at high speed. Hearing protection is another prudent layer in a noisy repair scene where power tools, pneumatic tools, and compressors may run for extended periods. Cut-resistant gloves guard against abrasions when handling steel components, bead seating tools, or sharp edges along damaged tire carcasses. Insulated gloves are prudent when electrical systems are involved. Clothing should be snug-fitting and free of dangling accessories that could catch on moving parts. Long hair should be tied back, and jewelry removed to prevent entanglement. A thoughtful PPE plan also considers heat and chemical exposure. If the vehicle has recently operated in hot conditions, components near the engine bay or exhaust manifold can be dangerously hot. If fluids such as oil, fuel, or coolant are present, gloves with chemical resistance protect skin from contact, while a face shield adds an extra layer of defense against splashes from a punctured fuel line or a ruptured coolant hose. In short, PPE is not a fashion choice; it is the first line of defense against unpredictable, high-energy dynamics that unfold the moment a tire comes off the wheel.
Handling hazardous materials is an integral part of tire repair in the truck environment. Fuel vapor, engine oil, brake fluid, and coolant each carry their own risks—flammability, toxicity, or corrosivity. Work in a well-ventilated area to minimize vapor buildup, especially if you must open the fuel line or remove a cap in close proximity to the cab. Keep fuel away from any ignition source, including static electricity sparked by tools or clothing, and never use a flame-based device to work near a fuel system. Use designated waste containers for fluids, and segregate used rags or contaminated materials so they can be handled safely and disposed of properly. Spills should be contained promptly with absorbent materials designed for hydrocarbons, and any contaminated materials must be disposed of in accordance with local regulations. Battery systems, while not always involved in tire repair, can also present hazards in certain setups, particularly on older trucks with exposed terminals or unsecured wiring. Avoid skin contact with battery acid, protect eyes from splashes, and ensure that any battery service procedure follows explicit safety steps. Remember that quiet, careful handling of these materials reduces the risk of fires, chemical exposure, and environmental harm while maintaining a calm, productive repair atmosphere.
High-temperature components demand special awareness. After a truck has run, heat remains in the exhaust manifold, brakes, and surrounding metalwork. Do not reach for hot parts or open a radiator cap when the engine or nearby components are still hot. Allow the system to cool completely before performing any work near the engine or exhaust. A sudden contact with a hot surface can cause severe burns and can also lead to a loss of control if the technician reflexively pulls away from a hot object. This cooling period isn’t merely a safety pause; it’s a practical step that protects you from injury and also prevents accidental damage to nearby components. When you reassemble and reinflate the tire, monitor for unusual heat in the wheel or wheel well, especially if the tire has been stressed by heavy loads. The mechanical stresses of heavy vehicles mean that even after a successful repair, a tire and rim assembly can behave differently under load. Close attention to the thermal profile of the wheel during the early miles of operation helps ensure that the repair remains stable under real-world conditions.
Electrical system safety remains a frontier for trucks with advanced electronics or high-voltage propulsion. If the vehicle is a modern diesel with enhanced electrical networks or an electric or hybrid unit, following manufacturer-specific disabling procedures is essential. In such cases, ignition must be off, and negative terminals must be disconnected first when possible, with the circled warning that only trained personnel should re-energize such systems. Tools used around high-energy electronics should be insulated to the voltage rating required by the vehicle. The emphasis here is not to deter technicians but to recognize that the safety landscape changes with technology. A routine tire repair might stay simple in spirit, but the surrounding electrical architecture can introduce new risks that demand disciplined practice and clear boundaries.
The work environment, often overlooked, is a crucial safety lever. A clean, dry, and organized workspace lowers the likelihood of slips, trips, and tool-related injuries. Light is essential for seeing punctures, bead seating issues, or damage around the rim. A cluttered area invites mis-steps, especially when lug nuts and heavy tires are moving in and out of the wheel hub. A well-ordered toolkit reduces unnecessary hand movements and helps ensure each action has a deliberate purpose. Floor cleanliness matters too because oil and fuel on concrete create slip hazards that can cause a fall when lifting a heavy tire. The work area must also accommodate the potential for sudden incidents—an accessible fire extinguisher, a first-aid kit, and clearly marked exits contribute to a safer repair culture. In a high-pressure setting, these environmental safeguards preserve focus and reduce cognitive burden, enabling technicians to apply correct procedures rather than improvising under stress.
Specialized procedures, while technical, are fundamentally about respecting the tire and wheel system. The repair you undertake on a flat tire must follow the manufacturer’s guidelines and the accepted standards for high-load, heavy-vehicle configurations. The tools you select—plugs, patches, or mechanical seals—must be compatible with the rim type and the tire’s tread condition. This is not the moment to substitute a tool or force a solution that doesn’t align with the tire’s design. When a tire is repairable, a cold patch or plug might be used in the tread area, but for large trucks with heavy loads, hot vulcanization performed by a professional shop offers superior durability and safety. The top priority remains to prevent a secondary failure after repair, which could have catastrophic consequences under load. If the tire damage is beyond the salvageable threshold—such as sidewall injuries, large cracks, bulges, or multiple punctures closely spaced—the prudent choice is replacement rather than repair. The human factors in decision-making—recognizing limits, seeking expertise, and stopping when the risk is too high—are as important as the technical steps themselves. When brakes, steering, or suspension are involved or influenced by the tire condition, a careful test of the system should follow any repair. Pump the brakes to confirm proper pedal feel, and verify that the ABS or traction controls respond as expected. A calm, deliberate test ride after repair builds confidence that the system will behave as designed under real driving conditions.
Emergency preparedness threads through every moment of tire repair. Knowing where to locate fire extinguishers, how to respond to a fuel spill, or what to do if someone suffers a burn or inhalation exposure is essential. A quick, practiced response can prevent a minor incident from becoming serious. Having a first-aid kit accessible, along with a basic set of spill-control kits, ensures you can contain issues at the source. It’s also wise to have a written plan for roadside repairs that outlines roles, responsibilities, and escalation procedures. This reduces ambiguity and speeds up safe decision-making when time and visibility are limited. For teams, rehearsal—drill-style practice of the plan—helps cement habits that translate into safer, faster outcomes when the real situation arises. The overarching message is simple: a culture of safety, reinforced by preparation and practice, yields the most reliable repairs and the least risk to life and limb.
In practice, the determination of whether a tire repair is appropriate hinges on the nature of the damage and the operating context. Small tread punctures may be temporarily sealed with a cold patch or plug, especially if the vehicle will operate at modest speeds and for a short distance to a safe repair facility. However, cold patches are inherently temporary—high-speed or heavy-load operations require a durable, professional hot vulcanization repair or a complete tire replacement. Sidewall damage, bulges, or cracks typically require replacement because the structural integrity of the tire is compromised beyond a safe repair. The decision to repair or replace must consider the vehicle’s load, the anticipated route, and the critical nature of the mission. In every case, the job is not finished simply by sealing the puncture. The tire must be correctly seated on the rim, inflated to the correct pressure, and torque applied to the lug nuts in a precise sequence. After reinstallation, the tire should be monitored closely for several miles, with particular attention to heat, vibration, or any sign that the repair has failed. A cautious approach—drive slowly for the initial miles, then recheck pressure and lug torque—adds a buffer against hidden issues that could escalate under load.
The safety framework described here is not isolated from the broader knowledge ecosystem that governs tire repair. Official guidance from tire-safety authorities underscores the idea that repairs must be evaluated against well-established thresholds for damage and vehicle type. For technicians and fleet operators alike, consulting these sources helps ensure that on every job, decisions are grounded in proven standards rather than improvised judgment. In addition to formal guidelines, a practical, experience-based awareness—recognizing when a repair is likely to be temporary and when the situation demands a professional shop—and backing up decisions with clear documentation creates a robust safety loop that protects people, property, and performance on the road. The synergy of stabilization, energy isolation, PPE, hazardous-material handling, thermal and electrical safety, environment, procedures, and emergency readiness creates a resilient, repeatable path to safer tire repair on trucks.
For ongoing, workaday reading on structured truck maintenance and safety practices, technicians may reference internal resources that describe in-house procedures and standards. See Turnage-Sons in-house truck maintenance for a concise guide to aligning practical repair steps with company-specific safety protocols and workflow expectations. This resource can help teams standardize their approach to tire repairs within the larger maintenance program and ensure that the on-the-ground actions harmonize with formal safety policies. Turnage-Sons in-house truck maintenance
In closing, the path to safely repairing a flat tire on a work truck rests on disciplined, deliberate practice. It requires a mindset that treats every repair as potentially dangerous, a preparation that extends beyond the moment of detachment from the road, and a commitment to real-world safety whenever the vehicle is back in service. By prioritizing stabilization, energy isolation, PPE, hazard handling, environmental safety, and professional judgment about repair versus replacement, technicians protect themselves and the people who share the road with them. The result is not only a successful tire fix but a demonstration of how safety-centric repair culture translates into better outcomes for drivers, fleets, and communities.
For readers seeking authoritative, external guidance on tire safety standards, consult the National Highway Traffic Safety Administration’s tire safety resources. They provide clear criteria for when tires should be repaired versus replaced and how to apply these standards to commercial vehicles like trucks. https://www.nhtsa.gov/vehicle-safety/tire-safety
Final thoughts
Effectively managing flat tire repairs is critical for any fleet operation, ensuring minimal downtime and optimal safety for drivers. By thoroughly assessing tire damage, preparing adequately with the right tools, selecting the appropriate repair method, and prioritizing safety, fleet managers can maintain high-efficiency standards within their operations. This article serves as your comprehensive guide to ensuring your fleet remains roadworthy and prepared for the challenges of the job.

