Chevrolet trucks, from the rugged S10 to the robust Silverado, are vital components of many commercial fleets and enterprises. Over time, their floor pans can suffer from rust, damage, and wear, compromising vehicle safety and performance. Understanding how to repair floor pans is crucial for fleet managers, trucking company owners, and operators in construction, mining, and logistics. This guide delves into essential steps, from assessing the damage and executing cuts and welds to utilizing aftermarket kits and recognizing when to seek professional help. Each chapter is designed to equip you with knowledge on best practices, safety precautions, and the potential for enhancing your truck’s longevity through effective repairs.
Solid Ground Again: Rebuilding Floor Pan Rigidity in a Chevy Truck
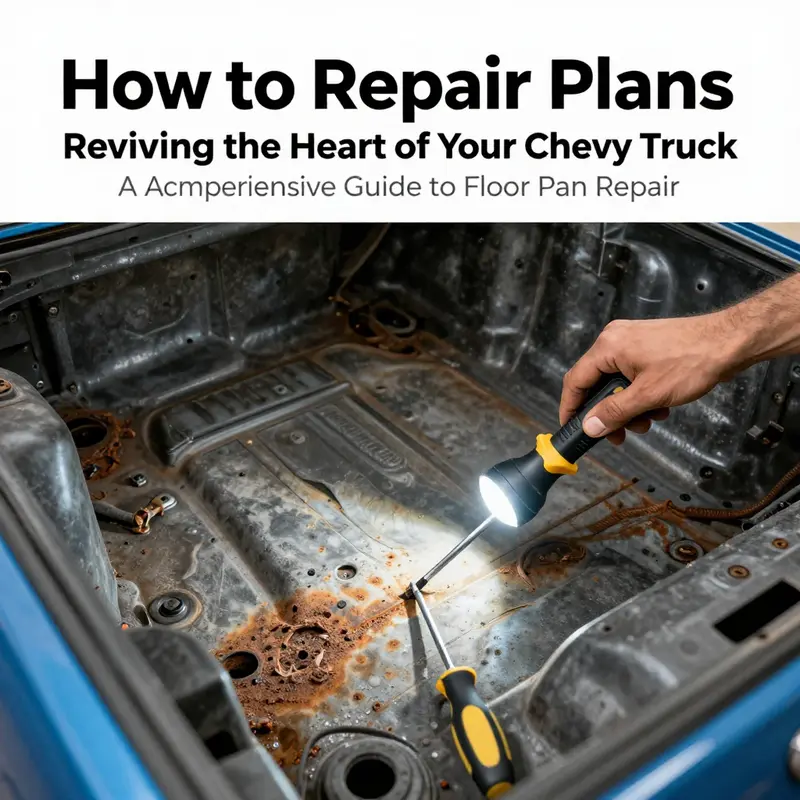
Repair work begins where the car sits now, with interior components removed to expose the full extent of the floor pan and its weld joints. The interior removal is more than cosmetic clearance; it reveals hidden valleys where rust hides, often along seams and at the junctions with the rocker panels. With carpet up and the sound deadening out of the way, you get a true view of the metal surface, the pitting, and any perforations that may be hiding under years of moisture. The inspection phase is not a momentary glance but a careful survey that treats every inch of metal as a potential problem area. Look for rust perforations that break through the skin, for sagging where the floor no longer supports the seat or the transmission tunnel, and for warping that suggests there is more damage beneath than meets the eye. This is a crucial moment, because the decision you make here governs the repair path you take. If the rust is isolated to a small patch, you may be able to favor a patch panel, a localized repair that preserves as much of the original metal as possible. The patch approach hinges on sound edges, good corrosion protection along the patch seam, and a compatible thickness of metal to maintain the floor’s original stiffness. But when the rust has eaten into a broad swath of the floor, or when the damage reaches the frame rails themselves, replacing the entire section becomes not only the safer option but often the more economical one in the long run. In this scenario, you start to think in larger terms, about how the repair will align with the rest of the chassis, how the new metal will fit with the rocker panels and the transmission tunnel, and how the welds will hold under road vibration and load. The decision is not just about patching a hole but about preserving the floor’s structural integrity and the cabin’s protective seal against the weather. The Chevrolet Truck Repair Manual offers essential guidance here, providing diagrams and torque specifications that keep the work anchored to factory practice, reducing the risk of improper alignment or weak welds that could undermine performance down the line. The manual is a reliable companion for engine bays and floor pans alike, offering a clear path through the often complicated sequence of steps required to restore a floor pan with reinforcement and correct mounting to the frame rails. The principle is straightforward: a well-sealed floor that resists water intrusion and a welded joint that remains strong after years of exposure to heat, salt, and humidity. The repair options, in essence, fall into two broad streams. The first is patching, a repair that targets localized rust or small perforations with a patch panel that is welded into place and then ground smooth. The second stream is full replacement, which involves removing the entire damaged segment, cutting back to clean edges, and fitting a new panel that matches factory contours. For a Chevy truck, especially a model where the floor pan forms part of the vehicle’s overall rigidity, the full replacement often proves more cost-effective when the damage spans a large area or threatens the structural joints. The choice is not merely a matter of dollars but of durability and safety. A patched section can work well for a small, well-prepared patch, but a large, compromised area risks differential movement at seams and corners if the edge preparation or weld quality is compromised. That is where the virtues of precision and care shine. When replacing, the process typically begins with marking and cutting away the damaged section using a plasma cutter or reciprocating saw. The goal is to remove all rusted metal and any weakened edges, leaving a clean, square opening that will accept the new floor pan. Edges must be square and true to ensure a seamless fit. The new panel—whether OEM replacement or aftermarket compatible with the model year and configuration—will then be aligned and welded into place. The weld sequence matters; stagger the welds to minimize heat distortion, keep the welds well away from the edges that bear load, and use proper technique to avoid warping the tunnel or creating gaps that invite moisture infiltration. A careful weld bead, clean and consistent, helps ensure a solid seam that will resist flex and fatigue over time. After welding, the area is thoroughly cleaned and prepared for corrosion protection. Sanding to a smooth surface removes weld beads, reveals any pinholes, and ensures a clean finish for coatings. The next stage—protective treatment—cannot be skipped. The goal is to prevent moisture intake that could reintroduce rust into the repair. A combination of rust inhibitors, an anti-corrosion primer, and an undercoating or seam sealer provides a robust barrier against water intrusion. In restoration contexts, a floor pan kit designed for the specific model year and truck configuration is highly advisable. These kits are engineered to incorporate reinforcement features and to align with factory dimensions, which helps maintain the vehicle’s structural integrity. The reinforcement pieces are not a cosmetic add-on; they serve a practical role in resisting flex and distributing loads more evenly across the floor. When installed correctly, these kits contribute to a floor that behaves like a true part of the chassis, not a patch of sheet metal that may separate under stress. It is important to treat the seam areas with a careful approach to seam sealing. A well-sealed seam is essential for long-term performance. The moisture barrier between the floor pan and the interior should be thorough. The combination of seam sealer, protective undercoating, and a carefully selected topcoat helps seal the repair from the inside and outside. In many cases, the interior remains exposed to some vibration or temperature changes, so a durable finish that resists chipping and peeling is worth the extra attention. The scope of the job also invites a broader consideration of the vehicle as a whole. If the floor pan replacement involves frame alignment or any substantial structural changes, professional oversight becomes highly advisable. A shop with experience in vintage or heavy-duty truck restoration can bring a level of alignment accuracy that is difficult to replicate in a home garage. Even small misalignments can translate into door gaps, hood alignment issues, or suspension geometry that shifts over time, reducing safety and performance. The emphasis here is clear: proper alignment and the restoration of structural continuity matter as much as the cosmetic finish. The repair plan, therefore, should be built around a few core principles. First, ensure that the area to be repaired is clean, free of rust, and prepared for edge mating. Second, choose the repair path that best preserves the truck’s structural integrity—patch for minor damage, full panel replacement for extensive corrosion or frame rail involvement. Third, use a high-quality welding process and materials, with attention to edge preparation, welding pattern, and heat management to avoid warping. Fourth, protect the repaired area with rust inhibitors, protective coatings, and seam sealers to create a moisture barrier that lasts. Fifth, verify alignment and fit after welding, before final finishing, to guarantee that the floor integrates seamlessly with the rest of the chassis. In practice, many owners find that taking a methodical approach yields rewarding results. Start with a thorough assessment, then plan the repair in stages that minimize downtime and maximize durability. The end result should be a floor that feels solid, a cabin that remains weather-tight, and a truck that can be trusted in daily use or in a long-term restoration project. As you chart the repair path, it helps to keep a few practical anchors in mind. Budgeting for routine truck maintenance, for example, is a prudent habit that pays dividends when large repairs loom. The concept is simple: set aside funds gradually for care and eventual major repairs, so you are not surprised by the cost when the job becomes necessary. A practical way to approach this is to view floor pan work as part of a broader maintenance plan rather than as an isolated, one-off project. This perspective aligns with long-term reliability and helps you keep the truck on the road rather than in the shop. For those who want a structured, real-world guide to keeping a truck in top shape, resources that address maintenance budgeting can be a helpful companion along the way. budgeting for routine truck maintenance. The goal is not just to fix the hole but to ensure the repair endures, preventing future rust and protecting the investment you have made in a Chevy truck that has stood by you for years. The repair work also benefits from a broader awareness of the surrounding components. If you are replacing a floor panel, you will often encounter the need to address related areas like the toe boards, seat brackets, and the lower dash structure. These connections can influence how the new floor panel sits and how the doors fit later on. Ensuring proper alignment during welding and test-fitting can prevent the post-repair misalignment that creates gaps or rattles. A careful, measured approach reduces the chance of rework and helps you move toward a finish that feels solid and integrated, rather than a patchy repair that stands out to the eye and the touch. In sharing this practical path, it is worth acknowledging that the work, while straightforward in principle, becomes considerably more forgiving when you approach it with the right sequence and a pace that allows you to catch mistakes before they compound. Even veteran DIY enthusiasts know that the line between a durable fix and a fragile patch is often the attention given to edge preparation, the cleanliness of welds, and the thoroughness of corrosion protection. The result is not just a repaired floor pan but a revived sense of the truck as a well-built, weather-resistant machine. The road to that outcome runs through methodical steps, adherence to best practices, and a willingness to call in professional help if needed for complex structural work. In the end, a Chevy truck that returns to reliable daily service or a respected restoration project is a testament to thoughtful repair work that respects both the vehicle’s heritage and the demands of modern use. For readers who want to deepen their understanding of repair techniques, a broader set of automotive resources can offer deeper dives into welding procedures, edge preparation, and long-term corrosion prevention. The Car and Driver resource, while general in some respects, provides across-the-board insights into automotive repair and maintenance that can inform your approach to floor pan work as part of a larger restoration strategy. External reference: Car and Driver. Car and Driver
From Rust to Rigidity: Cutting and Welding a New Floor Pan in a Chevy Truck
A Chevy truck is more than a collection of sheet metal and a chassis; it’s a single, structural unit whose floor pan anchors safety, stiffness, and the integrity of the cabin. When that metal succumbs to rust, corrosion, or bending, the repair demands a disciplined approach that blends diagnosis, precise cutting, and careful welding. This chapter outlines the practical, methodical path of replacing a compromised floor pan in a Chevy truck, whether you’re restoring a classic S-series crew cab or a larger Silverado, and threads together preparation, execution, and post-repair care into a coherent, repeatable process. The goal isn’t just to seal a hole or cover a dent; it’s to restore a fundamental layer of structure that keeps occupants safe, steering precise, and the body aligned with the frame. By treating the repair as a full-frame, factory-accurate operation, you ensure the job endures under future miles, mud, water, or winter spray.
Assessment and mindset. The repair begins long before any metal moves. A floor pan isn’t a cosmetic panel; it’s part of the vehicle’s load path. Assessing the damage means looking past surface rust to the edges where the panel meets the frame rails, seat mounts, and transmission tunnel. Minor issues—scratches, shallow pitting, or small surface dents—may respond to cleaning, rust converters, and a fresh coat of interior paint. But once rust holes, sagging, or deformation show themselves, the plan shifts toward replacement rather than salvage. This is especially true in trucks that see frequent exposure to road splash, off-road spray, or winter road salt, where hidden corrosion can weaken a panel’s ability to carry loads or maintain seal integrity. The aim is to decide, with honesty, whether a patch will suffice or a full cut-and-weld replacement is required. The choice is critical to safety and long-term durability, and it should be guided by careful measurement, an understanding of the frame geometry, and a precise sense of the panel’s placement within the body assembly. For anyone contemplating this level of repair, a straight, factory-accurate outcome hinges on clean edges, proper alignment, and a sound seal against moisture.
Safety and preparation. Safety is not optional here; it’s foundational. Stabilize the truck so it cannot shift while you’re under it. Place the vehicle on jack stands or a lift, never rely on a hydraulic jack to hold you up. Disconnect the negative battery terminal to prevent shorts during welding, and take care to keep away from the electrical system that could spark during arc work. PPE is non-negotiable: safety glasses or a welding helmet with a proper shade, fire-resistant clothing, gloves, and sturdy boots. A well-ventilated workspace is essential because welding fumes can be stubborn, and ignition risks rise when you’re working with exposed metal and dry wooden floors or rags nearby. A neat, organized workspace makes the cutting and welding stages predictable and reduces the chance of errors—especially when you’ll be trimming, fitment-checking, and tack-welding in multiple steps.
Marking and removal. With the vehicle secure, you begin the delicate work of outlining the damaged area. Use a marker to draw clean cut lines that follow the natural seams and boundaries of the original floor panel. The lines should permit the removal of the entire compromised section while preserving the surrounding panels and structural supports. Precision here matters: an irregular outline makes fitment harder and can leave gaps that trap moisture. The actual removal is performed with a reciprocating saw equipped with a metal-cutting blade. Take your time along the cut lines, letting the blade do the work rather than forcing it. Stop short of dense structural members that you don’t intend to replace, and keep the surrounding metal cool to prevent warping. Once the damaged section is freed, you’ll see the hole or hole-amidst rust where the old floor once stood. This is the moment when the restoration sense of purpose must be matched by a practical, measured approach to fabricating or sourcing a replacement panel.
Fabrication and fit. Acquiring a replacement floor pan—OEM if possible, aftermarket if necessary—gives you a sheet-metal template that should align with the truck’s frame rails, rocker panels, and the transmission tunnel. The fit-check is a crucial step. Carefully place the new panel over the opening and mark any minor discrepancies. The goal is a snug cradle that sits flush with surrounding surfaces and leaves no gaps along the seam. This is where precision pays off. A good fit reduces the amount of grinding and welding needed and minimizes heat distortion during the weld process. Once you’re confident in fit, you begin the tack-welding phase. Use a spot welder or spot welds around the perimeter at evenly spaced points to hold the panel in place. The tacks should be light enough to allow you to reposition if necessary but numerous enough to prevent warping. These initial tacks act as anchors, guiding you through minor alignment adjustments before you commit to continuous welds along the entire seam.
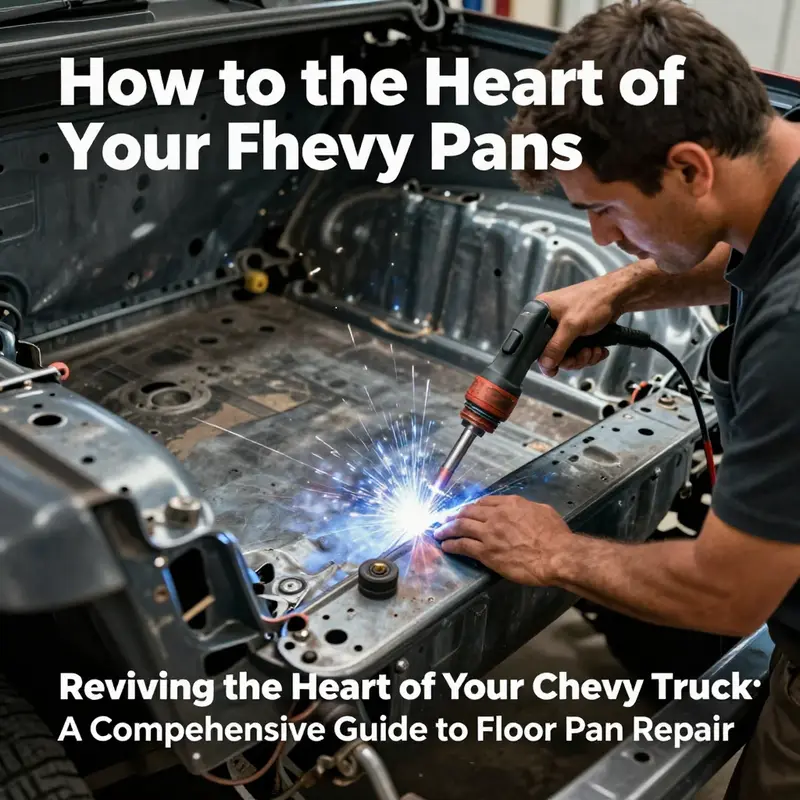
Welding technique and seam integrity. The welding stage marks the transition from a framed plan to a unified panel. MIG welding is generally the method of choice for this kind of work because it provides a clean, strong bead with good control on thin sheet metal. Before welding, you might slightly bevel the seam edges or ensure that the edges are square and tightly mated. The aim is a continuous, penetrative weld that fuses the new floor pan to the surrounding metal along the entire seam. Begin at one corner and work around, or run sequentially across the seam in segments to avoid excessive heat buildup in one area. Grind the ridge smooth after welding to create a uniform surface and reduce potential stress risers. It’s essential to keep a steady hand, maintain a clean work area, and continually clean the surface to prevent weld contamination. If the welds don’t appear uniform, stop, cool, and re-check the fit. Poor weld penetration or gaps can compromise the pan’s seal against moisture and rust, and can later produce creaks or flex under load.
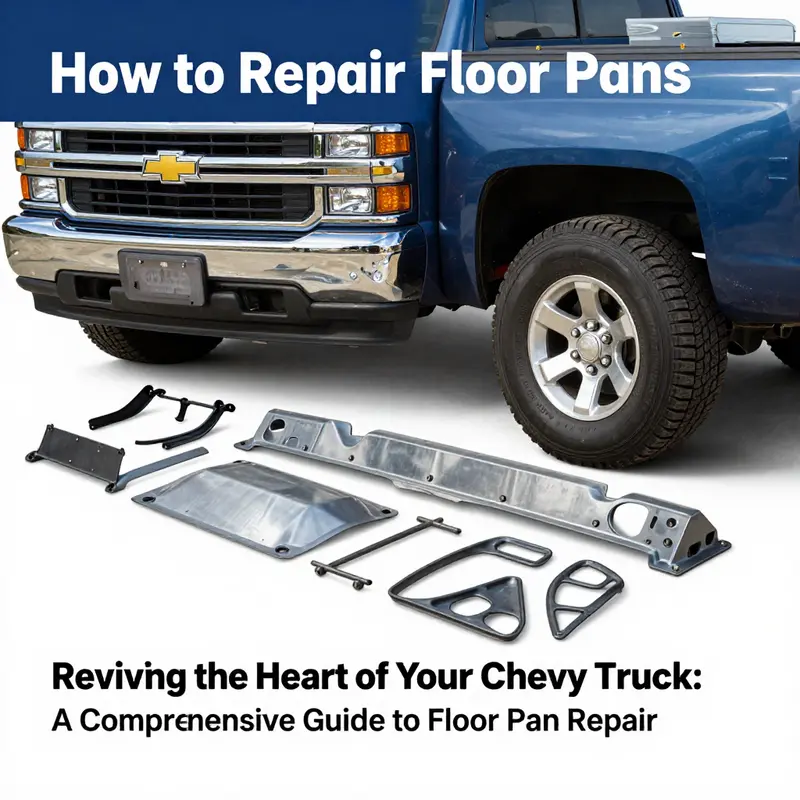
Finishing and protection. After the seam is welded and ground smooth, the repair area should be treated as if you were finishing a new factory seam. Apply a high-quality primer to prevent rust where bare metal remains. A topcoat that matches the interior can help blend the repaired zone visually, but more importantly, the area should be sealed with rust-inhibiting sealants designed for automotive use. The interior-facing surface should receive a protective coating that resists moisture intrusion, especially in the corrugations and joints where water tends to collect. An undercoating or protective sealant layer adds another barrier against road spray and salt, helping postpone future corrosion. This is not merely cosmetic; it’s a practical step that helps keep the repair durable for years of service. If you’re restoring a classic Chevy or preserving a heavy-duty truck as a family workhorse, consider a floor pan kit engineered to match factory specifications. These kits often include reinforcements and are designed to integrate with existing mounting points and structural features. A kit can simplify the alignment process, improve rigidity, and reduce the risk of misalignment as the vehicle experiences thermal cycles and road loads.
Quality and measurement. Throughout the process, quality control means more than just finishing the welds cleanly. It means verifying that the floor pans align with the rest of the body’s geometry and with the frame. If the repair affects frame alignment or requires structural changes, the work should be reviewed by a professional auto body technician who specializes in vintage or heavy-duty restoration. The frame’s alignment affects steering, suspension geometry, and the way doors seal against the body. Even a small misalignment can create cockpit rattles, misaligned door gaps, or compromised water sealing. The best practice is to treat this as a restoration-grade repair, especially if you’re dealing with an older Chevy where frame tolerances have changed over time or where the maintenance history is uncertain. In those cases, the best outcome arises from a measured, patient approach and, if necessary, consultation with a shop that specializes in this type of structural work.
Maintenance of the repaired area. After you’ve completed the welding and finishing steps, you’re not finished with the job; you’re entering the ongoing maintenance phase. The repaired floor pan needs ongoing protection from moisture. Ensure all seams are sealed, that there are no pinholes or gaps where water can intrude, and that any exposed metal is coated. The underbody should receive a durable rust preventive treatment, especially in regions where road salt and humidity create an aggressive environment. Regular inspection becomes a habit: check for signs of moisture buildup in the footwells, around the seat mounts, and near any cross members that could trap water. If you notice anything unusual, address it promptly. In restoration work, resealing and repainting are often part of the process, but the core requirement remains a continuous barrier against corrosion. The long-term success of a floor pan replacement hinges on how well you manage moisture, how clean you kept the edges during welds, and how thorough your rust-prevention strategy is in the weeks and years that follow.
Context and guidance. The described method—driving the repair from assessment to final sealant—aligns with industry best practices for structural metal repair. It emphasizes a clean cut line, precise fitment, controlled welding, and thorough finishing. For those pursuing restoration or careful maintenance, a floor pan replacement represents a significant, technically demanding repair, but it’s one that can be performed in a competent home shop with the right tools, a systematic plan, and adherence to safety. The approach also echoes the broader consensus that, in cases of extensive damage, replacement—not patchwork—is the most reliable way to restore strength and safety. The process is not merely about patching holes; it’s about re-establishing a solid, moisture-resistant floor that can become the reliable foundation for the vehicle’s interior and drivetrain alignment. For additional depth on the principles of replacing a floor pan and to see how professionals approach this job, consider reading an authoritative automotive repair guide that outlines a similar sequence of steps and emphasizes precision in cutting, fitting, and welding, which can provide further diagrams and context to this practical workflow.
Internal reference. For readers planning this kind of repair as part of routine maintenance or a larger project, it can be helpful to review broader guidance on long-term upkeep and budgeting for repairs. See Budgeting for routine truck maintenance for strategies that help you allocate funds, source parts carefully, and plan for the inevitable costs of metalwork, paint, and protective coatings over time. This context can help you balance the immediate needs of a floor pan replacement with other maintenance tasks that contribute to overall reliability and value.
External resource. For a detailed exterior-focused reference that outlines the general approach to replacing a floor pan in a pickup, including diagrams and step-by-step notes, you can consult a respected automotive publication that discusses cutting, fitting, and welding in similar terms. The guidance there complements the practical steps described here and offers an additional perspective on technique and safety. External reading: https://www.thetruthaboutcars.com/2025/08/07/how-to-replace-a-floor-pan-in-a-pickup-truck/
Internal link. For further reading on related maintenance topics and workflow coordination, you can visit the site’s blog that covers a wide range of truck care topics. This resource can provide broader context for keeping a Chevy truck in good running shape while you undertake more involved repairs like floor pan replacement. See Budgeting for routine truck maintenance
From Rust to Road-Ready: Restoring Chevy Truck Floor Pans with Aftermarket Kits
Restoring a Chevy truck’s interior starts with the floor pans. They may seem like a discreet, hidden part of the chassis, but they are the backbone of how a truck carries you and your gear from one job site to the next. In rust-prone models, especially classic Chevy trucks that have spent years tethered to damp roads or salty winters, floor pans can become more than a cosmetic issue. They can sag, hole through, and compromise the vehicle’s structural integrity. When restoration is the goal, aftermarket floor pan kits offer a practical balance between factory-like fit, durable materials, and a path back to a clean, solid floor that you can trust underfoot and behind the wheel. This chapter examines why aftermarket kits are often the most reliable route for restoration and how to approach the job with a focus on precision, durability, and long-term protection. It ties the practical, hands-on steps to the larger aim of preserving the truck’s character while returning it to road-ready performance, so you’re not just patching metal—you’re rebuilding a foundation that supports every drive, every load, and every memory you plan to make behind the wheel.
The decision to pursue aftermarket floor pan kits typically follows a clear assessment of the damage. A few scratches or light surface rust on a well-maintained floor may respond to surface prep and a fresh coat of paint. But when rust has carved holes through the metal, when stiffness has started to sag, or when the floor has warped enough to affect pedal geometry and seat mounting, a full replacement becomes the more reliable path. In these cases, aftermarket kits shine for several reasons. They’re engineered to match factory specifications in terms of contour, mounting points, and material thickness, which helps ensure the new pan aligns with the vehicle’s frame and body. That alignment is not a cosmetic luxury; it preserves the structural integrity that keeps the cab quiet, the door gaps even, and the seat anchors dependable. In a restoration context, you want a replacement that behaves like the original sheet metal under stress, not just something that fits loosely and invites future rust and misalignment.
What makes aftermarket floor pan kits particularly appealing to Chevy truck restorers is how they approach the problem from a fit-first perspective. The kits typically include new floor pan sections made from high-grade steel or aluminum, selected to mirror OEM configurations. The advantage, besides match and fit, is a complete path to restoration that includes proper reinforcements. When you replace a damaged section, you aren’t simply swapping metal; you’re re-establishing the seam lines, the drain channels, and the way the pan integrates with the transmission tunnel and the rocker panels. It’s a modular solution that lets you tailor the scope of the repair to the damage while keeping the original truck’s character intact. And because the process is designed around factory geometry, it helps maintain structural relationships that are critical for a safe, durable restoration.
The practical workflow begins with the careful removal of the damaged floor. Start by cutting out the rusted sections with control and precision so you don’t nick adjacent sound metal. This is where a steady hand and respect for the surrounding structure pay off. You don’t want a jagged edge that will complicate the fit of the new panel or create an additional corner to weld. As you remove the damaged material, keep the area as clean as possible. A clean edge is the foundation of a solid bond, so you’ll want to remove any corroded remnants and then bring the surface to a uniform plane before the new pan is set in place. After removal, the surrounding area should be scoured and treated to minimize any remaining rust. This step protects the rest of the floor cavity and the frame rails from the same creeping corrosion that damaged the original sheet metal.
With the damaged metal out of the way, you move to cleaning and prepping the surrounding area. The aim is to create a neutral, rust-free canvas for the new section to weld into. You’ll likely grind or sand the edges to remove paint residue and loose oxidation. It’s essential to reach clean, sound metal so the welds can bite deeply and evenly. While you work, you’ll also be mindful of the cavity’s corners and the shape of the tunnel, ensuring nothing distorts the geometry of the floor once the patch is in place. The more exact the preparation, the less the new pan will fight to stay in place during welding, which reduces warping risk and speeds up the process overall.
The next stage is to test-fit the new floor pan section. This step cannot be rushed. You place the replacement panel into its rough position and verify alignment with the frame, the rocker panel seam, and the inner braces that anchor the floor to the vehicle’s structure. You want the panel to sit flush against existing seams without forcing it into trim or bending it to accommodate a poor fit. It’s common to trim the replacement panel slightly to mirror the exact contour around the transmission tunnel, the footwells, and the pedal mounts. The goal is to achieve a seamless interface where the new metal becomes a single, continuous surface with the car’s body.
When you are confident in the fit, you proceed to securing the panel permanently. Welding is the heart of the repair, and the technique you employ matters almost as much as the equipment you use. The contrast between a clean, methodical stitch weld and a hurried, erratic weld can be the difference between a repair that lasts and one that invites future failures. You’ll typically weld the panel in sections, allowing the metal to cool between passes to control warping and to minimize heat-affected zones. Keeping heat manageable protects adjoining metal, prevents warping of the floor’s corners, and preserves the alignment with the frame rails. A patient, controlled approach yields a sturdier seam and a longer-lasting repair. Following the welds, you’ll see the panel hold its shape, a sign that the patch has become part of the floor rather than an add-on.
After welding, the area needs careful cleaning and finishing. You’ll grind down fusion lines to make them smooth and uniform, paying attention to the transition between the original metal and the new patch. The objective is not only a solid bond but also a clean surface that paints and coatings can grip. It’s common to see a thin fade-line where the old and new metal meet; with proper grinding and feathering, you reduce this visual cue and create a surface that looks factory-calibrated. Once the area is clean, you apply an anti-corrosion treatment to the bare metal. Rust inhibitors or phosphating coatings provide a protective layer that hurts rust’s chances of returning. The protective layer doesn’t just exist to keep the metal clean; it also acts as a primer for the next steps, ensuring that paint and undercoating adhere well and resist moisture ingress.
Painting and sealing come next, and this stage is critical for long-term durability. You want a finish that not only looks good but seals the metal against moisture and road salts. A proper paint system begins with a high-quality primer, followed by color-matched coats that blend with the cab floor’s aesthetics. If you’re aiming for a restoration that mirrors factory visuals, the color match is essential, but the quality of the sealant matters just as much. A robust topcoat plus a protective undercoating can create a moisture barrier that blocks water ingress and slows the cycle of rust. The goal is not merely camouflage; it is a durable, long-term shield that protects the repair area for years of use and abuse. You may also consider seam sealers along the weld lines to further guard against moisture intrusion in seams and joints.
An aftermarket kit’s value often extends beyond the patch itself. Many of these kits include reinforcement elements—additional panels or braces designed to restore structural integrity that might have degraded with the rust. The kit approach helps ensure alignment with factory geometry and provides a complete path to restoring the floor to a robust, load-bearing condition. This is particularly important if the truck is a restoration project where the goal is not only function but authenticity. If your project includes other structural work or frame alignment concerns, a complete kit can give you the necessary anchors and references to maintain correct geometry as you address other areas of the vehicle. The result is a floor that behaves as the sheet metal did when the truck was new: solid underfoot, precise in its alignment with the body, and resilient to the stresses of daily use.
Of course, not every repair on every truck requires a full floor pan replacement. The scope of the job should be guided by the extent of corrosion, the vehicle’s intended use, and the restoration’s goals. In some cases, a partial replacement paired with careful surface treatment may suffice, especially on a project that prioritizes authenticity or those working under a tight budget. Yet for many Chevy truck restorations, especially those involving significant rust or fatigue in the floor’s structural regions, aftermarket kits provide a reliable path to a stronger, longer-lasting result. They offer consistent fit, dependable materials, and a process calibrated to the kind of metalwork that a serious restoration demands. In other words, the kit approach supports both the function and the form that define a well-executed restoration.
As you work through a project of this scale, keeping a clear eye on safety and long-term durability is essential. The work involves heavy tools, precise cutting, and careful handling of the vehicle’s frame. It also requires a careful assessment of adjacent components—seat mounts, pedal assemblies, and the transmission tunnel—to ensure none is compromised during removal and replacement. When the repair touches the frame or involves substantial alignment work, or if you find yourself facing more extensive corrosion than anticipated, the best path often leads to professional auto body expertise. A shop with restoration experience can bring alignment accuracy, welding proficiency, and a measured approach to reinforcement that protects the truck’s safety and performance for years to come. This is not a critique of do-it-yourself ambition; it is a recognition that some of the most critical elements—structural integrity, alignment, and long-term durability—benefit from professional oversight. A careful decision about whether to pursue in-house workmanship or professional restoration services can save you time, money, and heartache when the job is finally put to the test on the road.
For readers seeking further context on best practices in automotive restoration and the balance between DIY skill and professional guidance, consider turning to established automotive restoration resources. They offer insights into repair strategies, material selection, and the realities of keeping vintage or heavy-duty trucks safe and roadworthy. Additionally, the practical experience of enthusiasts who have undertaken similar projects can illuminate the choices that work best for specific models and configurations. A well-considered approach will help you maintain the truck’s character while ensuring it remains a dependable daily driver or a compelling centerpiece of a collection. If you’re exploring this topic further, a wealth of guidance awaits, including detailed discussions on choosing the right kit for your model year and configuration. The path to restoration becomes clearer when you see how the pieces fit together, from careful damage assessment to the final protective coatings that keep rust at bay.
To further connect this discussion to broader restoration resources, you can explore practical guidance and case studies from experienced builders in the field. They often emphasize the importance of choosing a kit that aligns with your truck’s exact model year and configuration, ensuring proper fit with the frame and the body lines that give a Chevy truck its unmistakable silhouette. A precise fit minimizes the amount of rework needed on the edges and corners and supports a cleaner, more professional appearance after paint. This approach, in turn, reduces the likelihood of moisture pockets forming behind misaligned seams, which can become hotbeds for rust years down the line. In the long run, this is the kind of attention to detail that elevates a restoration from a series of fixes to a cohesive, durable rebuild that can be enjoyed for decades.
For readers who want to see how these principles translate into hands-on results, the restoration community frequently shares before-and-after projects, including the challenges of aligning floors with various bed configurations, cab corners, and floor tunnel shapes. The shared experiences reinforce the value of a well-designed aftermarket kit and a careful, methodical approach to cutting, fitting, welding, and sealing. They remind us that restoration is both science and craft—requiring precise measurement, steady hands at the welder, and a patient, steady workflow that respects the metal and the memories tied to the truck.
If you’re pursuing a restoration path that emphasizes maintaining originality while upgrading durability, you’ll find that aftermarket floor pan kits offer a compelling middle ground. They provide a factory-like fit without forcing you to compromise on materials or geometry, giving you a reliable baseline to work from. They also help you maintain a clear project trajectory: remove damaged sections, prep carefully, install with accuracy, weld cleanly, treat for corrosion, and finish with a protective layer that repels moisture and salt. This sequence is the backbone of a solid, long-lasting repair that not only returns the floor to its former strength but also preserves the truck’s character for the road ahead.
As you reflect on the steps and considerations described here, remember that restoration is as much about planning as it is about execution. The right kit will align with the truck’s model year and configuration, reducing guesswork and rework. The right sequence—careful removal, meticulous edge prep, precise fit, controlled welding, and thorough sealing—will accumulate into a result that feels both authentic and dependable. In the end, the floor pan is more than a patch of metal. It is the safe, stable surface that supports every journey you plan to take in the Chevy truck you are rebuilding. For ongoing reading and practical tips on similar topics, you can visit the Master Truck Repair Blog for deeper discussions on truck maintenance and repair strategies. This resource can provide you with a broader perspective on how floor pan work fits into the wider practice of keeping classic trucks in reliable, road-ready condition.
External resource: For additional guidance on choosing and installing quality floor pan replacement kits, see: https://www.classictrucksupplies.com/repair-kits/floor-pan-replacement-kits
From Rust to Rigidity: Rebuilding Chevy Truck Floor Pans with Safety, Skill, and Sound Practice
The floor pan of a Chevy truck is more than a sheet of metal. It is a fundamental part of the cabin’s foundation, a structural bridge between the body and the frame, and a shield against the wear and moisture that ride up from the undercarriage. When rust gnaws at this surface or when significant corrosion saps its stiffness, the entire vehicle can lose integrity. Yet, with careful assessment, a clear plan, and disciplined execution, a repair or replacement can restore rigidity, preserve safety, and steward the truck’s value for years to come. This chapter threads together the practical realities of repairing floor pans in a Chevy truck with the realities of working in a shop or a well-equipped driveway. It respects the line between what a DIYer can responsibly tackle and where the hand of a professional is the safer, wiser choice. In the end, it isn’t merely about patching a hole; it’s about reinstating the vehicle’s designed strength and ensuring the floor remains a secure base for every journey ahead.
The first step is a thorough assessment. Floor pans sit at the front lines of moisture and impact, so expect rust to begin at the edges near seams, drain holes, or along vulnerable corners where carpet and insulation trap dampness. A careful inspection considers more than surface appearance. The rust may extend beneath the top layer, nibbling at spot welds, cross members, and punching through to become holes that compromise structural integrity. Sagging floors are a red flag; they signal weakened support for the driver’s position and seat mounts, as well as potential misalignment of the pedals and transmission tunnel. An honest appraisal asks: Is this a cosmetic scar, a localized pocket, or a sign of widespread penetration that requires a full panel replacement? If the damage is confined to a small patch, a precise patch repair might be enough. If anti-corrosion measures have failed or the corrosion has hollowed out critical anchoring points, replacement becomes the prudent path. In restoration projects, the choice often leans toward a floor pan kit that mirrors factory dimensions and includes reinforcements to maintain original strength. The material choice—OEM or high-quality aftermarket—should align with long-term durability and authenticity goals. The goal is not a quick fix but a durable, sealed, factory-like floor that behaves as the chassis intended it to behave under load and movement.
Planning begins with interior and underbody access. Remove carpeting, seats, and trim to expose the metal work and inspect the edges of the existing pan. A clean surface is essential for fitment and weld integrity. You’ll need to determine whether you can salvage portions of the existing pan or if the entire section must be cut out. The decision hinges on edge quality, the continuity of the welds to surrounding panels, and the health of adjacent structural members. For minor surface rust, you might treat the area with rust converters and prepare it for a careful coating, followed by a matched paint to stop further corrosion. But take note: surface smoothing does not solve deep-seated structural decay. In those cases, removal and replacement of the affected pan are usually the safest, most reliable options. When restoration is the aim, a floor pan kit designed for your model year and truck configuration helps preserve authentic geometry, anchor points, and the overall look of the floor. The kit approach also often includes reinforcements where the factory placed them, ensuring the repaired area bears the same load paths as the original sheet metal.
If you decide to proceed with replacement, the process demands careful preparation and the right tools. Cutting out the damaged section requires clean, square edges to ensure a snug fit. A plasma cutter can deliver neat, burn-free edges, while a reciprocating saw with a metal-cutting blade can serve as a practical alternative in a home shop. The key is to work slowly, maintain a steady hand, and verify fit before any welding begins. A new floor pan—whether OEM or aftermarket—must align with the surrounding floor and cross members. The edges should meet the original contours, and every mounting point should align with the drill points or stampings in the new panel. Without a precise fit, welded seams may warp, and the panel may sit unevenly, creating gaps that invite moisture ingress and rust down the line. In a well-equipped shop, professionals often use a jig or frame alignment system to ensure the panels are held square as they are welded in place. This is not merely about aesthetics; misalignment can quietly erode safety margins and lead to handling quirks that show up in everyday driving and in a collision.
The welding phase is the heart of the repair. It requires respect for metal quality, alloy compatibility, and the ambient conditions in which you work. A properly executed weld is clean, continuous along the seam, and free of burn-through or undercut. In terms of materials, choose a pan that matches the surrounding metal’s grade and thickness as closely as possible. The entire repair relies on a weld that preserves the water-tight nature of the floor and maintains the panel’s rigidity. After welding, the seam should be ground flush and sealed. A high-quality seam sealer prevents moisture from wicking into the joints, and an anti-corrosion coating or undercoating provides an additional layer of protection against road salt and humidity. The goal is to return the floor to a state where moisture cannot linger, and where the welded seam behaves like a continuous, factory-created bond rather than a hollow point for future rust.
Even with a precise fit and a solid weld, attention to the post-repair environment remains essential. Proper finishing is not cosmetic; it is functional. Sanding and feathering the surface prepares it for primer and paint, but more important is sealing the underside and inside the wheel wells. The final coatings should resist chipping and abrasion, while also offering a moisture barrier that extends life in a salt-logged climate. For restoration projects, the finish should mirror the vehicle’s original look and texture as closely as possible, a detail that can influence the vehicle’s value and authenticity. If the project centers on long-term durability rather than perfect restoration, a robust undercoating plus a topcoat that blends with the interior can suffice while still delivering reliable corrosion resistance. In any case, the work must be thorough, with attention paid to every seam, corner, and transition where moisture and rust tend to concentrate.
For those who are dedicated to authentic restoration, it is wise to consider the reinforcements that accompany many floor pan kits. Factory rails and braces are not merely decorative attachments; they serve a critical structural function. A kit that includes reinforced cross members and mounting tabs helps ensure that the floor remains a stable platform under load. When you bolt or weld in a reinforcements kit, you are re-creating the structural logic of the original assembly. This is where a careful alignment process becomes non-negotiable; even a small misalignment can translate into a crooked floor or a misaligned seat, which in turn affects driver safety.
The decision to seek professional help is not a confession of defeat. It is recognition that floor pan repair sits at the boundary between skilled metalwork and structural engineering. Professionals bring access to specialized tools that most hobbyists cannot justify owning for a single project. Spot welders, precise metal cutters, and frame alignment systems are part of their toolkit. They also understand the subtle but important differences in metal grades and compatibility. A seasoned auto body technician can anticipate edge conditions that a DIYer might miss, check the fit under the car, and perform welds that endure years of vibration and heat cycling. They can also advise on whether a full panel replacement or a salvage approach offers a safer, longer-lasting result given the truck’s current condition, its age, and its intended use. If the repair involves frame alignment, suspension geometry, or other structural changes, the expertise of a shop becomes even more essential. The safety of occupants and the performance of the vehicle during heavy use depend on these professional checks and balances.
Safety must infuse every step of the repair. Begin by disconnecting the battery to prevent any sparks near exhaust or fuel vapors. Wear proper PPE—heavy gloves, safety glasses or a face shield, a respirator when grinding or welding, and sturdy clothing that covers the skin. Work in a well-ventilated space; fumes from cutting and welding can pose both short-term and long-term risks. Support the truck’s frame securely with jack stands and wheel chocks; never rely on jacks alone, especially when you are removing large panels that alter the vehicle’s weight distribution. Keep a clean, organized workspace so metal shards do not become hazards, and ensure that all tools are in good condition and suited for the metal you are working with. These precautions are not obstacles to progress; they are the foundation that makes the difference between a repair that lasts and one that fails under stress.
Beyond the mechanics of the repair lies a broader philosophy about maintenance and prevention. Once the floor is repaired, the final step is to keep moisture away from vulnerable joints and seams. Seal, coat, and protect all exposed metal surfaces, and pay particular attention to the underside where salt and moisture tend to concentrate. Regular inspections after heavy washdowns, after winter, or after rough commutes can help catch early signs of new rust, allowing you to address issues before they become expensive, time-consuming fixes again. In a restoration frame of mind, you may choose to spray interior cavities with rust-inhibiting agents or to apply a redundant moisture barrier in critical areas. In a practical, everyday-use scenario, a proactive maintenance plan that includes periodic inspections of the floor and adjacent panels will extend the life of the repair and preserve the truck’s structural integrity.
For readers seeking a practical roadmap and additional, grounded guidance, the Master Truck Repair LLC blog offers hands-on discussions that complement this chapter. You can explore more practical tips and real-world examples there as you plan your approach. Master Truck Repair LLC blog. In every step, the emphasis remains on careful assessment, precise fabrication, and thoughtful protection against future corrosion. This is not merely about patching a hole; it is about rebuilding a vital part of the truck’s skeleton so that every drive, every lever pull, and every mile feels solid and secure.
As you move from planning to execution, remember that the repair you choose should fit your truck’s current condition, your skill level, and your long-term goals for the vehicle. If your S10 or larger Chevy truck carries decades of use and a history of rust, a full panel replacement with reinforcements can restore factory-like stiffness and safety. If the damage is localized and the edges remain sound, a well-executed patch repair can be a sensible, cost-effective step that buys time while maintaining structural integrity. Either way, the central principle holds: precision, protection, and patience. The floor pan is not just a panel to be fixed; it is the anchor that secures the vehicle’s body to its supporting frame, the point where moisture and wear challenge the design, and the area where careful work today preserves performance and safety for tomorrow.
For those who want a structured, step-by-step reference, the external floor pan repair guide provides detailed procedures, safety checklists, and expert recommendations. It serves as a reliable external resource to supplement the knowledge shared here: https://www.autorepair.com/chevy-truck-floor-pan-repair-guide. This kind of guide can help you confirm fitment tolerances, welding techniques, and sealing practices as you finalize your repair plan. In addition to following an external guide, keep in mind the value of consulting model-specific resources and communities. Classic Chevy truck forums and restoration groups can be a source of model-year specifics, including inner tunnel geometry and the exact reinforcements used in certain production runs. A careful blend of professional guidance, well-documented DIY practice, and model-aware planning is the best path to a repair that not only looks right but also behaves safely under real-world driving conditions.
Final thoughts
Repairing floor pans in Chevy trucks is not merely a task but a necessary investment in the longevity and safety of your vehicles. This comprehensive guide has equipped fleet managers, trucking company owners, and other stakeholders with crucial knowledge—from accurate damage assessment to advanced repair techniques. Prioritizing these repairs not only enhances vehicle performance but also maintains structural integrity critical for safety in operational environments. As you approach these repairs, always ensure that stringent safety measures are adopted, whether undertaking the work yourself or collaborating with professionals.

