Truck box latches are essential for the safety and functionality of fleet vehicles. Regular maintenance and timely repairs can prolong their lifespan, ensuring cargo security and operational efficiency. This guide delineates specific methods for addressing common issues associated with latches, including breakage, misalignment, rust, and electronic failures. Each chapter offers targeted solutions, empowering operators to take proactive measures and maintain optimal performance across their fleets.
Lock, Load, and Restore: A Practical, Seamless Guide to Repairing Truck Box Latches
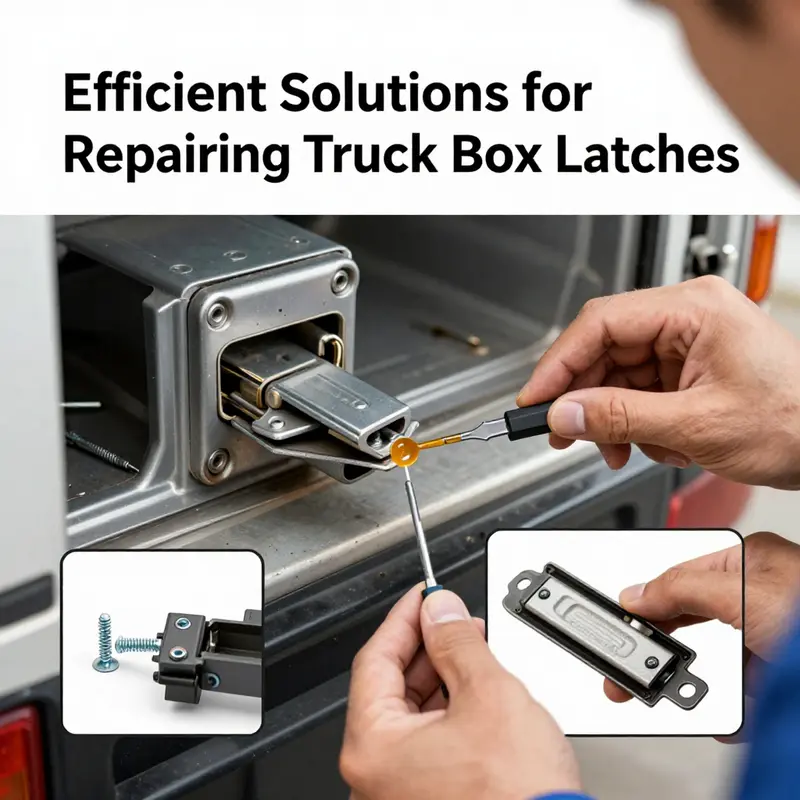
The latch on a truck box isn’t just a stubborn hinge; it’s a small yet critical gatekeeper for your cargo and your peace of mind. When a latch gives way, it can turn a routine delivery into a scramble to secure the load, a scramble that isn’t safe for you or others on the road. This chapter treats latch repair as a craft of assessment, restraint, and restoration. It honors the fact that some fixes are simple, some require parts, and a few demand professional hands. The goal is to keep you moving with confidence, not to sell you on a single solution. As you read, picture the door you rely on every day, the latch that keeps it shut against a gust, a spray, or a stray rock on a gravel road. If the latch is loose, misaligned, stuck, or damaged beyond quick repair, there are routes that stay true to the cargo’s safety and the vehicle’s integrity. And where the line between home repair and professional service lies is clear enough to guide you through the moment you face it, so you don’t compound a problem with a hasty fix.
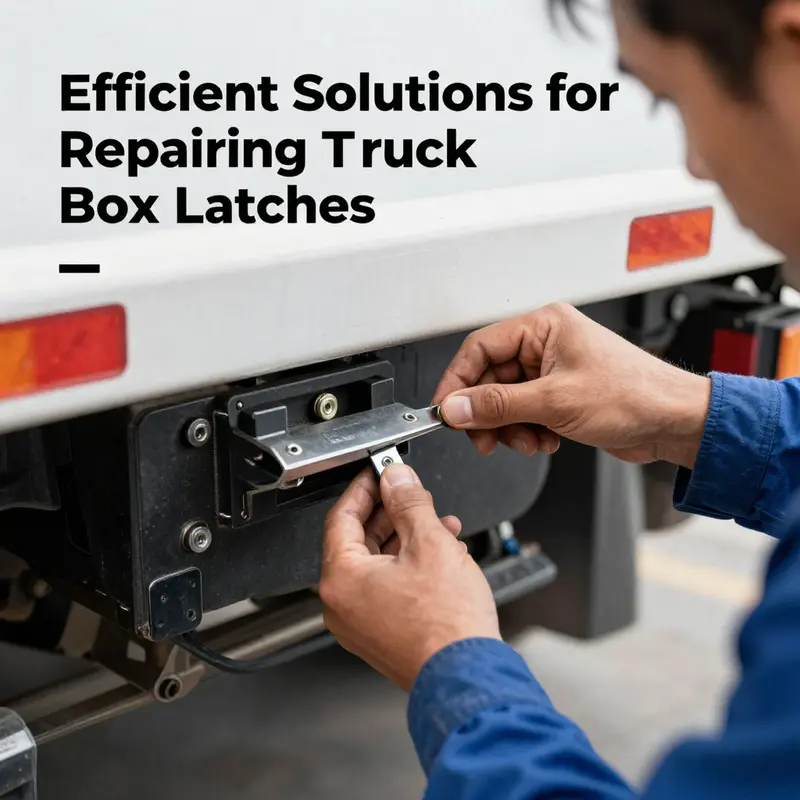
Begin with a clear, safe assessment. Safety isn’t a cursory concern here; it’s the first step toward a durable solution. If the door feels insecure or the latch isn’t engaging properly, pull over in a safe location and secure the load with sturdy restraints until you can evaluate further. A cautious approach is not a sign of weakness but a smart recognition that a compromised latch can fail in transit, with consequences that extend beyond a single trip. With the truck parked, inspect the mechanism from the outside and the inside. Look for loose screws, bent arms, a cracked housing, or any sign that a spring is no longer springing. In many trucks, the problem starts with a minor misalignment or a loose fastener that a few minutes of attention can fix. If the door is truly secure only when jammed or held in a certain position, you’re likely dealing with misalignment or a bent component rather than a broken part. In such cases the fix may involve simple realignment, not a full latch replacement.
When it comes to repair, you’ll encounter a spectrum of issues, each with its own best practice. For loose or bent components, the narrative is almost always about securing the anchor and guiding the latch into its proper orbit. Begin by tightening any screws that secure the latch to the frame. Use a torque wrench to apply a measured 25–30 newton-meters, stopping short of over-tightening, which risks stripping threads or cracking the mounting surface. If the striker plate—the metal piece on the frame that the latch hooks into—has drifted, nudge it back into alignment with a screwdriver or an appropriately sized Allen key. Small adjustments can make a big difference: a fraction of an inch of misalignment can keep the latch from engaging smoothly. It’s worth taking time to verify operation by latching and unlatching multiple times, taking note of any resistance, uneven engagement, or unusual sounds. In some older trucks, where the bed and cab have settled at different rates, a reinforcing bar installed between the bed and cab can reduce stress on the latch points over the long haul. The practical upshot is straightforward: a quiet, firm engagement is the mark of a well-aligned, well-fastened latch.
If the latch is stubborn, jammed, or stubbornly resistant to movement, the culprit is often rust, dirt, or old grease baked into the moving parts. A well-lubricated mechanism behaves predictably; a dry or crusty one resists. Begin with surface lubrication: apply a penetrating spray directly to the lock tongue and the pivot points, then work the latch back and forth a dozen times to coax the spray into every recess. If rust has formed or debris has built up in the mechanism, you may need to disassemble the accessible parts to clean and re-lubricate them. For tougher cases, disassembly followed by scrubbing with a wire brush and a moderate solvent can free seized pieces. After cleaning, reassemble and apply a light coating of a grease designed to stay put on metal-to-metal surfaces. A Teflon-based grease, in particular, provides low friction and long-lasting lubrication for moving parts exposed to the elements. For future resilience, consider sealing external latch components with weatherproofing measures—weatherproof covers or seals—that slow the ingress of water, salt, and dust.
When the internal parts fail, a broken spring, a cracked lock tongue, or a damaged pawl means the entire mechanism is no longer dependable. In such cases replacement is usually the most reliable route. Start by removing the old latch assembly with the appropriate screwdriver, keeping track of mounting hardware and the orientation of each part. Source a latch that matches your truck’s make, model, and year, ensuring that the mounting pattern, striker plate geometry, and engagement points align with the existing frame. Install the new unit with the same level of care you would apply to any critical component: verify that screws and bolts are snug, align the latch so that it engages smoothly without binding, and test by opening and closing repeatedly to simulate real use. If the housing is cracked or severely deformed, repair isn’t practical. The safest course is a full replacement with a unit engineered to the original specifications so that security and weather sealing remain intact.
Electronic or remote latches add another layer of complexity. In newer trucks, door modules communicate with key fobs and the vehicle’s central computer. If the latch fails due to battery drain in the remote fob, start with the obvious and simple check: replace or recharge the key fob battery and see if the system responds. If the problem persists, a reset can sometimes clear a glitch: disconnect the vehicle battery for about ten minutes to reset the door module, then reconnect and test. If the fault lies in signaling or sensor data, a diagnostic tool (an OBD2 scanner or equivalent) can reveal sensor errors or communication faults within the door module. In persistent or recurring cases, the literature points to upgrades in sensing technology—such as a higher-reliability Hall effect sensor—to reduce interference and false readings. While these electronic upgrades offer meaningful gains, they usually sit at the boundary between DIY and professional work, especially when the control module must be interrogated or reprogrammed.
No chapter on repair is complete without a clear sense of when to call in help. Minor repairs that restore function without compromising security are the kinds of tasks many do themselves with basic tools. But if you discover internal components that show excessive wear, or the latch housing is cracked, or the mechanism refuses to engage despite careful adjustment and lubrication, seek professional assistance. A locksmith or auto repair technician can source exact replacements, confirm proper alignment, verify the integrity of the locking system, and ensure weather sealing remains effective. In the realm of safety, when a latch has shown repeated failures, it is not wise to push through another cycle just to save time. A failure at highway speeds can be disastrous, and the cost of a professional fix often saves more than the immediate repair by reducing risk and downtime.
Maintenance is not a one-time act but a habit that lengthens the life of your latch and, by extension, your cargo protection. Regular inspections—ideally aligned to routine maintenance visits or after returning from particularly wet or salty environments—show early signs of wear: loose fasteners, slight misalignment, or dull movement. Clean the mechanism to remove dirt and salt exposure, then re-lubricate and re-tighten as needed. Maintaining the latch is as much preventive as restorative: by addressing minor wear before it becomes a problem, you reduce the likelihood of sudden failures on the road.
The decision to repair versus replace also hinges on planning and cost awareness. While minor repairs can be economical when performed with common hand tools and a small selection of components, persistent issues, structural damage, or recurring electronic faults warrant a broader plan. In practice, consider budgeting for routine maintenance that includes eventual latch checks and, if necessary, part replacement. This perspective aligns with broader truck maintenance strategies and helps you avoid emergency expenses. For readers looking to integrate smart financial planning into their repair habits, consider resources that cover routine maintenance budgets and contingency planning, such as budgeting for routine truck maintenance. Budgeting for Routine Truck Maintenance.
When you assemble the practical toolkit for latch repair, you’ll find it’s not about a single clever trick but about a sequence of reliable steps. Inspect, secure, realign, lubricate, test, and if needed, replace. The steps interlock: a properly aligned striker plate makes engagement seamless; clean, well-lubricated components reduce wear; a robust latch housing, free from cracks and deformation, protects the integrity of the system. Testing is the capstone of any repair. After any adjustment or replacement, close the door firmly, then open it again, again, and again, simulating the loads and cycles the latch will experience on the road. Only after repeated, consistent engagement should you rely on the latch under normal operating conditions. If in doubt, document the repair and seek a professional assessment. Documentation helps track wear, plan future maintenance, and explain decisions if you ever need to justify a repair to a fleet manager or insurer.
For those who want a broader reference point on the topic, a detailed technical walkthrough published by a major automotive publication offers a comprehensive view of trap mechanisms and latch assembly behavior in the context of modern trucks. This external resource can provide additional diagrams, torque specs, and troubleshooting tips that complement the practical experience described here. External references like this are especially useful when you’re facing complex electronic or integrated locking systems and you want a broader engineering perspective on how modern latch assemblies interact with vehicle control systems.
The approach outlined here emphasizes practicality, safety, and longevity. It avoids gimmicks and focuses on methods that respect the design of the latch and the box it protects. In the end, you’re preserving not just a door, but the integrity of the cargo you carry and the reliability you owe to yourself on long hauls. The road will demand enough of your equipment; with thoughtful repair and routine maintenance, the latch can meet that demand again and again.
External reference: https://www.motortrend.com/trucks/maintenance/repairing-truck-bed-latches/
The Quiet Alignment: Mastering Misaligned Latches on a Truck Box to Restore Reliable Closure
A truck box that no longer sits squarely on its frame or refuses to latch cleanly is more than a nuisance. It is a signal that the door, hinges, and frame have begun to move as a system rather than as separate parts. In demanding work environments, where exposure to rain, salt, and heavy vibration is constant, the geometry that keeps a box door sealing and gripping must stay intact. Misalignment is often progressive, starting with small gaps that widen over time, or with a latch that catches irregularly and then fails to hold securely. The remedy, when approached with patience and precision, is not a dramatic overhaul. It is a measured set of adjustments that reestablishes the relationship between door, latch, striker plate, and frame. When done correctly, the outcome is smooth operation, dependable sealing, and extended life for the hardware that keeps valuable cargo protected. The process begins with a careful assessment, the kind that treats the truck box as a small mechanical ecosystem rather than a collection of isolated parts. You step back, observe the door in its closed position, and feel for uniformity in the gaps around the edges. A well-aligned door should present even daylight or even shade across its sides when closed. If the gaps are noticeably larger at the top than at the bottom, or if the bottom edge binds against the weather seal, you are witnessing a misalignment that deserves attention, not quick grease and a shove. It is tempting to jump straight to tightening screws or nudging the striker plate, but alignment is a three-part dance: the hinges, the door itself, and the striker plate that the latch grabs as the door swings shut. Each plays a role, and each can drift under the duress of daily use. In practice, the first step is to verify the hinges. If they have loosened, the door will sag and the latch will lose its point of engagement. With the vehicle parked on a level surface and the engine off, you inspect the hinge bolts and observe whether a small rotation of the door reveals improved alignment. The adjustment is subtle. You loosen the bolts just enough to permit a gentle repositioning, and you test the door through several cycles before re-torquing. The objective is not to force the door into a rigid position but to coax it into a state where the gaps around all four sides are uniform and the latch can engage without resistance. The torque you apply to the hinge bolts matters. Too little and the door will wander; too much and the metal threads will strip or the door shell may distort. In a practical sense, a range of 25 to 30 Newton meters provides a solid baseline for securing such components in typical light-to-medium-duty truck boxes. This is not a universal prescription, but a benchmark that aligns with common expectations for structural fastenings in the bed-to-cab region of a mid-sized service truck. As you adjust, you pay close attention to how the door meets the striker plate. The striker is the fixed metal piece on the frame that the latch hooks into. If the striker is too high, too low, or offset to one side, the latch will struggle to engage consistently or will only catch intermittently. Loosen the striker plate screws and shift the plate in small increments. After each micro-adjustment, close the door firmly and observe the latch’s travel. The latch should engage with a decisive, almost tactile snap, and the door should close with a uniform seal along the weather strip without requiring extra force. If the latch still lingers or binds, the problem may lie in the latch itself or in a bent frame. In those cases, the solution extends beyond simple repositioning. Debris or corrosion within the latch housing can create enough resistance to throw off alignment. A careful cleaning—removing rust buildup, dirt, and old lubricant—is worth the effort. Use a light penetrant to loosen any stubborn deposits and remove them with a soft brush. Then re-lubricate the moving parts with a light, dry-lubricant or a silicone-based spray. The goal is to reduce friction without attracting excess dirt. A small amount applied to the latch barrel, the pivot points, and the striker interface helps the components move freely. Lubrication is not a cure-all, but it often makes a meaningful difference in engagement consistency and quietness of operation. Transformation of a misaligned latch into a dependable one frequently hinges on ensuring that no single point bears disproportionate stress. Old trailers and work trucks often experience frame sag or minor distortions in the bed that accumulate over miles and seasons. In such cases, a simple reinforcing strategy can help. A steel reinforcement bar placed between the bed and the cab can relieve stress from the latch points and preserve alignment over time. While this approach is more involved, it is a pragmatic route for aging fleets or vehicles that routinely shoulder heavy loads. When you consider reinforcement, you do so with an eye toward the long game: the goal is to minimize the slopes and shifts that gradually push a latch out of alignment rather than chasing a quick fix that only lasts a season. If your vehicle uses a more modern electronic or remotely actuated latch system, the scope expands beyond mechanical adjustment. A misalignment here can be exacerbated by sensor or actuator drift, or by software that does not account for door travel accurately. In these cases, you can still begin with the mechanical aspects—checking hinges, door gaps, and striker plate alignment—and then verify that the door module, the wiring harness, and the battery supply for the electronic portion are delivering stable signals. A refreshed alignment often reduces the incidence of false sensor readings, and it can lower the frequency of digital recalibration attempts needed to maintain proper operation. The narrative of alignment also carries forward into routine maintenance. Industry guidance emphasizes that consistent tightening and periodic review are key to preserving latch life. A practical takeaway is to integrate a lightweight inspection and adjustment cadence into a regular maintenance routine. The frequency can be tied to miles driven or seasons endured; many operators find it prudent to reassess latch alignment after major weather events, after salt exposure, or following a heavy-duty job that conduces significant door movement. The idea is not to chase perfection with obsessive minor tweaks but to maintain a stable relationship among hinges, door, and striker plate that keeps the door sealing reliably without requiring excessive force. When you adopt this mindset, the act of adjusting misaligned latches becomes less about crisis response and more about preventive care. It is a craft built on observation, measured action, and a willingness to iterate. If you are unsure about a particular adjustment, consult the vehicle’s service manual or seek guidance from a professional who understands the job’s demands. For model-specific guidance, you may also review reputable maintenance resources that discuss door and latch systems in similar commercial configurations. Even with careful adjustments, some scenarios will exceed home-based repairs. A door that consistently fails to align after careful realignment of hinges and striker plates, or a frame that shows visible bending, calls for professional intervention. In those moments, a technician can reframe the door geometry, replace worn hinge assemblies, or realign the frame using tools and techniques designed for structural correction. The aim is to preserve safety and sealing integrity, not to force a fix that could compromise the door’s performance under load. As a practical step beyond the immediate alignment work, consider documenting your maintenance activities. Note the door gaps, the position of the striker plate, the torque values used on hinges, and any follow-up tests. This record helps you track progression and provides a useful reference for future inspections or for a technician who may service the truck again. It also reinforces a preventive mindset by making it easier to notice when a previously corrected misalignment begins to drift again. For readers who want a model-wide perspective on sustaining truck box hardware, a broader maintenance approach can be helpful. The idea is to connect latch alignment with the broader picture of routine upkeep, including weatherproofing, hinge inspection, and periodic retightening of fasteners. A cohesive plan that treats latch reliability as part of overall box integrity yields the best long-term results. If you want to explore practical guidance on budgeting and planning for routine truck maintenance that includes latch work, see Budgeting for Routine Truck Maintenance. This resource can help you allocate time and funds for inspections, small repairs, and minor upgrades that reduce the likelihood of more serious faults developing later. It reinforces a disciplined approach to keeping the box functional in demanding environments and helps you avoid the cost and downtime that come with unexpected latch failures. In sum, addressing misaligned latches on a truck box is usually a straightforward affair when approached with care and method. Begin with the door’s position in relation to the frame, then refine hinge tension and striker alignment in small steps. Clean and lubricate to reduce resistance, and consider reinforcement in older frames to prevent future drift. Test by cycling the door multiple times to confirm smooth engagement and a consistent seal, and maintain a simple, documented record of what was done and why. If the frame or latch shows obvious damage or persistent misbehavior despite careful adjustments, don’t hesitate to call in a professional who can restore structural integrity and restore confidence in the box’s closure system. The practice of careful alignment, modest adjustments, and proactive maintenance becomes a quiet but powerful routine that keeps your truck box reliable under the harshest conditions. External reference for visual guidance on misaligned truck door latches can be found in editorials that illustrate common issues and practical remedies, such as Autocar’s step-by-step guide on fixing a sticking or misaligned truck door latch: https://www.autocar.co.uk/article/how-to-fix-a-sticking-or-misaligned-truck-door-latch
Rust Weighs Down the Latch: A Practical Path to Repairing a Stuck Truck Box
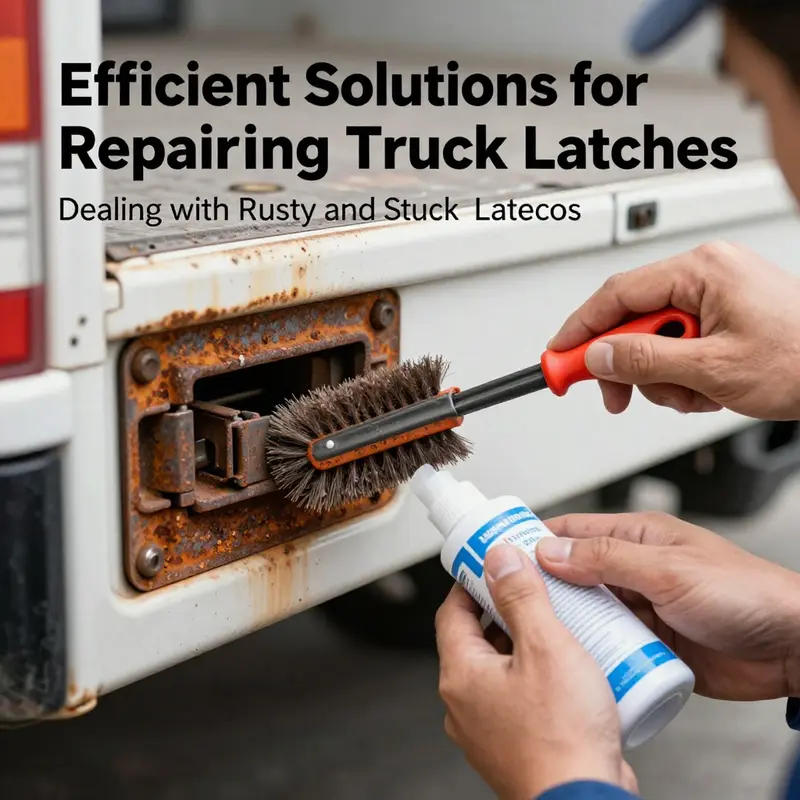
Rust can turn a simple, daily task—opening or closing a truck box door—into a stubborn ordeal. A latch that once clicked with a clean, confident engagement now balks, sticks, or refuses to release at the worst moments. When the metal around the latch starts to corrode, a door handle that should swing freely can feel locked in place by years of damp weather, road salt, and the occasional misstep of a heavy load hitting the latch at the wrong angle. In those moments, it helps to treat the problem not as a single fix but as a small, ongoing maintenance project. The goal is not just to get the latch working today but to slow the march of rust, restore reliable operation, and keep the box secure through seasons of use and exposure.
From a practical standpoint, the first step is a careful assessment that blends safety with a clear sense of outcome. Park on a level surface, turn off the engine, and remove the keys. Protect your hands and eyes because rust flakes and grit can fly when you work the mechanism. Begin with a simple test: can you close the latch firmly, then reopen it after a few normal cycles? If it struggles to engage or feels loose, you’re facing either corrosion that binds the moving parts or a misalignment that prevents proper engagement. Both issues require different, though not mutually exclusive, approaches. The general philosophy is to address rust and buildup, then reintroduce smooth motion with targeted lubrication and, where necessary, gentle realignment. If the latch is structurally compromised, the path becomes replacement or professional intervention, but most rust and sticking issues are well within the realm of careful home repair when done methodically.
Rust is the primary antagonist here because it changes the geometry of the latch and corrodes the interfaces where metal meets metal. The treatment is twofold: break down the rust and restore the ability of the latch to move, then reaply a barrier that slows future corrosion. A metal de-rusting agent is applied directly into the lock cylinder and along the latch mechanism to loosen deposits that have locked the parts together. The agent needs time to work, typically allowing it to penetrate and loosen the corrosion for a sustained period—often around 30 minutes or more, depending on the product and the severity of the buildup. After the de-ruster has done its work, a penetrating lubricant is introduced to loosen the remaining bonds and to carry away loosened rust particles. A light, even spray into the lock cylinder and along the moving interfaces helps the parts begin to move again, and the latch can then be worked through several cycles to distribute the lubricant evenly. The key here is patience and repeated gentle operation rather than forcing a stubborn mechanism, which can chip away at metal and hasten failure.
In stubborn cases, a controlled application of heat can aid the process. A low-temperature heat source applied cautiously to the surrounding metal can expand the metal slightly and relieve tightness caused by rust. The heat must be used with care; plastic seals or rubber gaskets around the latch can warp or degrade if overheated. The guidance here is judicious warmth rather than ACS-offense hot pursuit. If you do use heat, keep it gradual, monitor for any softening of adjacent plastics, and stop if you notice any distortion. The next steps are protective rather than punitive: re-treat with a rust converter or remover if needed, and seal gaps to minimize moisture ingress. The overarching aim is to restore the door’s natural swing with minimal force, then prevent a quick recurrence of the same issue.
Once the latch begins to respond again, mechanical cleaning and maintenance become essential. Debris—dirt, grit, and small stones—often works its way into the latch housing and can jam the moving parts. An industrial vacuum is well suited for this task, removed to clear the frame around the latch, followed by a careful wipe-down of accessible surfaces with a clean rag. A tiny brush can help dislodge stubborn particles from corners where a rag cannot reach. After cleaning, reapply a lubricant designed for automotive use. The lubricant should be chosen for its ability to cling to metal, resist fling-off, and provide long-lasting protection in a dusty or wet environment. In some cases, a PTFE-based grease is a good option because it forms a slick, low-friction film that reduces wear at the sliding interfaces. The goal is a thin, even layer that allows the latch to move smoothly without attracting excess grit.
Following cleaning and lubrication, the next move is a careful check of alignment. A latch that closes but does not engage fully, or one that feels loose, is often a sign that the striker plate—the metal piece on the frame the latch hooks onto—is out of position. A simple realignment can dramatically improve engagement. With the latch in the closed position, inspect the striker plate and observe how the latch engages. If there is a tendency to miss, gently loosen the mounting screws, shift the striker plate a fraction of a millimeter, and retighten. The aim is a precise alignment that allows the latch to snap shut with a definitive click and release with the same reliability. It’s a small adjustment, but it can have a large impact on long-term durability. For older trucks with sagging frames or worn mounting points, a reinforcing bar installation can reduce stress on the latch points and prolong life. While this might sound like a big modification, it is essentially a way to distribute load away from the vulnerable latch mounting and keep the mechanism in its optimal operating zone.
In some cases, a latch becomes stuck due to a combination of corrosion and mechanical wear at play. You may notice that while the latch moves freely after cleaning and lubrication, it still binds under load or at certain temperatures. This is where a more comprehensive approach is warranted. Check for worn springs, cracked levers, or a seized lock cylinder. If these internal components are damaged, a simple cleanup will not suffice. In such situations, replacing the latch assembly with a unit that matches the truck’s model and year is often the most reliable route. Replacement requires no guesswork about fit, and it provides a clean, factory-aligned interface that can be expected to endure. If you decide to go this route, ensure that the new latch is installed with proper torque on mounting screws and that the latch’s travel matches the striker plate’s arc. A misfit new part can lead to new problems, so the installation needs patience and precision.
Even when the latch is functioning again, preventive habits matter. Regular inspections every 20,000 miles, or after exposure to water or extreme weather, help catch problems before they become failures. A simple routine of cleaning, lubricating, and rechecking alignment can extend latch life by significant margins. A weather-resistant seal or anti-dust strip around the door frame can dramatically reduce moisture and debris entering the latch area, which is especially valuable in wet, salty, or dusty environments. If environmental exposure is chronic, upgrading hardware to corrosion-resistant materials—such as stainless steel components or coatings with low friction properties—can provide meaningful protection. These measures are not about short-term gains; they’re about building a resilient, dependable system that continues to perform year after year, even under tough conditions.
There are circumstances when professional help is the wisest course. If the latch remains seized after repeated lubrication, if you notice structural damage to the door or frame, or if the internal components show signs of cracking or severe wear, a professional mechanic or locksmith is the safest option. They can diagnose whether the problem is limited to the latch or indicates a larger issue with the box, frame, or hinge alignment. A professional assessment can prevent a cascade of related problems, such as door misalignment that harms weather sealing or accelerates rust elsewhere on the body.
As you work through rust and stuck latches, remember that the objective is reliability. A well-maintained latch reduces the risk of unexpected openings, which can be dangerous on the road and costly in terms of cargo security. The repair philosophy is straightforward: remove what hinders motion, restore smooth movement, and protect against future corrosion. This approach makes it possible to handle many latch issues at home with basic tools, but it also respects the reality that some situations demand professional hands. The end result is a truck box that opens and closes with the same confidence you expect from the rest of the vehicle.
For readers who want to broaden their practical repair knowledge beyond latches, a complementary, hands-on repair guide can be helpful. This type of resource emphasizes the same core principles—careful assessment, methodical cleaning, appropriate lubrication, and precise parts compatibility—and can provide guidance for related repair tasks you might encounter on a truck. You can explore a practical guide such as the DIY Windshield Repair Guide for Truck Owners to see how durable repair workflows translate across different components of the vehicle. This kind of cross-topic learning supports a deeper, more durable repair practice without substituting professional service when safety is at stake.
In summary, rusty and stuck latches on a truck box deserve a thoughtful, layered response. Start with a clear safety-focused assessment, then break down the problem into rust removal, mechanical cleaning, and alignment checks. When necessary, replace the latch assembly with one that fits your model, and always follow through with preventive measures that shield the latch from future exposure. By combining careful technique with prudent maintenance, you can restore reliable operation and extend the life of the box, keeping cargo secure and the vehicle ready for the next haul.
External resource: https://www.autoblog.com/2025/10/29/truck-box-latch-rust-solution/
Fixing Electronic Latch Failures on a Truck Box

Electronic latch failures on a truck box rarely point to a single, obvious fault. More often, they arise from a chain of small issues that intersect at the lock mechanism, the power source, and the control electronics. The problem can be as simple as a weak battery in the remote or the box’s internal module losing signal integrity, or as complex as a sensor or control unit drifting out of spec. In practice, diagnosing these failures is as much about a disciplined method as it is about the tools you have on hand. The goal is not just to fix the latch for one trip, but to understand how the system behaves under load, in weather, and across a range of voltages. A truck box that reliably locks and unlocks when commanded contributes to cargo safety, reduces the risk of theft, and lowers the chance of a late-night roadside fix turning into a multi-hour ordeal. Read in sequence, the steps below offer a practical, field-appropriate approach that respects safety, durability, and the realities of real-world use. It also aligns with preventive practices that keep electronic locking systems from becoming chronic problems, rather than chasing after the latest gadgetry in pursuit of a silver bullet.
Begin with the power source, because without adequate voltage, the entire electronic chain can behave unpredictably. The most common trigger for electronic latch failure is a depleted or failing battery in the remote or in the truck box’s own power system. A simple multimeter check is the fastest way to confirm whether the battery is up to the task. If a remote or internal supply reads below 2.7 volts under normal load, replacement is warranted. This threshold isn’t arbitrary; it corresponds to the point where the electronics begin to lose enough punch to reliably drive the actuator, report status, and maintain stable communications with the door module. Replacement should be done with a correctly specified battery, matched to the system’s voltage requirements, so you don’t create a new source of resistance or noise that can throw the circuit off again. In the long run, a truck box designed with smart power management—the kind that throttles power usage and prioritizes essential functions—can extend battery life and reduce the frequency of this recurring fault. Such improvements aren’t just theoretical; they translate into tangible reductions in nuisance failures and better reliability in the field.
If the battery is healthy, the next step is to consider electromagnetic interference, or EMI. EMI can distort the radio signal between the key fob and the lock receiver, especially when you park near large electronic devices, towers, or metal structures that reflect signals. The simplest test is observational: carry out a few unlock/lock cycles in a few different locations, steering clear of obvious EMI hotspots like substations or dense arrays of electronics, and note whether the problem recurs. If the latch function becomes intermittent only in certain locations, EMI is likely the culprit. If, however, the problem persists regardless of where you park, the fault most likely lies deeper in the electronic chain—perhaps in the sensor array, the receiver module, or the data line that carries the lock signal to the actuator. In such cases, a more rigorous diagnostic approach is warranted, because EMI can mask a sensor drift or a failing control unit that won’t respond consistently to commands.
When the battery checks out and EMI is ruled out, the focus turns to the sensors and the control module. The electrical lock system relies on a small series of sensors—often Hall effect devices—that report orientation and position to the central control module. A professional-grade diagnostic tool can monitor the waveform from those sensors, providing a live readout of voltage, timing, and signal shape. If a sensor drifts by more than a small margin, typically a deviation of around 10 percent, it indicates a failing or miscalibrated sensor. In that scenario, the remedy usually involves replacing the sensor with a component that maintains a tighter tolerance and better resistance to noise. A newer-generation Hall effect sensor, designed for improved interference tolerance, can dramatically enhance reliability in environments with variable EMI. This upgrade is particularly valuable in trucks that operate around heavy electrical noise or where the electrical system is aging and prone to subtle fluctuations. If the diagnostic results point to the control module itself as the source of the fault—anomalies in its outputs, inconsistent responses, or an inability to recognize valid sensor signals—professional intervention is advised. Replacing or reprogramming a control module requires specialized equipment and expertise, and attempting DIY fixes on a faulty module can leave you with a nonfunctional latch and a dead battery sooner than you might expect.
Even with precise diagnosis, there is a place for practical, temporary safety measures. If you discover a latch that won’t engage properly or has begun to stick, secure the cargo with heavy-duty restraints and avoid relying on the latch alone to secure a load. This is not a diagnosis or a fix in itself, but it is a necessary safeguard if you must drive with a compromised locking system while awaiting professional service. The overarching principle is to prevent cargo loss or movement that could compound the risk of damage or injury. In parallel, it’s prudent to log and monitor symptoms over time. A latch that intermittently fails in cold or wet weather may betray moisture ingress into the sensing or locking pathway, suggesting the need for weatherproofing or environmental sealing alongside any electronic repair.
From a maintenance perspective, electronic latches benefit from routine scrutiny on a formal schedule. A full inspection every 20,000 miles provides a practical cadence that aligns with the typical wear cycle of heavy-duty locking pathways. During these inspections, cleaning the internal parts with an ultrasonic technique—designed to dislodge micro-debris without dismantling the entire mechanism—can restore smoother operation. When feasible, applying protective ion-plating treatments to critical components can also improve corrosion resistance and extend service life in harsh environments, such as coastal areas or regions that use road salt in winter. In environments with high moisture exposure, a waterproof kit for external latch components can measurably reduce failure rates, potentially by as much as 60 percent. While the language around these enhancements borders on advanced preventative maintenance, they are very much appropriate for fleet managers and meticulous owners who want to maximize reliability and minimize downtime. The point is not to turn every fix into a laboratory procedure, but to recognize patterns, adopt a practical routine, and escalate when the symptoms point beyond simple wear or environmental stress.
In practice, a balanced approach works best. Start with the simplest fixes that preserve function: confirm battery voltage, reseat connectors, and ensure the physical linkage between the latch and striker plate is aligned within the tolerance that allows for clean engagement. A misalignment can make the latch feel loose, even when the electrical system is sound, and can accelerate wear. If minor mechanical tweaks are needed, do them with care, avoiding permanent deformation of metal parts and ensuring that the latch mounting points remain rigid and secure. If you find yourself performing repeated lubrication or torque adjustments without a lasting fix, that is a signal to evaluate electrical components more thoroughly. Do not overlook the possibility of corrosion on electrical contacts or build-up within the lock cylinder, as such factors can erode electrical contact quality without obvious external signs.
One practical takeaway from this approach is that many electronic latch issues are not one-and-done fixes but a combination of improvements. A healthy battery, minimal EMI exposure, precise sensor readings, and a robust control module together create a system that behaves consistently under a wide range of conditions. When one element drifts out of spec, the others can mask the problem, leading to a cycle of intermittent failures that erode confidence in the locking system. The diagnostic path described above—start with the power source, assess EMI exposure, evaluate sensors and the control module, and then implement targeted mechanical or environmental fixes—offers a structured method to identify and address the core root causes rather than chasing symptoms.
For readers who want ongoing guidance that integrates practical maintenance with broader vehicle care, a good next step is to explore resources that cover routine truck maintenance in a broader context. Our maintenance blog provides insights into preventative strategies, part selection considerations, and field-tested approaches that complement the electronic latch focus without getting lost in overly technical minutiae. You can visit our maintenance blog. This hub can help you translate the theory of electronic reliability into actionable, everyday practices on the road.
If a fault persists after these steps, the prudent path is to involve a qualified technician or locksmith with experience in heavy-duty locking systems. Complex electronic issues, especially those that involve the control module, require diagnostic equipment and software access that are beyond typical DIY capabilities. Safety remains paramount: never operate a truck with a known latch failure, and never attempt to bypass a faulty lock to save time, as that creates a higher risk for both cargo and crew. The blend of careful diagnosis, prudent maintenance, and timely professional intervention is what ultimately keeps a truck box’s electronic latch system dependable over thousands of miles of service. External reference materials corroborate the value of systematic prevention and professional handling for persistent electronic latch problems, underscoring the practical balance between self-help fixes and expert service.
External reference: https://www.truckmaintenance.org/industry-reports/electronic-latch-failure-prevention
Final thoughts
Addressing latch repairs promptly and effectively is crucial for maintaining the safety and efficiency of truck fleets. By implementing the strategies outlined in this guide, fleet managers can not only enhance cargo security but also prolong the lifespan of mechanical components. Regular inspections and timely corrective actions are key to mitigating potentially larger issues and ensuring operational continuity. Access to proper tools and materials is essential for effective repairs, alongside utilizing professional support when necessary.

