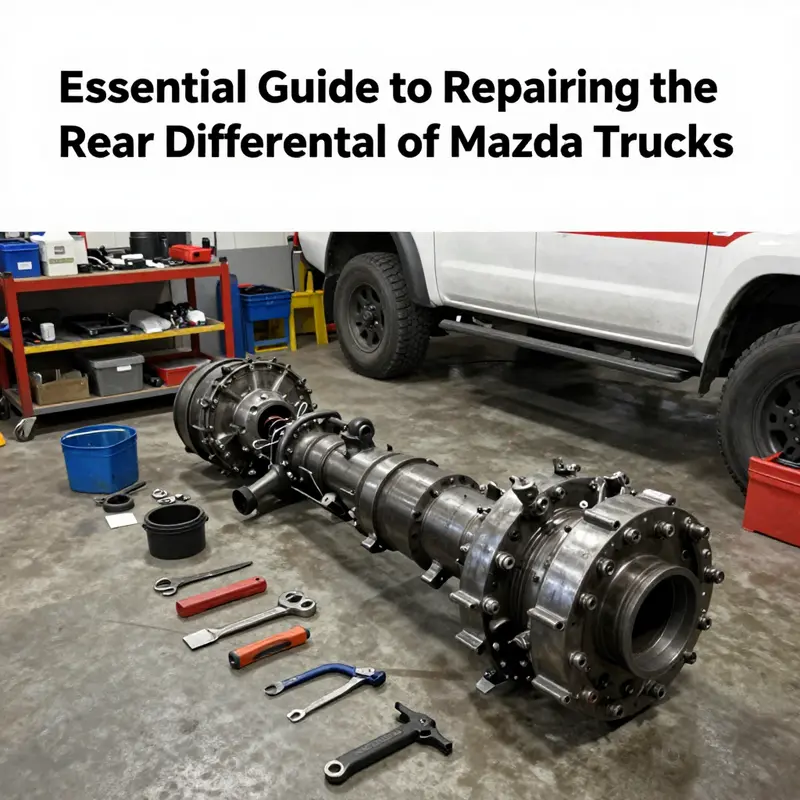
Repairing the rear differential of Mazda trucks is crucial for ensuring optimal performance and reliability in heavy-duty environments. The rear differential not only affects vehicle handling but also plays an essential role in overall fleet efficiency. This guide addresses the vital steps for diagnosing issues, preparing for repairs, conducting thorough inspections, and successfully reassembling the differential. Each chapter equips fleet managers, trucking company owners, construction operators, and logistics providers with actionable insights, ensuring that they can maintain the operational capabilities of their heavy machinery effectively.
Diagnosing and Repairing the Rear Differential on Mazda Trucks: A Practical, Truck-Grade Roadmap

Mazda engineers design rear differentials to handle a mix of daily driving and occasional heavier loads. While Mazda does not currently market a traditional pickup, many of their models share a common rear-gear architecture with trucks and SUVs that face similar wear and operating conditions. This chapter stitches together the diagnostic logic, the practical repair steps, and the decision points you face when the rear differential shows signs of distress. It treats the Mazda platform with the respect due to a precision mechanical system while translating the process into a workflow a shop or a capable enthusiast can follow—step by careful step, with attention paid to lubrication, tolerances, and safe, repeatable results. The goal is not to overwhelm, but to illuminate a path from symptom to repair that preserves vehicle reliability and driver confidence, even in the context of Mazda’s broader drivetrain family where traditional trucks are less common but the fundamental mechanics remain consistent. The arc begins with listening, observing, and feeling what the differential is trying to tell you before a tool is ever lifted from its position on the bench or under the vehicle.
The first signals are often audible and tactile. A rear differential that is approaching the end of its service life tends to announce itself with a spectrum of sounds. A high-pitched whine that grows louder as you accelerate or as the steering angle changes can indicate misalignment in the gear mesh or degraded bearings. A deeper, grinding undertone during acceleration, deceleration, or hard cornering can reveal pitted or worn surfaces in the ring gear, pinion, or carrier. A clunk when gear engagement happens or when shifting under load is another sign that parts have lost their precise fit. These audible cues must be weighed against the vehicle’s behavior: a vibration or shudder that appears during cornering, a pull to one side, or a drag-like drag on the drivetrain during steady highway speed can all point toward lubrication issues or bearing wear. The knowledge base emphasizes that improper gear meshing clearance or worn components often manifests as noise, but the complete story is told by fluid condition, leaks, and the feel of the drivetrain as it operates.
Oil health matters as much as sound. The differential’s oil serves as the coolant, sealant, and lubricant that lets gears spin smoothly without galling. A dark, gritty, or burnt-smelling differential fluid signals contamination or overheating and should trigger a more thorough inspection. In Mazda platforms with shared differential designs, prolonged intervals without changing the lubricant can accelerate bearing wear and create pitting on the pinion and ring gears. Leaks are not merely cosmetic: a seepage around the differential cover, the pinion seal, or the axle seals means the lubricant level is compromised, which invites heat buildup and accelerated wear. The symptom cluster—noise, vibration, and leaks—often converges on a single underlying issue: insufficient lubrication that has allowed small problems to grow into bigger ones.
With symptoms collected, the repair plan moves into preparation and safety. The vehicle must be parked on a level surface, and the parking brake engaged. The rear end should be safely supported with jack stands after the wheels and tires are removed to expose the differential area. This is not a time to improvise; you need a clean workspace, a clear tool set, and a plan for how you’ll reassemble with torque specs and clearances documented. The initial safety check includes ensuring the driveshaft can be disengaged safely and that the supports will hold the assembly without shifting. Once the differential cover and upstream components are accessible, the process of draining and inspecting begins. Draining the old differential fluid into a suitable container not only clears the way for the cover removal but also provides the first glimpse into the unit’s health through the presence of metal shavings or any other debris in the drained oil. A small quantity of metal on the drain plug could be a warning sign, whereas larger quantities suggest more serious wear.
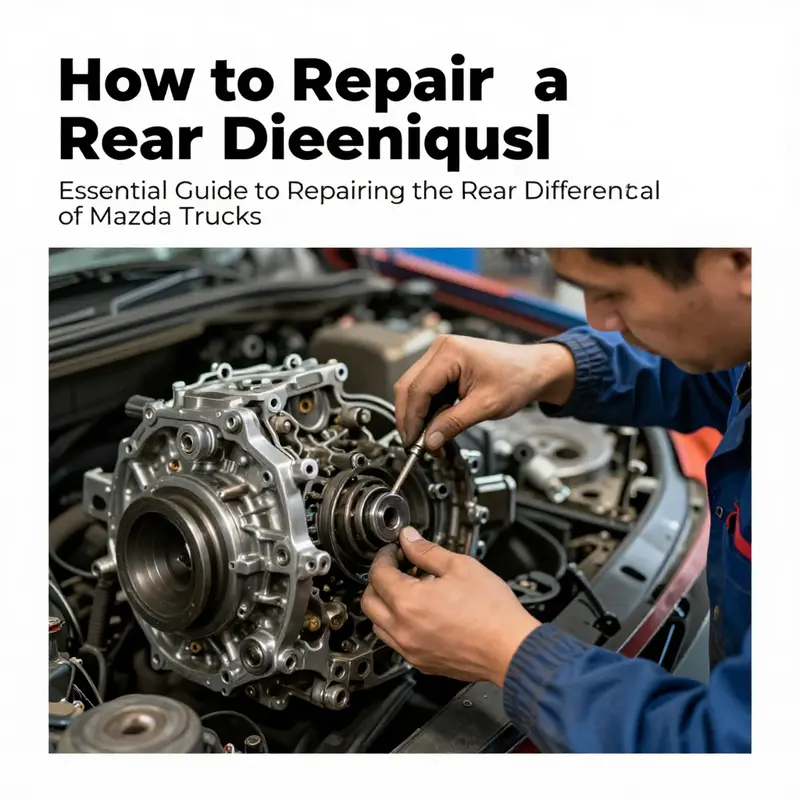
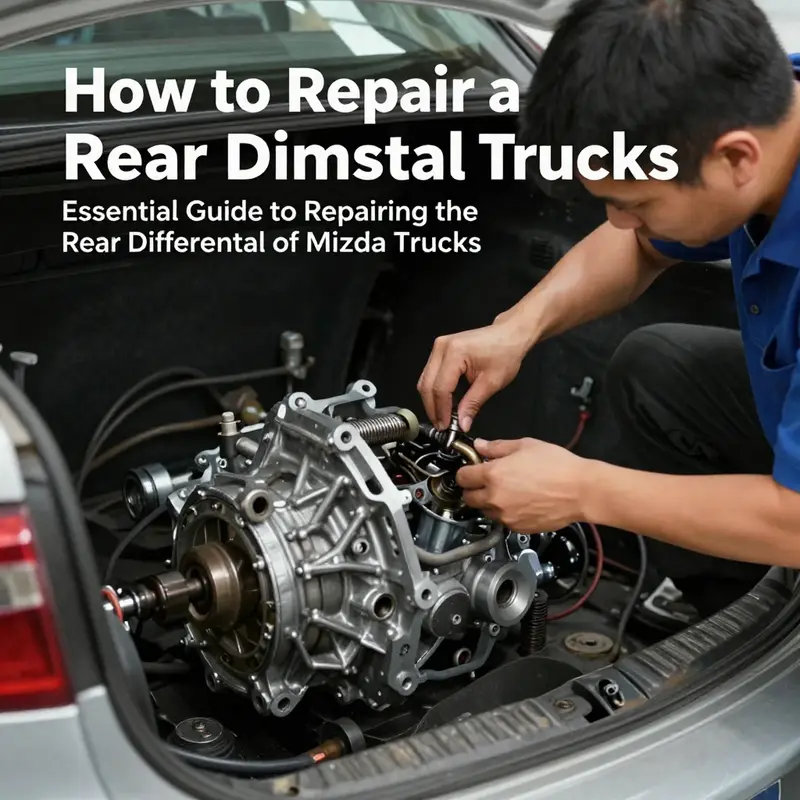
The removal of the differential is the bridge between diagnosis and repair. Disconnecting the driveshaft from the differential is the first technical step that frees the unit. After the driveshaft is detached, the bolts securing the differential housing to the axle housing must be undone, and the differential assembly can be carefully slid free from the vehicle. This step demands patience and a gentle touch to prevent damage to the mating surfaces or to nearby components. Depending on the model and the specific arrangement of the axle, you may encounter auxiliary components that require removal to gain unobstructed access to the carrier, the ring gear, and the pinion. The disassembly sequence should be approached with calm precision and with clean hands, so you can map every component’s orientation for reassembly.
Inspection is the core of the diagnostic phase. Bearings are a frequent failure point in rear differentials. Pinion bearings and carrier bearings should be checked for wear patterns, pitting, and any perceptible play or roughness when rotated by hand. If a bearing feels rough or has noticeable play, replacement is indicated. The gears themselves—the ring and pinion—should display uniform wear, without deep scoring, pitting, or chipped teeth. The tooth contact pattern must be valid and consistent; a compromised contact pattern yields poor load distribution, generating heat and noise in service. Seals and gaskets deserve careful scrutiny: worn, dried, or nicked seals often cause leaks and permit lubricant loss. If the side gears (in some configurations known as the half-shaft gears) or planet gears show burn marks, excessive wear, or obvious damage, they are likely candidates for replacement. In many Mazda differential configurations, a measured inspection reveals whether the damage is localized or spread across several components. When the measured wear exceeds a quarter of a tooth height or a fifth of the tooth length, the literature suggests replacement is the safer option to maintain reliability over miles of service.
Repair decisions follow inspection. Worn or damaged bearings or seals can often be refreshed with new bearings, seals, and gaskets. In some cases, the differential may benefit from a full rebuild kit designed for the model, which helps restore the precise tolerances required for proper gear engagement. The kit, while not universal across all platforms, is intended to renew core surfaces, bearings, and seals so that the mesh pattern returns to its intended state. If the damage is extensive, a complete differential assembly replacement may be the most reliable option, especially when critical components like the ring gear or pinion show substantial wear or when the preload and backlash cannot be restored to specification. The repair plan must align with the manufacturer’s service manual, which provides the exact torque sequences, bearing preload values, and backlash limits. Precision in reassembly matters as much as the initial disassembly, because the differential operates at high speeds and under varying loads where small tolerances can have outsized effects on durability and noise.
The reassembly phase begins with careful cleaning of all surfaces, then methodical installation of the components in the reverse order of disassembly. The ring gear and pinion must mate with the carrier with the right contact pattern, the backlash must stay within tolerance, and the bearings must be preloaded according to the spec. Proper seal seating is essential to prevent leaks, and the driveshaft must be realigned and reconnected with care. After the assembly is in place, the differential is refilled with the correct lubricant type and quantity, and the system is allowed to purge air and settle before a test. The first test drive is a focused verification: the vehicle should run quietly, without new noises, and there should be no unusual vibrations. If any tonal changes or handling anomalies appear, it is a sign that a recheck of the mesh pattern, bearing preload, or seal seating is warranted. A careful, incremental approach to road testing supports a reliable diagnosis rather than masking a latent problem.
A note on the practicalities of batch maintenance and model-specificities. This discussion centers on Mazda platforms that share a rear differential layout typical of light–to medium-duty configurations. The exact steps for torque, preloads, and backlash are model-dependent, so consulting the official service manual for the specific vehicle is essential. That document provides the numbers that prevent over-tightening and under-tightening, and it is the authoritative guide for achieving the correct preload in bearings and the precise contact pattern of gears. The principle behind these steps—maintain lubrication, maintain clean tolerances, and restore proper load paths—remains universal across Mazda vehicles and their drivetrain family. The repair philosophy is not to chase a generic fix but to tailor the repair to the unit’s observed condition, ensuring that the remedy aligns with the vehicle’s expectations for performance and durability.
In the broader view, maintaining a rear differential is part of a larger practice of disciplined truck maintenance. A failing differential often flags broader maintenance needs—lubrication discipline, fluid testing, and regular inspections across the drivetrain. Regular differential oil changes, using the correct lubricant type and refill amount, help reduce the likelihood of heat-induced wear and extend component life. For readers seeking a broader, ongoing discussion of truck maintenance practices and how to plan for maintenance expenditure, the Master Truck Repair blog offers a broad perspective on routine care and best practices. You can visit it here: Master Truck Repair blog.
To complement the written steps, a visual reference can aid understanding of the overall sequence. The core actions—drain, remove, inspect, replace, reassemble, and test—are the same across many platforms, and a cross-reference with truck repair videos can help you anticipate the subtleties of gear engagement, preloads, and seal seating. The external resource below provides a practical visualization of the differential rebuild workflow in a truck context, illustrating the critical moments of cover removal, gear inspection, part replacement, and reassembly. External resource: https://youtu.be/aKkLBK22nZc
The synthesis of diagnosis, parts, and procedure described here aims to empower readers to approach rear differential repair with clarity and confidence. It emphasizes a disciplined approach to diagnosing symptoms, verifying root causes, and executing a repair with precision. By recognizing wear patterns, understanding failure modes, and respecting the tolerances that govern gear mesh and bearing preload, a technician can tailor the repair to the unit’s actual condition. The process is not a guesswork exercise; it is a structured workflow that integrates inspection data, mechanical reasoning, and the manufacturer’s specifications to deliver a durable fix.
In closing, the rear differential is a compact, complex system whose health hinges on lubrication, alignment, and tolerance control. The Mazda platform brings its own design quirks, but the universal truths of differential care remain constant: clean surfaces, correct clearances, and meticulous reassembly. If you follow the steps with patience and respect for the engineering, you can restore quiet operation, restore power delivery to the wheels, and extend the life of the differential. This approach, practiced consistently, translates into fewer surprises on the road and more miles of confident driving under a wide range of conditions. The chapter does not pretend to cover every model variant, but it provides a solid, model-informed framework that can guide both DIY enthusiasts and professionals toward reliable outcomes. And for those who want to keep thinking about the bigger picture of truck maintenance, the Master Truck Repair blog remains a solid repository of ideas and best practices.
Laying the Groundwork: Preparation Steps for Repairing a Rear Differential on a Mazda Truck
Preparation for repairing a rear differential on a Mazda truck starts long before the first wrench meets metal. The rear differential is a compact world of gears, bearings, and seals that work in concert to transfer power smoothly from the driveshaft to the axle assemblies. Even though Mazda does not presently market a dedicated heavy-duty truck line, the rear-end architecture on many Mazda platforms shares fundamental mechanics with light trucks and SUVs. The practical steps that follow draw on real-world experience with a Mazda crossover drivetrain as a reference point, because the same principles govern gear mesh, lubrication, and bearing integrity across these vehicles. The goal here is to lay a reliable foundation that keeps you safe, minimizes downtime, and preserves the life of the differential while you address any noise, leaks, or wear you have detected on the road. This is a hands-on skill that rewards careful planning, clean work habits, and disciplined attention to torque, alignment, and fluid condition. As you prepare, remember that the plan you build now will shape not only the repair itself but the long-term health of the axle and its bearings. If you are budgeting for this kind of maintenance, consider a practical approach to routine truck maintenance to smooth out future repairs. For a structured look at maintenance budgeting, you can refer to budgeting for routine truck maintenance. (internal link) The steps below weave together diagnostic cues, tool selection, workspace ergonomics, and safe practices into a single, continuous workflow. While the exact model may differ, the core ideas translate across Mazda platforms that use familiar differential designs. When you start, have a clear objective: identify whether the issue is a fluid condition, a leak, or a mechanical wear pattern that requires bearings, seals, or gears to be replaced. The preparation phase thus becomes a diagnostic runway, allowing you to distinguish between a simple fluid change and a more complex repair while preserving critical surfaces and tolerances that define proper gear contact patterns. The preparation framework that follows also emphasizes safety and organization because a well-organized worksite reduces the risk of losing small components and helps ensure accurate reassembly, which is essential for quiet operation and reliable lubrication after the job is done. The tools and materials you assemble at this stage should reflect the scope of the work you anticipate. You will need a mix of basic hand tools, a few metric sizes commonly used on Mazda platforms, and a torque wrench to enforce the precise clamping forces that keep the differential sealed and properly aligned. Start with a checklist: the right tools, the right lubricants, and access to the parts you may replace if inspection reveals excessive wear. The preparation phase rewards those who anticipate the next steps rather than improvising as you go. It is not only about removing a few bolts; it is about setting up a clean, organized workspace where parts can be laid out in order, inspected with a critical eye, and reassembled with confidence. The following section outlines the tools and materials you should have at hand before you lift the vehicle. Gather a reliable set of wrenches—especially a 23 mm and a 24 mm open-end or adjustable wrench—along with a socket wrench that includes a 21 mm socket and an extension. A torque wrench is essential for reassembly, ensuring that mounting bolts and connecting hardware meet the manufacturer’s specified clamping forces. A pry bar or lever helps with stubborn seals and gently coaxing the differential free from the axle housing without harming mating surfaces. Safety stands rated for at least three tons each provide a stable, level support when the rear of the vehicle is raised. A small screwdriver, a clean shop rag, and a magnetic tray to catch fasteners prevent dropped bolts or lost clips during disassembly. In terms of consumables, you’ll need new differential oil that matches the GL-5 class commonly specified for many rear-end designs, plus new gaskets and seals if any are compromised. Depending on the wear you uncover, you may also require bearings or a repair kit designed for the vehicle family you are working on. It is important to avoid improvising cheap substitutes for seals and gaskets because a poor seal will quickly undermine any repair by allowing fluid leakage and oil starvation in critical components. The lubrication path is the lifeblood of the differential, maintaining the gear teeth in proper meshing and preventing overheating during operation. You should not underestimate the value of a clean, dry work area. Lay out a large mat or drop cloth to catch any drips, and keep a trash can nearby for used parts and packaging. A well-lit space helps you inspect small details—pitting on gear teeth, play in bearings, or cracks in seal faces—that might otherwise go unnoticed in a dim corner of a garage. Before you touch anything, bring the vehicle to a safe work height. Park it on level ground, set the parking brake, and place wheel chocks behind the front wheels to prevent movement. Use a reliable floor jack to lift the rear of the vehicle and position four jack stands under the frame rails on both sides to secure the car. The stability of the chassis is non-negotiable because you will be diving into the rear suspension area and the differential housing, where even a minor shift in balance can cause injuries as you work. If you expect to work under the car for an extended period, consider laying a sturdy mat or using a creeper for comfort and efficiency as you maneuver around the workspace. In the preparation phase, it is also wise to perform a quick visual survey of the differential housing for obvious signs of damage, leaks, or loose bolts. Take note of any fluid seepage from seals or covers, and check the condition of hoses and lines connected to the differential—especially the breather tube on some Mazda platforms, which can become clogged with dust or oil residue over time. The first step in diagnosing a functional problem is to check how the fluid looks and feels when you drain it. Loosen the drain plug on the bottom of the differential housing and allow the old oil to flow into a clean container. As you drain, observe the consistency of the fluid and any metallic debris that accompanies it. A fluid that is dark, smells burnt, or contains visible metal shavings is a red flag that wear has occurred and that more thorough inspection, including disassembly, may be required. In some case histories, the fluid has appeared almost paste-like, a symptom of long service without change that leads to bearing failure from insufficient lubrication. The narrative you uncover during this phase will guide you through whether to proceed with a simple fluid change or move into a more involved bearing or gear inspection. Once the drainage is complete, you can begin the process of removing the differential assembly from the vehicle. This involves decoupling the driveshaft from the differential, unbolting the differential housing from the axle housing, and carefully extracting the unit from its mounting. The removal procedure is repeated with care to avoid bending or stressing the housing, which could complicate reassembly. As you approach the bench, plan to inspect the bearings—both the pinion and carrier bearings—for signs of wear, pitting, or abnormal noise. Worn bearings can transmit vibrations and noises that are mistaken for gear problems, so careful assessment is essential. Similarly, examine the ring and pinion gears for wear patterns, scoring, or pitting, and ensure that contact patterns are consistent with the manufacturer’s specifications. The seals and gaskets that control oil retention should be scrutinized for cracks or hardening; damaged seals are a primary cause of leaks and can lead to fluid loss that compounds wear. In some designs, the planet gears and their shafts must be scrutinized for wear, and the side gears—often called the half-shaft gears—should show no burn marks or excessive wear. If damage exceeds roughly one-quarter of the tooth height or one-fifth of the tooth length, replacement of the affected gears is typically required. With a clear diagnosis in mind, you can plan the replacement strategy. A repair kit designed for the model is commonly available and enables the installer to replace bearings, seals, gaskets, and, if necessary, select gears. The emphasis here is on using parts that match the original design. While a full differential assembly replacement is a possibility in severe cases, many repairs can be accomplished by swapping in new bearings, seals, and gaskets and reusing intact gears if their contact pattern remains within tolerance. After identifying what needs replacement, you’ll proceed to reassembly with careful attention to alignment and lubrication. Reassembly begins with installing the new sealing surfaces and ensuring the gears are dry and properly spaced. The differential is then reinstalled in the vehicle, the driveshaft reconnected, and the assembly torqued to the manufacturer’s specifications. Refill with the correct differential fluid to the proper level, and ensure the fill and drain plugs are secured. The final steps involve lowering the vehicle and performing a test drive to confirm the repair has eliminated the noise and restored smooth operation. A successful repair not only resolves the immediate issue but also leaves you with a chassis that is quiet, well-lubricated, and ready for the miles ahead. Throughout this process, keep a careful log of what you replaced, what you inspected, and what measurements you took. This documentation becomes a valuable reference should future issues arise or if you need to discuss the work with a mechanic. If you need additional context on broader differential principles, you can consult general technical resources that explain how differentials work and why precise tolerances matter. As you gain hands-on experience, you’ll develop a sharper sense of when a diagnosis is simply a fluid issue and when it points to bearing or gear wear that requires more substantial intervention. The path from preparation to final test drive is a continuum, not a single step. Each stage reinforces the next, and the discipline you bring to this project will influence the long-term reliability of the rear end. The work is exacting, but with the right approach, the payoff is a quiet, confident drive and a differential that continues to perform as intended. For further guidance on planning and budgeting for routine maintenance, see budgeting for routine truck maintenance. By grounding your preparation in methodical checks, you reduce the risk of costly surprises and set the stage for a successful repair that extends the life of the differential and the vehicle as a whole. For readers seeking a broader technical overview of how differentials function, this resource provides foundational context: https://en.wikipedia.org/wiki/Differential
null
null
Reassembly and Final Checks: Restoring a Mazda Rear Differential to Smooth, Quiet Operation
When the time comes to put a repaired rear differential back together, the work is far from finished. Reassembly is the moment where all the careful diagnostics and precise disassembly converge into a single, dependable mechanism that drives the vehicle forward. A rear differential that has been torn down, inspected, and repaired must be brought back to life with exacting discipline. Any deviation from the manufacturer’s standards—misfitted parts, improperly seated bearings, or an overlooked seal—can undermine reliability, generate noise, or shorten the component’s life. The goal at this stage is not merely to assemble parts, but to recreate the original harmony of the system so that torque flows smoothly, lubrication stays in its lanes, and heat never becomes an uninvited guest. The road to that result begins with methodical preparation, continues through careful alignment, and ends with a suite of checks that confirm the work is complete and the race is won, linearly and quietly, on the very first drive after installation.
Preparation is the quiet foundational act that supports every subsequent decision. Before any bolt is torqued or any seal seated, the technician surveys the housing for cleanliness, freedom from debris, and proper mating surfaces. The mating faces of the differential case and the axle housing must be spotless and free of nicks or burrs. Threads should be clean and free of oil buildup or corrosion that could skew torque readings. Any shim stacks or bearing races that were disturbed during disassembly are rechecked for correct orientation. This moment of attention prevents a cascade of problems that would otherwise surface as soon as the vehicle moves. The next layer of care involves the bearings and gears themselves. The pinion and carrier bearings carry the weight of the gear train and the load transmitted by the wheels. If their preload is off or if they exhibit any residual damage from the prior disassembly, the entire gear mesh will misbehave. A precise preload is needed to maintain the correct contact pattern between the ring and pinion gears and to minimize heat and wear during operation. The gears, too, must be handled with respect. The ring and pinion must mate with the correct backlash and depth; any deviation can re-create the fault that prompted the repair, or worse, create a new failure mode that will present itself under load or at higher speeds.
The reassembly sequence, anchored in the service manual, emphasizes consistent torque patterns and strict orientation. The bolts that secure the differential housing to the axle housing must be tightened in a graduated sequence to bring the components into alignment evenly. This is not a procedure to improvise. Each fastener has a defined torque value and a prescribed order, designed to ensure that the mounting surfaces seat squarely and that the bearing preload is maintained. The absence of measured torque can lead to over- or under-torque, both of which invite unwanted movement, misalignment, and leakage. Alongside the fasteners, seals and gaskets receive heightened attention. Old seals are removed with care, and the sealing surfaces are inspected for damage or distortion. Any compromised seal is replaced with an equivalent, properly installed seal designed for the model. The aim is to create a fluid-tight, pressure-stable environment inside the differential housing, so that lubrication remains where it belongs and contaminants stay out. The language of this stage is careful and repetitive, but it is not redundant. It repeats the logic that precision in the assembly determines reliability in the long run.
A key part of the process is confirming the correct gears’ meshing and the proper play between components. The contact pattern between the ring and pinion gears provides a window into the health of the set. If the pattern is off, the teeth may be risking pitting or accelerated wear. The same attention is paid to the planet gears and their shafts, as well as the side gears that connect to the axles. If any tooth shows excessive wear, burns, or damage beyond a conservative threshold, replacement becomes necessary. The objective is not merely to install new components, but to restore the precise geometry and surface finish that allow the differential to operate as the manufacturer intended. In this context, a model-specific repair kit—crafted to fit the exact tolerances of the Mazda rear differential architecture—serves as a critical ally. It provides matched components and a cohesive set of parts that work in concert. The emphasis remains on avoiding improvisation that could upset the delicate balance of gear geometry and bearing preload. While the technical vocabulary may feel daunting, the underlying principle is straightforward: every piece must fit like a part of a single, well-made machine.
With components properly aligned and the seals replaced, attention shifts to the actual reassembly. The differential assembly is guided back into the axle housing, and the mounting bolts are reinstalled in their prescribed pattern. The housing must sit squarely and the gear train must be free of binding before the driveshaft is reconnected. At this stage, cleanliness remains nonnegotiable: oil passages and mating surfaces should be free of dust and debris that could compromise lubrication or seals. The driveshaft connection is checked for axial alignment; any misalignment can translate into vibrations that propagate through the drivetrain. The final fitting of the driveshaft is followed by a cautious, staged fill of the differential with the recommended lubricant. The oil chosen should match the specification of the differential and be appropriate for the temperature and operating conditions of the vehicle. The goal is to fill to the correct level, as indicated by the dipstick or level indicator used on the differential housing, ensuring the lubricant creates a hydraulic cushion that reduces metal-to-metal contact and heat generation during operation. A fluid that is too low or degraded can permit metal-to-metal contact and rapid wear, erasing the advantages of careful assembly.
After the mechanical reintegration is complete, the chapter of checks begins in earnest. The first tactile test is a manual rotation of the assembled differential. This step confirms that the assembly turns with a smooth, uninterrupted motion and without unusual resistance or binding. Stumbling or gritty sensation is a warning sign that something in the mesh or preload is off. The next test is a shallow dynamic check. With the vehicle in a safe, elevated position, the engine is briefly started and the transmission is allowed to engage in a forward and reverse cycle while the differential remains stationary. This light test confirms that the gears engage cleanly and that there are no leaks at the seals. Any drip or seepage during this stage would indicate a seal or gasket issue that must be addressed before the vehicle leaves the workbay. These checks are not about performance at speed; they are about confirming that the basics are sound, and that the static state of the rebuilt differential will hold under load when the car is finally driven.
The final layer of verification is a controlled road test that validates behavior under real-world conditions. A smooth, predictable response in turns, a quiet pinion or ring gear, and the absence of clunks or whines are the markers of success. The differential should deliver consistent torque across a range of speeds and loads, with no loose components or misalignment becoming audible as road speed climbs. If the vehicle is equipped with a traction-management system, the differential’s behavior should not trigger unexpected interventions or feel inconsistent when the vehicle enters a corner. In the absence of a true road test, a thorough test harness on the hoist can approximate the scenario by simulating steady acceleration and deceleration through a set of controlled maneuvers. While not a substitute for a full road test, this approach catches several categories of issues before the car leaves the shop.
The endgame of this reassembly and final-check phase rests on documentation. The manual recommendations about torque values, bolt patterns, and assembly sequences exist for a reason. Where a doubt remains, the safe course is to reconsult the official repair guidance and confirm the exact specifications for the specific vehicle model. In practice, technicians rely on dedicated tools—torque wrenches with a precise torque curve, bearing preloads measured with appropriate gauges, and alignment jigs designed for the differential housing—to ensure accuracy. The discipline of following the documented sequence, using model-appropriate parts, and performing the step-by-step checks creates a robust barrier against future leaks, noises, or premature wear. This is the curriculum of a proper repair, taught not only in theory but proven in the quiet reliability of vehicles that traverse long miles with confidence.
As the final task of the chapter, a reminder about maintenance discipline accompanies the technical steps. The differential is not a one-and-done repair; it is a component that thrives on periodic inspection and consistent lubrication. Even with the most careful reassembly, lapses in routine maintenance can accelerate wear and noise. Therefore, it is prudent to plan preventive checks—fluid replacements at the intervals recommended by the manufacturer, periodic inspection for leaks, and a listening ear for unusual sounds during normal driving. These practices preserve the integrity of the rebuild and extend the life of the differential as a whole. For readers seeking a broader context for keeping trucks and drivetrains in good shape, a practical overview of routine maintenance budgeting provides useful guidance and helps align repair efforts with long-term ownership costs. See Budgeting for Routine Truck Maintenance for a practical frame of reference. Furthermore, the literature warns against substituting custom or improvised parts that do not meet the original design intent; the use of model-appropriate components, seals, and lubricant remains essential to the reliability of the repair. The emphasis on structured procedure should not be seen as rigid; rather, it is a pathway to predictable outcomes and safer driving.
For readers who want to explore practical, model-agnostic maintenance strategies, the literature and manuals point toward a careful balance of precision work and routine care. The final impression is clear: reassembly and final checks are not merely the last steps in a repair, but the culmination of a disciplined process that safeguards performance, safety, and durability. The difference between a job that merely fixes a problem and a repair that restores confidence lies in the attention paid to the interface between parts, the cleanliness of the assembly, and the fidelity to the manufacturer’s specifications. The reassembled differential speaks to the clinician’s craft as much as to the mechanic’s hands, delivering quiet operation and enduring reliability once the process is honored with patient care and rigorous testing. External reference and ongoing learning from official repair guides can further illuminate the specifics of any model, ensuring the approach remains aligned with evolving engineering practices. For a deeper technical repository and formal procedures, consult the manufacturer’s differential repair guide. External resource: https://www.mazda.com/tech-support/repair-guides/differential-repair
Final thoughts
Understanding the complexities of repairing a rear differential in Mazda trucks is critical for fleet and logistics operations. Effective diagnosis, meticulous preparation, thorough inspection, and careful reassembly not only enhance performance but can also significantly reduce downtime and repair costs. Adhering to these detailed practices will empower fleet managers and service providers to maintain their vehicles in peak condition, ensuring the reliability and efficiency expected in their operations.

