Rust repair is a critical maintenance task for fleet managers and truck operators, as it directly influences the operational efficiency and safety of vehicles. The bottom of truck doors, often exposed to moisture and road debris, is particularly susceptible to rust damage. This guide outlines essential repair techniques tailored for fleet and logistics companies, helping ensure longevity and reliability in their operations. Each chapter delves into vital stages of the repair process—assessing damage, preparing for repairs, implementing structural techniques, and applying finishing touches—empowering managers to tackle rust issues proactively and effectively.
Assessing Rust on the Bottom of a Truck Door: Diagnosing Primer Breach and Planning the Repair Path
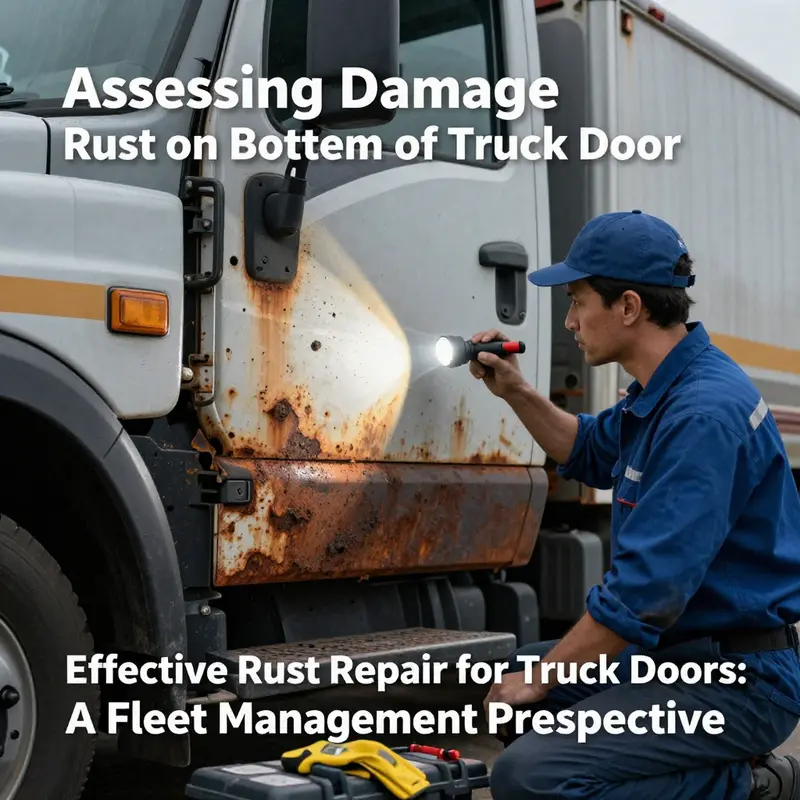
The bottom edge of a truck door is where rust often begins its quiet work. It sits close to road grit, mud, and, in winter climates, a constant shower of salt spray carried by the wind and spray from passing traffic. The damage can hide beneath a seemingly innocent coat of paint, and from the outside it may look minor or even invisible. Yet the decision to repair, replace, or simply keep under observation hinges on a careful assessment of what lies beneath the surface. This chapter walks you through a disciplined, observations-based approach to determining whether the primer has been breached, how far the damage has progressed, and what path forward will protect the door from further decay. The aim is to provide a clear framework for diagnosing the severity of rust so you can decide whether you can manage it at home or need professional intervention. The starting point is to recognize the signs that the protective layers have failed and moisture has gained entry, because that breach is what accelerates corrosion and can convert a small spot into a larger problem if left unchecked for a season or two.
Begin with a thorough visual inspection. In bright, direct light, focus on any scratch, scrape, or chip that exposes bare metal. The most telling signal is not the color of the paint but the contrast between the exposed metal and the surrounding, intact finish. If you observe that the exposed area appears markedly darker—think black or gray—this is a strong indicator that the base coat or primer beneath the topcoat has been breached. On light-colored vehicles, the same scratch may reveal a gray or even black tint that signals primer exposure. It’s not just about color; the texture and edge of the exposed zone matter, too. Where the border between painted metal and bare metal is ragged or irregular, you are likely looking at a point where moisture can begin to intrude more aggressively. A single scratch that exposes metal should not be brushed off as cosmetic. It is a vulnerable spot that can serve as a doorway for rust to spread if moisture lingers.
Beyond the naked eye, a tactile check adds a practical layer of diagnosis. Gently run the pad of your fingertip over the damaged area. A smooth, even surface is a good sign, but if you feel roughness, a shallow catch, or a perceptible resistance when your nail glides over the edge, it indicates that the paint layer is damaged deeper than the surface and the metal may already be exposed. The absence of a rough feel does not guarantee safety, but it lowers the odds that the underlying metal is more extensively compromised. If you sense any edge or corner where the coating seems to lift away from the metal, treat it as a red flag. Such micro-delaminations can trap moisture between layers and become focal points for rust expansion.
A practical water test can confirm whether the protective barrier remains intact. Lightly spray a bit of water onto the affected area. If the water beads and runs off as it would on sound paint, the barrier remains reasonably intact. If, however, the water soaks in rather than beading, you are observing compromised barrier function. This indicates that the primer or base coat protection has failed to seal the metal, creating a prime environment for corrosion to start or accelerate. The importance of this test lies in its simplicity; it translates a visual cue into a functional readout of protection status. When you see rapid absorption of moisture, you should presume that rust can begin forming sooner rather than later, especially if there is any existing pitting or micro-holes beneath the surface.
To refine your assessment, consider using a magnifying tool to examine the edges of the affected area for subtle signs that lie beneath the surface. A handheld magnifier can reveal tiny cracks, flaking, or bubbling that may not be visible to the naked eye. In a professional setting, technicians sometimes use a paint thickness gauge to determine whether the coating has fallen below normal specifications. While you may not own such a tool, recognizing the cues these instruments are designed to capture helps you frame your findings: if the coating thickness is significantly reduced in the damaged zone, the protective system has already deteriorated. Any measurement that points toward a breached base coat or thinning primer strengthens the case for urgent attention and a targeted repair plan.
If your inspection yields unmistakable signs—dark, exposed metal; a rough, catching edge on the scraped area; or moisture that quickly soaks into the surface—you have diagnosed a compromised barrier. The carcass of the issue is not merely a cosmetic blemish; it is a signal that moisture can reach bare metal and begin electrochemical rust processes. In such cases, immediate attention is warranted. Delaying action allows corrosion to deepen and spread under the paint, which raises repair costs and can weaken the door structurally over time. Still, there is a distinction to be made between surface rust that has not penetrated the base layers and rust that has done so. Surface rust, if caught early, is often recoverable with a straightforward restoration process, while breached primer and metal exposure call for a more deliberate, often professional, approach. This differentiation guides you toward a repair pathway that aligns with the actual severity rather than the initial appearance.
As you navigate these diagnostic signals, keep in mind that rust rarely respects the boundaries of a single brush stroke on the door. It tends to migrate along the lowest points and along seams where moisture collects. The bottom edge of a door often sits at the confluence of splash and spray from road conditions; it’s the rustic garden where rust seeds thrive if the protective layers have failed. If your assessment reveals any hint of ongoing spread, or if you can detect softening of metal when you probe with a tool, it’s prudent to escalate the response. You may be dealing with a problem that extends beyond a single patch of surface rust and into the early stages of material loss. In that scenario, consulting a certified auto body technician is the sensible course. They can determine whether the rust is superficial, whether it has impacted the structural skin of the door, and what intervention best preserves the vehicle’s integrity and resale value.
The value of a structured diagnostic approach extends beyond a one-time fix. It informs the decisions you make next: the scope of maintenance required to halt progression, whether you can address the issue in a home shop, and how to budget for the kind of repair that fits the door’s material health. The plan should balance practicality and durability. For example, if the assessment shows a shallow, non-penetrating layer of rust, a homeowner can proceed with careful surface preparation, rust inhibitor application, and topcoat repair to restore the seal and delay deeper corrosion. If, however, the diagnosis reveals holes or substantial pitting where metal has already thinned, the repair becomes a different proposition. In such cases, you might need to cut out the damaged section and weld in a patch, or, depending on the extent of the loss, replace the panel or door portion. The act of making this call—whether to repair or replace—depends on the structural implications and the cost-benefit balance of the repair as compared to the door’s overall condition and the vehicle’s value.
In addition to the mechanical and aesthetic considerations, it helps to adopt a preventive mindset. After you’ve completed the assessment and addressed the immediate threat, taking steps to prevent recurrence is essential. A recurring pattern is the friend of rust; prevention reduces the likelihood that compromised areas will reappear in other parts of the door or nearby panels. Regular washing, especially after exposure to road salt or damp conditions, helps to remove corrosive contaminants that can start the rust cycle in any shallow scratch. When you wash, focus on the lower edge and any crevices that attract moisture. Dry the area thoroughly so残 moisture does not linger and encourage further oxidation. These maintenance habits may seem simple, but they create a reliable first line of defense against the slow creep of rust into more vulnerable areas of the door.
As you consolidate your assessment into a repair plan, it’s useful to anchor your approach in trusted guidance while recognizing your own skill level and the door’s condition. For a more comprehensive understanding of early-stage rust and how professionals diagnose and treat it, authoritative resources emphasize methodical assessment of coating integrity and metal exposure. The key takeaway from such guidance is that when the coating is breached, moisture can enter, and corrosion can begin promptly. This is why the signs you observe—primer exposure, darkened metal, roughness, and quick-moisture absorption—are more than cosmetic cues; they are road signs directing you to the correct repair pathway. If the rust has spread beyond a discrete patch, or if you have any doubt about the integrity of the door’s structure, a professional evaluation becomes especially important. The door is part of the vehicle’s overall safety envelope, and the repair choice must respect that broader responsibility.
With these diagnostic signals in mind, you may also consider the broader maintenance implications. A well-planned maintenance routine can keep rust in check across the entire vehicle. If you are budgeting for upkeep and unexpected repairs, a measured approach that weighs the likelihood of surface restoration against the potential need for more extensive welds or panel replacement makes financial sense. For a practical starting point, many readers find it helpful to consult a structured guide on routine maintenance budgeting, which offers workflows to allocate resources for prevention, minor repairs, and larger restorative projects. This approach helps ensure you are not surprised by costs when the rust issue advances from a simple patch to a more complex repair. See Budgeting for Routine Truck Maintenance for a focused framework you can adapt to your fleet or personal truck.
Finally, while opinions on repair paths vary by the exact extent and location of rust, the central principle remains unchanged: early identification saves both money and time. If any of the diagnostic signs described here are evident, do not delay. Move toward a plan that addresses the root cause—moisture intrusion through breached coatings—before it advances. If the rust is confined to a small, superficial area and the underlying metal remains sound, you may safely pursue a home repair pathway with careful prep, proper rust inhibitors, and a color-matched repaint. If you discover deeper corrosion, significant pitting, or any hint that the metal’s integrity is compromised, seek professional assessment. In such cases, a certified auto body technician can determine whether a patch, a splice, or even door replacement is warranted and can perform repairs with the structural and safety considerations in mind.
For further reading on identifying and treating rust at its earliest stages, you can explore reliable guidance from automotive maintenance authorities. CarMD offers insights and diagnostic steps that align with the signs and tests described here. External resources can provide a complementary perspective and help you compare at-home methods with professional practices. Budgeting for Routine Truck Maintenance provides a practical framework for allocating funds toward rust prevention and repair as part of your ongoing vehicle care. By coupling careful assessment with a thoughtful repair plan and preventive habits, you can preserve the door’s integrity, appearance, and the overall longevity of your truck.
External resource: https://www.carmd.com/learn/early-stage-rust-repair/
From Clean to Cure: Meticulous Preparation for Rust Repair on the Bottom Edge of a Truck Door
The bottom edge of a truck door is a quiet battleground where moisture, road salt, and road grime converge. When rust first whispers from beneath paint, it rarely announces itself with a dramatic crash; it begins as a tiny discoloration, an edge of rough texture, or a flake that crumbles at a touch. Yet the path from a minor, surface condition to a lasting repair hinges on one decisive moment: preparation. The success of any rust repair on the lower door seam, the drip rail, and the panel beneath hinges on how thoroughly you identify, clean, and prime the surface before you even think about filler, welds, or paint. In this chapter, the focus stays on preparation and cleaning as the foundation of a durable fix. You will learn to read the signs of rust, to wash away the caked debris that nurtures corrosion, and to prepare a bare, receptive surface that will hold coatings and patches for the long haul. The goal is not merely to hide a blemish but to set up a repair that stands up to another winter, a sweaty summer, and the daily wear of road salt and humidity.
Identify rust early, then act with method. The first signal is a color shift that looks less like the original metal and more like orange-brown spots on the surface. Those spots, often visible around the door’s bottom edge and along the seam where water tends to pool, are more than cosmetic. They indicate oxidation that has begun to creep under the protective surface. A rough or uneven texture under your fingertip is another tell. If you can feel raised areas or a chalky, flaky powder when you run your hand over the metal, that powder is rust debree, a sign that the oxide layer has broken free. A metallic odor can accompany more advanced stages, especially when moisture and air are locked into the crevices by dirt and salt. Early detection matters because it keeps you in the driver’s seat, allowing you to remedy with minimal invasiveness and avoid costly repair later.
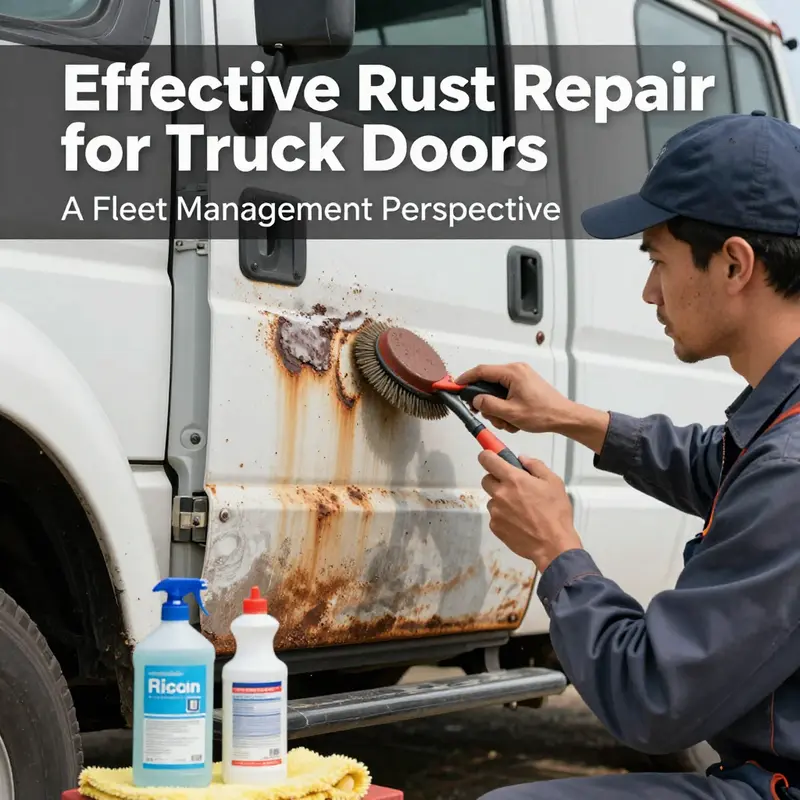
Begin with a thorough, deliberate cleaning. The cleanup stage is not a surface rinse but a deep excavation to remove dirt, grease, and contaminants that trap moisture and harbor rust-promoting microbes. Start with a high-pressure water wash to the entire underside of the door. The aim is to reach every seam, crevice, and corner where water collects and grime hides. The underside is not just a sample area; it is a system where moisture can migrate to metal if left unchecked. Take care to spray into recessed channels and along the edge where the door and frame meet, because those small channels become nests for salt and road film after each trip. After cleaning, the surface must dry completely. A realistic target is a full 24 hours of air drying in a well-ventilated space. If you live in a humid climate or the day is damp, you may extend the drying window a bit to ensure no moisture remains trapped under primer or filler later. Any lingering water can compromise adhesion and invite new corrosion, negating the work you put into cleaning.
When rust removal begins, the method must match the severity. Light to moderate rust responds well to mechanical removal. A wire brush or sandpaper in the 80–120 grit range is typically enough to strip away loose rust and scale. The goal here is not to sand until you vanish the metal you need but to remove the surface rust that would otherwise undermine primer adhesion. Work gradually and consistently, moving in one direction to minimize gouging and heat buildup. If you encounter deeper pits or stubborn patches that resist brushing, switch to a chemical rust remover. Follow the manufacturer’s instructions precisely and wear appropriate safety gear—gloves and goggles—to protect against caustics and splashes. The chemical step is a bridge between cleaning and neutralization, enabling you to reach metal that brushing alone cannot touch.
Residual chemicals left behind by rust removers can continue to attack metal if not neutralized. Use a dedicated rust neutralizer after chemical treatment. This step is critical because neutralizers halt ongoing chemical activity and improve the longevity of subsequent coatings. The surface should feel inert to your touch and look uniformly prepared, without shiny spots or hidden residues. Neutralizing not only protects the already-cleaned metal but also enhances adhesion for primer. This is a small, often overlooked detail that can dramatically affect the durability of the repair over time. After neutralization, give the surface a final wipe or light rinse if the product instructions call for it, then allow it to dry again. The aim is to present a surface that is clean, dry, and chemically inert, free from oils, salts, and stray oxide films.
Surface preparation for priming is a subtle but essential art. Light sanding with finer grit paper, typically in the 220–320 range, creates a uniform finish that supports even paint and primer distribution. The suggestion here is not to remove every trace of the previous texture but to create a micro-roughness that will accept and grip the primer. Once sanding is complete, wipe the area with a clean, lint-free cloth dampened with isopropyl alcohol. This step removes dust and oils that can interfere with primer adhesion, ensuring the bare metal’s surface energy is at a healthy level for bonding. The clean, dry surface that remains is the canvas for rust-inhibiting primer, which forms the protective barrier that slows future corrosion and gives subsequent coats something to grab onto. It is tempting to rush to finishing, but primer must have an uncontaminated stage on which to set.
The priming itself represents a line drawn between a temporary fix and a lasting one. Apply a rust-inhibiting primer after you are certain that the surface is perfectly clean, dry, and free of contaminants. The primer’s job is twofold: to seal the metal from moisture and to encourage good adhesion for the topcoat. In this context, you’re not just priming a patch; you’re resetting the environment so that future paint, sealers, and clear coats can perform as intended. The primer should be even, with no runs or bare spots, and should provide a uniform base color that hints at the original door color in undertone but ultimately disappears beneath paint. The drying time for the primer varies by product, humidity, and temperature, so follow the manufacturer’s guidance to the letter. Plan ahead and avoid exposing freshly primed metal to rain or heavy dew for the recommended post-application window. Patience here translates to durability later.
A broader mindset supports the preparation work: treat rust repair as a return to a protected, long-lasting metal surface rather than a quick cosmetic fix. The underside of a door is a high-wear area; it endures splash from road spray, contact with moisture in the frame, and occasional impact from road debris. Preparation, therefore, must be thorough enough to withstand these challenges while remaining flexible enough to accommodate the next steps in patching or finishing if needed. This is the hinge point where planning and patience pay off. If deeper structural damage is evident, if you see holes or extensive thinning, the repair path may require more than surface treatment, including patching or professional evaluation. But even in those cases, the discipline of clean, methodical preparation remains the foundation of any successful solution.
As you work, maintain a steady, organized workflow. Keep your workspace free of dust, and cover nearby areas with drop cloths to prevent contamination. Protect your eyes and skin from dust and chemical splashes, and ensure good ventilation, especially when using solvents or aerosols for primers and sealants. It helps to have a simple, repeatable sequence: identify, clean, remove, neutralize, sand, wipe, prime, and dry. When you hold to this rhythm, you reduce the risk of missing a hidden pocket of rust or leaving a layer that could trap moisture later. You also preserve your ability to resume work without re-conditioning the surface, saving time and money in the long run.
This chapter anchors the history of any rust repair project by aligning preparation with long-term performance. It does not promise a miracle cure in a single afternoon, but it does offer a robust framework for turning a compromised edge into a stable, protected section of the door. The process honors the reality that the bottom of the door is a living interface with the elements. It deserves an approach that respects both safety and longevity. As you prepare to proceed to the repair itself—whether it’s welding a patch, applying body filler, or re-spraying to match your vehicle’s color—remember that the quality of your initial cleaning and surface preparation determines the bite of the patch and the resilience of the finish. The adage holds true here: good prep equals good adhesion, and good adhesion equals a rust repair that lasts longer than a season.
To keep this journey practical and grounded, consider this additional guidance. For readers seeking hands-on, project-neutral guidance that complements these steps, the Master Truck Repair blog offers practical, accessible insights and scenarios that mirror real-world conditions you’ll face on work trucks and daily drivers alike. Explore practical tips, safe procedures, and technique-focused explanations that stay within the realm of do-it-yourself competence while recognizing when to seek professional help. Master Truck Repair blog
Finally, when you finish this phase of the project, take a moment to evaluate the door’s underside again. Confirm that every seam is clear of debris, that the surface is evenly prepared, and that no moisture has found a foothold behind the primer. This is the moment when you know you have laid a robust groundwork for the next steps—filling, patching if needed, top coat, and sealing. The door’s bottom edge, once neglected, can become a dependable component again when treated with the care and discipline described here. And while you may not know the precise weather or road conditions awaiting the truck in its next journey, you will know that you have given rust a fighting chance by setting a stable, durable foundation for the repair to come.
As you proceed to the actual repair steps—whether that involves fabricating a patch, welding, or applying filler and color-matching paint—remember that the integrity of the finish is inseparable from the groundwork you’ve laid. The rust you remove, the neutralizers you apply, the priming you cap with a film of sealant—these are not merely preparatory moves; they are the essential acts of defense against future corrosion. Treat the process with respect, and the bottom edge of the door will not just survive another season; it will serve as a testament to a repair performed with patience, precision, and purpose.
External resource for professional best practices: ASE Automotive Rust Repair Best Practices. This resource provides standardized procedures and safety considerations that complement the hands-on steps described here. https://www.ase.com/automotive-rust-repair-best-practices
null

null
Polish, Protect, Perfect: Finishing Touches After Rust Repair on the Bottom Edge of a Truck Door
The repair is only as good as its finish. After you’ve cut away, filled, and welded, and after the primer and paint have cured, the last phase of the work focuses on appearance and long-term resilience. The finishing touches are what keep new metal from succumbing to the same moisture and road salts that attacked the door in the first place. They also determine whether the repair disappears into the door’s surface or looks like a patchwork that betrays the work you’ve put in. When done correctly, these steps blend the repair with the surrounding metal, restore a seamless color, and create a shield that resists moisture, salt, and micro-scratches for years to come. The goal is not merely cosmetic shine but a protective, durable barrier that supports the door’s structural integrity and the vehicle’s overall appearance.
Begin with the understanding that patience now saves trouble later. The curing times you followed during the undercoating and topcoat phases are not just numbers on a sheet; they determine how well the layers will respond to polishing and sealing. Once the final topcoat has fully hardened, usually within a day or two depending on the climate and the specific products used, you can begin the finishing process. At this stage, you want to approach the repaired area with the same care you’d give any other body panel, yet you also want to adapt your technique to a relatively small, highly visible zone. You’ll be looking for two things—extremely smooth texture and a color-and-gloss that matches the rest of the door as closely as possible. Any roughness or color mismatch will draw the eye and undermine the repair’s credibility, no matter how sound the metal underneath is.
First comes final sanding, a step that many DIYers treat as a formality but is in fact the crucial bridge between primer and polish. When the primer and paint have cured, usually after 24 to 48 hours, take a sheet of ultra-fine sandpaper, something in the 1000 to 2000 grit range, and very gently work the area. The motion should be flat and even, almost like polishing, not like grinding. The aim is to remove microscopic ridges and any tiny imperfections left by the sanding and filling process, not to remove large amounts of material. Keep the surface moist with a little water to suppress dust and overheating. If you see the color under the clear coat begin to show through in a way that looks uneven, you may be nibbling too aggressively or you may have a high spot that needs a lighter touch. The key is to take small passes and frequently wipe the surface with a clean cloth to inspect progress. You should end with a surface that feels as smooth as glass to the touch and looks uniformly slick in a good light—no rough patches, no specks, no edge anomalies where the repaired area meets the original metal.
After you achieve a uniform feel, the next step is cleaning. Dust, oils from fingers, and residues from polishing can dull the finish or leave micro-motes that compromise the final shine. Wipe the repaired area with a lint-free cloth dampened with a dedicated automotive cleaner or with isopropyl alcohol. Wipe in a consistent pattern and allow the area to dry completely before you proceed. This cleaning stage is especially important on the bottom edge of the door, where road grime can collect and where a small particle can act like sandpaper if it’s trapped under a wax or sealant layer. The goal is a pristine, contaminant-free surface that will accept the protective layer evenly and hold it for the long term.
The protective layer is where you can tilt the repair toward professional results without professional tools. A high-quality wax or sealant provides the frontline defense against UV rays, moisture, and contaminants while also enriching the color depth and gloss. The process is straightforward but precise. Apply a thin, even coat of wax or sealant over the repaired patch and extend the coverage slightly beyond the edges to ensure feathering blends with the surrounding paint. Work in small circular motions, and keep the product off trims and seals to avoid buildup in places that are hard to buff clean. Allow the product to haze or set according to the manufacturer’s instructions, then buff with a clean microfiber towel until the surface gleams with a uniform, glassy finish. The effect should be a protective shield that feels smooth to the touch and looks like a natural continuation of the factory finish, not a separate layer perched on top.
A common question at this stage concerns the balance between color match and texture. You may find that the repaired area shines differently than adjacent panels, or that the gloss feels slightly deeper in the repaired spot. This is a normal consequence of the repair process, and it can be minimized with careful feathering and curing time. If a slight mismatch remains, a light, targeted polish on the surrounding area can help blend the repaired zone into the rest of the door without removing too much of the original paint. If the repaired area still looks dull after polishing, a second, controlled pass with a fresh layer of sealant can help—always testing in a small, inconspicuous area first to ensure you don’t inadvertently strip the color or clear coat.
Inspection is the silent, patient companion to any finishing session. Stand back and view the door from multiple angles and lighting conditions. Look for edges where the new paint might not meet the old paint as cleanly as you’d hoped, or for any micro-misses in gloss that might betray the repair. If you notice a rough edge or a high spot where the surface catches light differently, a conservative final pass with very fine grit, followed by another gentle buffing and a fresh wax layer, can resolve it. The best inspections are performed with the door in natural daylight because it can reveal subtle contrasts that artificial lighting hides. If after your best effort you still see a discrepancy in color or texture, you may decide to consult a pro for a targeted blend and re-clear process. The strength of the finish, however, lies in the discipline you applied during sanding, cleaning, and sealing—each small, careful step compounds to produce a near-invisible repair over time.
Maintenance is where finishing touches transform into lasting protection. The most important routine is regular cleaning, especially after exposure to salty roads, winter grime, and wet conditions. A clean surface is less prone to moisture retention and rust re-growth than a dirty one, and it keeps the protective coating performing as intended. Beyond cleaning, consider a periodic wax or sealant reapplication, particularly if you live where weather swings are harsh or if you drive in coastal or salted environments. The exact cadence will depend on climate and driving conditions, but many owners find that a biannual or seasonal reapplication, timed before peak corrosion seasons, provides the best balance of effort and protection. In harsher climates, inspecting the undercarriage and lower door areas for signs of moisture intrusion or paint chipping becomes part of a broader rust-prevention routine. If you notice tiny specks of corrosion reappearing at the edge, it’s a cue to re-clean, re-seal, and possibly re-wax the area to restore the protective barrier before the problem progresses.
Long-term prevention is, in essence, a mindset about maintenance rather than a single product choice. Keep the underside of the door and the bottom edge free of debris, wash after driving through salty slush or heavy rain, and consider an occasional rust-proofing treatment in climates where salt and moisture are persistent foes. The repair’s longevity is tied to how consistently you monitor and care for the area after the initial finishing. The more you treat the repaired edge as part of a broader, ongoing protection strategy, the less you’ll face future rust creeping back in from beneath the paint. Remember that the repair is an investment that pays dividends in appearance and resale value when you maintain it with duty-cycle discipline and a routine that fits your driving environment.
For readers seeking a grounded plan that extends beyond this chapter, a practical approach is to integrate finishing-touches maintenance into a broader maintenance calendar. A straightforward routine could be: inspect monthly for any paint cracks or dull spots on the door edge, wash the area biweekly during off-season or after exposure to salt or mud, reapply a protective layer every four to six months or after significant wear, and perform a pro-grade re-polish or touch-up coating whenever you notice changes in gloss uniformity. This cadence keeps the repaired edge aligned with the rest of the door and reduces the likelihood of rust re-emerging under compromised finishes. If you want more structured guidance on budgeting for routine truck maintenance and planning long-term care, a resource focused on maintenance budgeting can provide a clear framework for scheduling these tasks and allocating funds accordingly.
Internal link for practical planning: you can explore budgeting for routine truck maintenance to formalize your approach and keep up with upkeep in a consistent, financially sustainable way. Budgeting for Routine Truck Maintenance.
As you close the finishing chapter on this rust repair, keep one overarching idea in view: the repair’s finish is the final armor against the day-to-day assaults of road grime, moisture, and temperature fluctuations. The steps—from final sanding to a disciplined maintenance plan—form a holistic process rather than a sequence of isolated actions. When you treat the completed repair as part of an ongoing care regimen, you maximize the door’s longevity, preserve the vehicle’s aesthetic, and avoid the cumulative costs that rust can impose if left unchecked. If the repair shows strong signs of durability in the months ahead, you’ve not only restored function but also reinforced confidence that meticulous, patient work can extend the life of metal and paint alike. For additional professional perspectives on post-repair care, consider authoritative resources from the automotive service community, which emphasize best practices in refinishing, corrosion prevention, and long-term maintenance. https://www.ase.com/
Final thoughts
Addressing rust on truck doors is a vital practice for maintaining fleet integrity and performance. Effective repair begins with accurate damage assessment, followed by thorough preparation and cleaning, precise structural repairs, and expert finishing touches. By adopting these techniques, fleet managers and trucking company owners can extend the life of their vehicles, reduce downtime, and minimize operational costs. Staying proactive in rust repair contributes to safety and enhances the overall value of fleet assets.

