The integrity of truck camper deck beds is crucial for both safety and functionality, especially for fleet managers and operators in industries such as construction and mining. This guide outlines key steps to effectively repair and maintain the deck bed overhang, addressing common issues like water intrusion, rot, and structural weakness. Each chapter will provide specific insights into inspecting damage, repairing rot, replacing damaged sections, and reinforcing the structure—ensuring your fleet remains reliable on the road and at the site.
Reading the Quiet Warnings: A Thorough Inspection of the Truck Camper Deck Bed Overhang
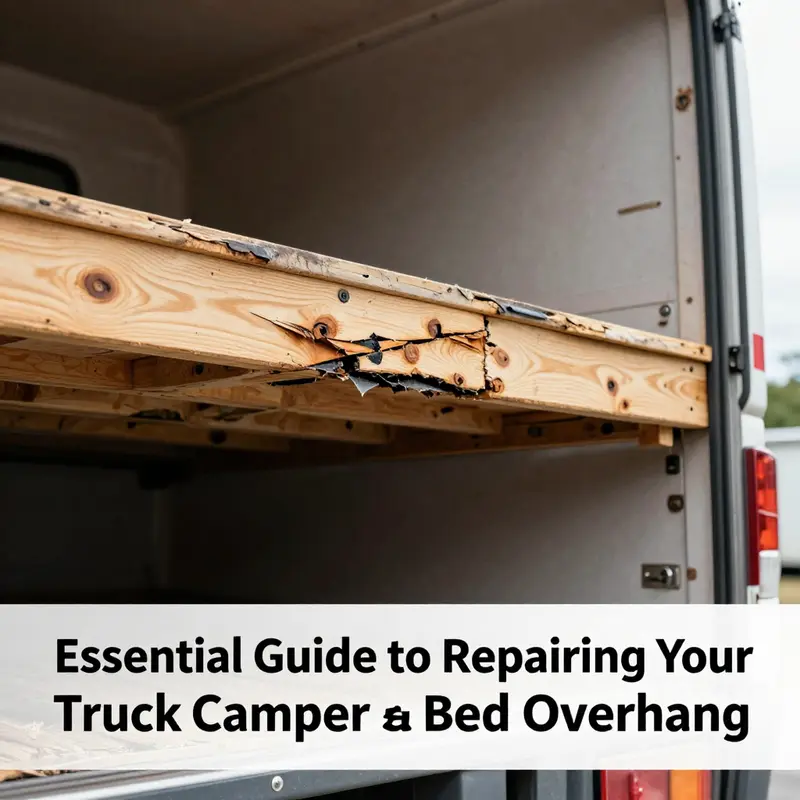
The overhang of a truck camper is more than a decorative overhang; it is a critical structural element that bears weight, transfers loads, and endures the fatigue of road travel. It extends beyond the truck bed and anchors the living space to the chassis, taking on the brunt of dynamic forces when you climb aboard to load gear, step outside to connect hoses, or navigate rough terrain at the end of a long day on the road. Because this component works in tension and compression across a wide interface—where the camper meets the deck, the rails, and the frame—hidden problems can fester without obvious symptoms. A careful inspection is not a luxury but a frontline defense against sudden failure that could compromise safety, damage the camper, or strand you far from help. A well-executed audit of the deck overhang reads the health of the structure through signs that may be subtle: a faint rust stain on a bracket, a hairline crack along a panel edge, a soft place in the wood under a joint, or a gentle misalignment that becomes more noticeable after a bumpy ride. Understanding these signals begins with a patient, methodical gaze and a willingness to probe with gentle touch and deliberate curiosity.
The best inspections balance eyes, hands, and hearing. Start with a visual sweep that travels from the outer edge inward: look for cracks in fiberglass or composite panels, and inspect the seams where the overhang meets the deck and the sidewalls. A hairline crack can be a thread that, if pulled, unravels a larger problem, especially if it runs along a joint or corners where stress concentrates. Pay attention to mounting brackets—these are the anchors that hold the overhang to the truck frame—and examine every bolt, weld, and connection for signs of corrosion, looseness, or distortion. If you spot rust that has spread beyond a bolt head or bracket, that is a clarion call to dig deeper into the metalwork. A visual assessment must be patient and wide-ranging, because the issue rarely announces itself in a single spot. It presents as a pattern of vulnerability around fasteners, joints, and interfaces that are repeatedly stressed every time you hit a pothole or bend a corner at speed.
To move beyond what the eye can discern, gather a small toolkit for the tactile portion of the inspection. A bright flashlight is essential; it turns hidden gaps and shadowed corners into legible terrain. A compact inspection mirror helps you peer into tight cavities behind panels and brackets where water might hide. A sturdy probe—the end of a screwdriver handle or a similar blunt instrument—lets you test the firmness of wood and foam cores by gentle tapping. A moisture meter is a helpful optional tool to quantify dampness in wood, but even without it you can gauge moisture by how wood responds to touch and by the presence of staining or a dark, damp odor near a joint. As you work, keep a careful ear for signs of hollow or delaminated panels when you tap along the deck’s underside or the overhang’s edge. A hollow sound often points to internal voids, concealed rot, or degraded framing that may not be visible from above.
In many cases, the most telling indicators are not dramatic, but cumulative. The overhang’s metal components—mounting brackets, rail attachments, and hardware that pins the structure to the truck—are prime suspects for corrosion and loosening. Road salt, rain, and continual vibration can corrode metal fasteners from the inside out, weakening the very threads that maintain alignment. A bracket that once held a precise, unwavering stance may begin to show a slight tilt, a couple of shy millimeters of movement, or a gradual shift in its position relative to the deck. Over time, loose fasteners compound stress in the surrounding wood and fiberglass, creating a feedback loop that accelerates wear. The result can be not just a wobble but a compromised interface where the overhang meets the deck. In some cases, the corrosion is not immediately visible; it may appear as a rough texture under a bracket or as a dull finish where a bolt should gleam. It is worth pausing on these signs rather than rushing past them, because metal fatigue can propagate into the very structure that keeps the deck aligned with the truck.
Cracks in the panels themselves deserve careful attention. Fiberglass and composite panels can tolerate a fair amount of flex, but fatigue cracks at the overhang’s edge or along a seam can widen with heat and movement. When a crack runs along a joint line or encounters a corner where multiple pieces join, water can track into micro-gaps and, over time, penetrate to the core material. If you observe fiber separation, delamination, or a spider web of fine lines that deepen after a rain, slow, careful repair is warranted. It is not necessary to panic at the first hairline crack, but it is prudent to map its location and monitor it across seasons. A cracked panel can be a conduit for moisture, and moisture, in turn, invites rot or corrosion that is far more expensive to remediate than a targeted, timely repair.
Sagging and warping present as visible evidence that the deck’s supporting structure is under duress. A deck that shows a bellied or uneven surface, or an overhang that tilts away from the truck frame, is not a cosmetic misalignment; it is a symptom that the internal joists, supports, or attachments have weakened. When the overhang drops a few degrees, stress can transfer to the fasteners and seals, amplifying the risk of water intrusion. Warping can also be a sign of wood that has absorbed moisture, swelled, and then dried unevenly, losing stiffness in the process. If you encounter sag, proceed with a measured plan: identify the source of the unsupported span, determine whether the problem is a localized joint, a cracked support, or a compromised deck member, and then decide on a course that restores evenness while preserving the deck’s integrity.
The metal side of the equation deserves its own careful scrutiny. Corrosion around the mounting brackets and rail connections does not only look unsightly; it weakens the very bond that keeps the overhang aligned with the truck. Where fasteners show signs of rust, replace them with corrosion-resistant hardware and ensure that any sealant gaskets around holes are intact. It is common to discover that some fasteners have loosened over time; others may be missing entirely. In such cases, the overhang is subject to greater vibration-induced movement, which can propagate cracks and loosen adjacent hardware in a cascading pattern. The inspection should conclude with a systematic check of every screw, bolt, and hinge—tighten those that are snug, replace those that show visible wear, and re-seal every penetrated surface to prevent future water ingress.
If you encounter moisture near seams or joints, you are likely facing a moisture path that invites rot or swelling. The detector here is patience and a willingness to let wood dry before you attempt repairs. Do not seal over rot; that is a shortcut that traps decay inside and makes future remediation more difficult. When rot is present, identify the extent of the damage by trimming back to solid, dry material. Replace the missing wood with the same thickness and a durable substitute, such as pressure-treated lumber for exterior-grade wood components or marine-grade plywood for panels and sub-decks. The precise fit matters: the new section should sit flush with the surrounding surface, and the joints should be clean, tight, and free of gaps that would trap moisture. Use a waterproof adhesive in addition to corrosion-resistant fasteners to create a sturdy, moisture-resistant bond. The replacement piece should be clamped and aligned carefully during installation; any tilt or misalignment between the new cut and the existing deck will create an uneven load distribution that defeats the purpose of the repair.
Beyond replacing rotten sections, addressing structural reinforcement can provide long-term resilience. If the original framing feels weak or span distances exceed what the deck was designed to bear, add reliable support beneath the overhang. Cross-bracing between joists, extra blocking, or the installation of metal angle braces in discreet locations can distribute loads more evenly. The objective is to reduce point loads and to maintain a level, continuous surface that sheds water rather than forming hidden pockets where moisture can linger. When you add these reinforcements, validate that all attachments remain synchronized with the vehicle frame and deck geometry. The aim is to create a stiff, integrated structure that resists flexing during road vibration and that maintains the overhang in true alignment with the rest of the deck.
Finishing and sealing complete the cycle of inspection and repair. After structural work, thoroughly clean exposed wood and joints to prepare for sealant. Apply a high-quality exterior-grade sealant to all seams and fastener holes. A durable waterproof coating on the top and sides of the overhang helps deter moisture entry and makes annual maintenance more straightforward. Schedule reapplication every one to two years, depending on climate and exposure. Remember that sealant is a protective boundary, not a substitute for structural integrity. Sealant slows moisture ingress and reduces the risk of water damage, but it cannot compensate for sagging, cracking, or rot that already exists on the internal framework. Regular re-checks of coatings and edges will catch wear early and keep the deck performing as designed for many seasons.
A complete inspection emphasizes the importance of fastener health, too. Tighten any loose fasteners and replace those that show corrosion or deformation. Use washers to spread loads, and consider gaskets in or around holes to minimize water penetration. These details may seem small, but they accumulate into a robust, leak-resistant envelope around the overhang. After the repair work, recheck overall alignment and ensure there are no stray gaps along the interface where water could collect and cause future issues. A disciplined approach to fasteners, seals, and alignment creates a durable result that is less prone to recurring problems after rough terrain or severe weather.
Maintaining an overhang is not a one-off event; it is a rhythm of care that aligns with the camper’s broader maintenance plan. Establish reminders to recheck the deck and overhang at least annually, and after any long trip or extreme weather event. Even small reseals should be reevaluated in the next seasonal check. The payoff for this restraint is a deck that remains a confident staging area for daily routines, a living space that resists the wear of travel, and a system that keeps you safe on the road. If the findings of an inspection feel beyond a straightforward patch, there is wisdom in seeking a professional assessment. A certified technician or an experienced camper assembly specialist can provide a rigorous evaluation and map out a repair plan that matches the vehicle’s make and model while upholding universal structural standards. A professional perspective serves as a valuable complement to your own checks, particularly when hidden rot, delamination, or complex reinforcement is involved.
In the end, reading the life history of the deck overhang is a skill born of patience. It requires looking beyond surface care and listening to the subtle cues of wear, vibration, and moisture. When you combine deliberate visual checks with careful tactile testing, dry-out periods after exposure to moisture, precise wood replacement when necessary, and thoughtful reinforcement to distribute loads, you restore not only the structural capacity but also the peace of mind that comes with a safe, dependable home on wheels. The journey from alarm to assurance hinges on a steady discipline of inspection, measured repair, and ongoing maintenance that keeps the overhang singing in tune with the rest of the vehicle and the road ahead.
For more practical, step-by-step context and visuals, see the Master Truck Repair blog at mastertruckrepairllc.com/blog/. It offers additional perspectives on structural checks, hinge and bracket maintenance, and careful approaches to patching deck components in mobile living environments. As you navigate these repairs, it is also wise to align your work with recognized industry standards and guidelines that address deck bed overhangs and related structural components. This alignment helps ensure that your repairs meet safety expectations and endure under real-world use, from long highway miles to off-road journeys. Following established guidelines reduces the risk of hidden defects and supports long-term reliability for your on-road home.
External resource: https://www.rvia.org/
Repairing Water Intrusion and Rot in Truck Camper Deck Bed Overhang: A Practical Path to Longevity
Water intrusion in a truck camper deck bed overhang is not always dramatic at first glance. The symptoms can be subtle yet relentless: a soft spot underfoot, a faint warp along the edge, or a persistent misting of moisture at seams after a rainstorm. When the overhang connects the camper body to the truck bed, it becomes a critical junction where moisture can travel unseen, seeping through micro-gaps and pooling at joints. A well-planned repair begins with a calm, patient assessment rather than a quick, band-aid fix. It is a test of measurement, materials literacy, and an eye for the way water travels over a curved surface and around fasteners. The goal is not merely to stop the current drip but to restore the deck’s structural integrity and create a durable envelope that can withstand repeated weather cycles. This is a chapter about reading the signs, removing the compromised wood, addressing the moisture source, and rebuilding with an approach that emphasizes long-term protection as much as immediate usability.
The inspection step is where many repairs begin to diverge. A thorough walk-around and a careful hands-on check reveal the true extent of the damage. Soft wood, discoloration, and the growth of mold point toward rot, while feel and sound under a tapping or probing motion can confirm structural weakness. The junction where the overhang meets the main deck and the side walls is particularly important. Micro gaps along these lines act like tiny channels, guiding rainwater, wash-water from a vehicle wash, and even road spray into the wood. These joints often hide the most persistent leaks because the moisture can travel laterally along hidden channels before it finally shows itself as staining or sag. Recognizing these signs early reduces the risk of a larger failure in the next storm or after a vehicle wash. It also informs the sequence of work that follows, which is as important as the work itself. A calm, methodical approach keeps the repair focused and reduces the chances of missing hidden rot that will reappear later.
When rot is confirmed, the next move is careful removal. Damaged material must be cut back to sound, dry wood, a rule that keeps the repair from chasing after revived rot in the months ahead. This means using a sharp saw and a sturdy chisel, cutting with straight lines to keep the replacement piece easier to fit. The goal is not to be aggressive but to be precise: clear away the compromised wood until a solid, dry core remains. It is essential to ensure a dry condition before proceeding. Wood that dries slowly invites future trouble, so the area should be allowed to acclimate in a well-ventilated environment, ideally with good air flow and a dry temperature. This drying period may take several days, depending on climate and the level of moisture detected in the surrounding materials. During this time, it helps to prepare your replacement components and plan the seam details that will eventually seal the zone against weather.
Root-cause analysis is the quiet but decisive phase. The best repairs address the source of moisture as well as the symptom. Often the problem lies in aging or compromised seals at seams, joints, or where the overhang meets the camper body. The repair gains lasting value when you re-seal joints with a high-quality marine-grade sealant or equivalent material, and when you replace worn or cracked seals that permit even tiny leaks. While this section speaks in generalities, the real work is about ensuring a reliable drainage path away from the vulnerable junction. If water can pool or sit along the edge, it will work its way into the wood, gradually dissolving the bonds and inviting rot anew. Long-term durability is enhanced when a flashing system is considered for the junction—an edging, either metal or rubber, that directs water away from the wood and toward a safe drainage path. Installing this flashing correctly requires attention to overlap, seam integrity, and the continuity of the waterproof envelope around the entire overhang. It is one of those details that pays dividends during heavy rains or when the camper is washed, because it reduces the likelihood of water finding its way into the wood rather than around it.
Wood treatment after rot removal is not a cosmetic step. It is a preventive measure that supports the longevity of the repair. Exposed wood surfaces should receive a waterproof coating that can resist soaking during rain, spray, or dew. The coating should be compatible with the materials used in the deck and be able to flex slightly as the wood expands and contracts with changes in temperature and humidity. After applying the coating, the wood must be allowed to dry fully before the next stage of the repair begins. This careful sequence—drying, sealing, and then assembly—helps prevent a return of rot from residual moisture and ensures that the new wood bonds properly with the surrounding material.
Replacement decking is the practical backbone of the repair. When rotted sections are cut away, the replacement piece must fit precisely and provide solid support without creating new weak points. The common choices for a truck camper overhang are treated lumber or rot-resistant composite decking, depending on availability and budget. The new piece should be cut to fit the removed section with a tight, flush surface against the rest of the deck. When attaching the replacement, corrosion-resistant screws are essential, and the use of a waterproof adhesive—such as an epoxy or a polyurethane glue—helps seal the joint and reduce the risk of moisture ingress through micro-gaps. The mechanical fasteners must be chosen for their ability to resist rust and withstand outdoor exposure. Ensuring that the new section is level and flush with the surrounding deck is critical to maintain even weight distribution and to avoid creating stress points where cracks and creaks can begin.
In practice, the repair is a balance between restoring strength and maintaining a prudent, weather-ready exterior. Once the wood is in place, additional reinforcement can be considered, especially if the overhang feels weak or sags slightly. Underneath the overhang, you might add support brackets or metal angle braces to transfer loads more effectively to the main deck structure. Some builders choose to add cross-bracing or blocking between joists for long-term stability, particularly in models with extended overhangs or in climates where heavy rain and wind are common. These steps are not merely precautionary; they provide tangible support that reduces the risk of future sagging or movement that could reintroduce gaps and invite moisture to re-enter.
Sealing and finishing complete the outer layer of protection. A quality exterior-grade sealant or waterproof coating should cover all exposed surfaces, including the newly fitted decking and the edges where the overhang meets the body of the camper. The key with any sealant is to ensure proper surface preparation, adequate cure time, and periodic reapplication. Over time, the sealant can degrade due to UV exposure, temperature cycling, and movement of the structure. Reapplying every one to two years, or as conditions dictate, keeps the protective barrier intact and reduces the chance of water finding a path past the deck. It is worth noting that while the outer seal is essential, the interior surfaces adjacent to the repair should also be checked for moisture that could travel inward through fastener holes or minor cracks.
Fasteners and hardware deserve focused attention. Leaks are often the result of loose or rusted screws, bolts, or hinges, especially where the overhang attaches to the truck bed or camper body. Tightening or replacing those fasteners with weatherproof components helps maintain a robust enclosure. When holes are drilled or screws inserted, use appropriate gaskets or washers to create a watertight seal around fastener holes. Silicone gaskets or seals around penetrations help prevent water entry at critical points. This practice reduces the need for rework and preserves the integrity of the deck and the overhang for years to come.
The repair journey also includes practical, field-smart considerations. A common DIY impulse is to seek quick fixes for a persistent drip, and a temporary solution often involves filling gaps with foam or other makeshift materials. While such measures can reduce air movement and offer brief relief, they are not a substitute for a thorough repair. They may degrade under UV exposure and mechanical stress, and they do not address structural rot or the root cause of water intrusion. A more measured approach favors identifying the moisture source, restoring wood integrity, and rebuilding a sealing system that endures.
For those pursuing a durable, long-lasting outcome, the choice of materials matters. Modern repairs benefit from rot-resistant wood or engineered composites that resist decay and are less prone to swelling from moisture. In conjunction with these materials, a flexible, durable sealant and a proper flashing system create a resilient barrier that accommodates expansion and contraction while keeping water out. The emphasis is on a complete envelope rather than a patch that merely slows a leak. These decisions—how you join the pieces, what you seal, and how you drain—define the lifespan of the repair and influence the overhang’s behavior in rain, snow, and highway spray.
If you want to explore more practical steps, visuals, and community-tested tips, you can visit the Master Truck Repair blog for related repair guidance and context. It offers a broader view of how professionals approach truck camper maintenance and common deck issues, including overhang repairs. Master Truck Repair blog.
Finally, there is value in broadening the perspective beyond the immediate repair. A well-planned waterproofing strategy for a truck camper overhang considers seam integrity, proper drainage, and periodic inspection as part of routine maintenance. A good rule of thumb is to recheck seals, coatings, and fasteners after each heavy rain season and again after any vehicle wash that involves spray splatter on the upper surfaces. By pairing careful repair with a proactive maintenance mindset, the overhang becomes a durable component rather than a recurrent problem.
For readers seeking a thorough, field-tested approach to waterproofing and long-term protection at the overhang junction, a detailed external resource offers additional depth and practical nuances beyond the scope of this chapter. It provides perspectives on flashing design, gasket choices, and long-term performance under varying weather conditions. You can explore it here: https://www.wanderthewest.com/truck-camper-overhang-waterproofing.
Replacing Damaged Sections of Truck Camper Deck Bed Overhang
Replacing damaged sections of a truck camper deck bed overhang is more than a cosmetic fix. It is a restoration of structural continuity, load paths, and moisture defense that keeps a mobile home ready for long trips and off-road adventures. The overhang is a critical junction where the deck meets the sidewalls and the main structure of the camper. When a portion is compromised by rot, warping, or cracking, the entire integrity of the deck can be at risk. The goal of replacement is twofold: remove the compromised material without disturbing healthy wood, and install a new section that integrates seamlessly with the surrounding deck, preserving both strength and water resistance. The approach should remain systematic, patient, and precise, because a rushed cut or a sloppy joint can invite future rot and water intrusion. The process begins with a clean assessment, moving through careful measurement, a controlled removal, and a thoughtfully chosen replacement that matches the original in strength and durability. A properly executed replacement will restore the deck’s continuity and help sustain the vehicle’s structural safety for years to come.
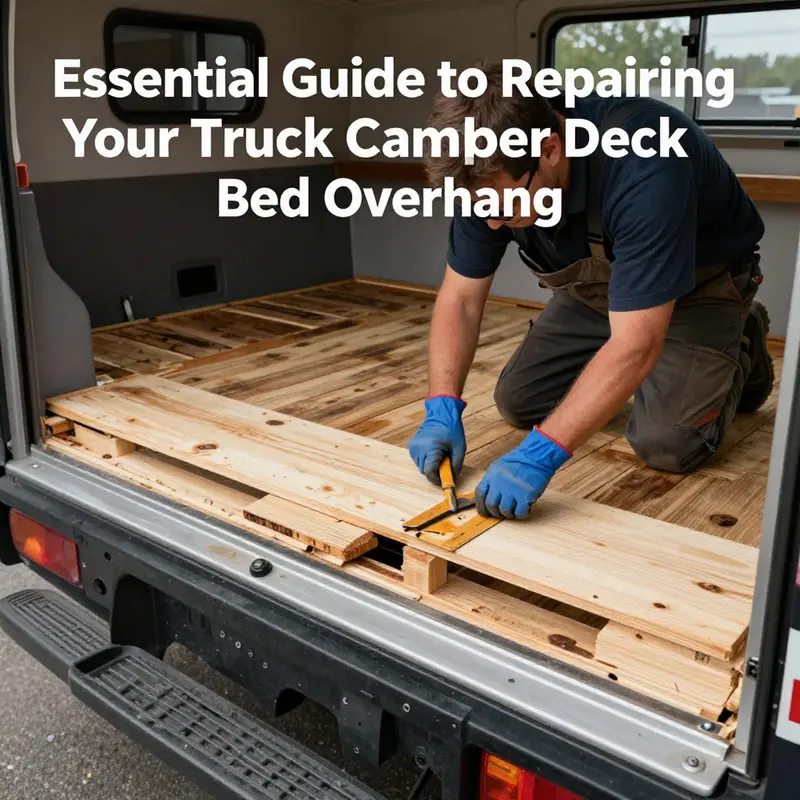
The first step is to remove only the damaged portion while preserving clean edges that allow for a secure fit. This means taking precise measurements of the extent of the damage and carefully cutting away the rotted or cracked material with tools that do not disturb the surrounding sound wood. It helps to work from the exterior edge inward, exposing a stable, dry margin of clean wood that can serve as a reference plane for the new piece. A crisp edge is essential; it prevents gaps at the joint that could trap moisture and compromise the seal. While you cut, you’ll notice that moisture can travel along the grain, so it’s important to work gradually and check your cuts from multiple angles to ensure the removed portion is square and true. After removing the compromised wood, you should inspect the exposed area for any signs of deeper rot or insect damage. If you find soft spots or discolored fibers in the surrounding wood that extend beyond the initial damaged zone, extend the removal to reach sound, dry material. A little extra cut done with care can prevent a later call-back for a similar repair.
With the damaged portion removed, the next phase is to measure and cut the replacement. Precision here matters as much as the cut itself. Use a sturdy measuring tape or a laser distance tool to capture the exact length and width of the opening. Remember to account for the thickness of the deck surface and any underlayment that lies beneath the overhang. The replacement piece should mirror the original in both dimensions and structural capability. Material choice is also critical. Two widely recommended options are marine-grade plywood and pressure-treated lumber. Marine-grade plywood provides excellent resistance to moisture and holds fasteners securely in place, while pressure-treated lumber offers durability and rot resistance that can withstand outdoor exposure. The thickness should align with the surrounding deck; if the deck uses a 3/4-inch thickness in the immediate area, the replacement should follow suit to prevent a step or uneven surface that could trip or trap water. When cutting the replacement, use sharp blades and clamps to keep the cut edges square and tight. Dry-fit the new piece first, setting it into place without adhesive to confirm that it sits flush with the deck surface and aligns with the edges of the surrounding boards and joists. A well-fitted piece will give you confidence that the subsequent fastening will produce a solid, water-tight joint rather than a loose patch.
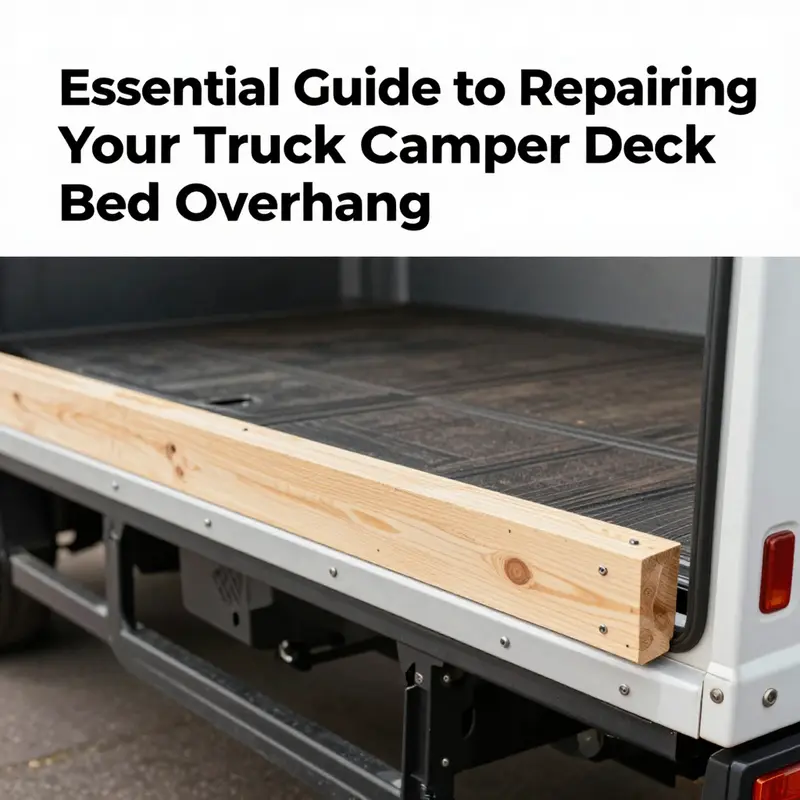
Securing the new section is where the repair becomes durable and long-lasting. Fasteners should be corrosion-resistant to withstand the outdoor, vibration-filled environment that a vehicle experiences on the highway and during off-road travel. Stainless steel or coated screws, applied with careful torque, provide reliable holding power without inviting rust into the joints. In addition to mechanical fasteners, apply a waterproof adhesive at the joints to seal the edges from the inside out. The adhesive should be chosen for exterior use and for compatibility with both the decorative deck surface and the chosen replacement material. When driving fasteners, take care to keep the heads flush or slightly below the surface to avoid creating ridges that can trap water. If gaps exist at the joint due to slight variances in the cut or deck curvature, filling them with a high-quality exterior-grade sealant before final fastening can help prevent water intrusion. A careful, methodical approach to fastening not only declares the repair as solid but also reduces the risk of future movement that could loosen the joint and invite detritus and moisture into the seam.
Reinforcement under the overhang is a prudent step that pays dividends in long-term stability. If the original design shows signs of sag or if the overhang feels weak when tested with light pressure, adding support brackets or metal angle braces beneath the overhang can restore rigidity. These supports should be designed for outdoor use and anchored to sound portions of the deck framing. Cross-bracing and blocking between joists can further distribute loads and reduce localized stress near the replacement. The goal is to create a continuous, well-supported structure that resists deflection and maintains a level surface for the deck above. When installing reinforcement, ensure that any new support members do not interfere with drainage paths or create pockets where water can collect. Proper alignment with existing framing is essential so that the deck behaves as a single, cohesive unit under load and weather exposure.
Seal and finish are the last defensive lines against moisture ingress. Once the new section is securely in place and reinforced, you should seal all exposed surfaces comprehensively. An exterior-grade sealant or waterproof coating should be applied to all joints and any raw edges of the replacement material. The coating needs to be compatible with the chosen deck material, and multiple thin coats may provide a more durable barrier than a single thick application. Remember that coating is not a one-and-done solution; it requires reapplication on a schedule—typically every one to two years, depending on climate exposure, sun, and wear. After the sealant cures, inspect the seam again to confirm there are no gaps or signs of moisture wicking. A thorough finish protects the new section from weather, sun, and friction, ensuring the repair remains intact through seasons of travel.
Throughout this process, attention to fasteners and hardware remains critical. Loose or rusted screws, bolts, or hinges are a common source of failure after a patch repair. Tighten or replace any questionable hardware, and choose weatherproof washers and gaskets around fastener holes to prevent water from entering the wood through the deck surface. The goal is to create a sealed, stable system where each fastener plays a part in defending against the elements. As you work, maintain a cadence that respects the vehicle’s structure and the delicacy of the surrounding deck. An overzealous hand with a drill can overdraw a hole or crack a board, while a cautious touch builds a joint that will endure.
Before proceeding, it is wise to consider local regulations and vehicle modification guidelines. Many jurisdictions have specific rules about altering the structure of a vehicle or altering the waterproof envelope around a living space on wheels. Checking with local authorities or a trusted technician can prevent delays or legal concerns if the repair involves cutting into structural members or altering the exterior envelope. A straightforward replacement that follows standard carpentry and marine- or exterior-grade practices typically aligns with most guidelines, but a quick check can save headaches later. This is especially important for owners who rely on the camper for extended travel or seasonal use, where compliance and safety carry extra weight. If you’re working in a shop or alongside a professional, bring along your notes on materials, dimensions, and fasteners. The documented measurements and chosen methods can help ensure that any inspection sees a coherent, justifiable repair rather than a patchwork fix.
As you complete the replacement, the narrative of the deck returns to its original flow. The new section should sit in the same plane as the surrounding deck, with clean joints and a uniform appearance. The joined area should shed water rather than hold it, with the sealant bridging the seam as a continuous barrier. The finish should blend with the adjacent boards to preserve the deck’s overall look, while the internal reinforcement provides reassurance that the repair will withstand both the weather and the road’s constant vibrations. With every bolt tightened and every edge sealed, the deck overhang regains its intended performance. The replacement is not a one-off effort; it becomes part of a longer-term maintenance story, a reminder that the deck’s health is tied to the vehicle’s safety and longevity on the road. If you’ve found this chapter useful, a practical, broader overview of related deck repairs can be found in the Master Truck Repair blog, which offers accessible guidance and practical tips for ongoing truck maintenance. Master Truck Repair blog
For readers seeking more comprehensive, visual guidance, the replacement workflow outlined here aligns with established best practices in the field. The emphasis on clean edges, precise measurements, appropriate material selection, and careful sealing mirrors guidance found in authoritative repair resources. It is important to approach every overhang repair as an integrated project that protects the deck, the living space, and the vehicle’s structural integrity. By treating the replacement as a planned, well-documented process rather than a quick fix, you reduce the likelihood of moisture intrusion, rot return, and future repair cycles. This disciplined approach fosters confidence in the repair and helps ensure that the truck camper remains a dependable home on wheels across many miles and seasons.
External resource for deeper guidance: https://www.truckcamperlife.com/truck-camper-bed-repair-guide
Strength Under Strain: Reinforcing the Truck Camper Deck Bed Overhang for Safe, Durable Travel
The overhang that projects beyond a truck camper’s main deck is more than a visual detail; it is a critical structural element that bears weight, absorbs vibration, and communicates with the vehicle’s frame under every mile of travel. When the overhang is weak or deflects under load, the risk isn’t just cosmetic. A flexing deck can transfer fatigue into joints, loosen fasteners, and, in worst cases, compromise safety during cornering, braking, or jar-filled highway miles. The goal of reinforcement, then, is not to turn the overhang into an indestructible slab, but to create a predictable, stiff, and well-damped system. It should distribute loads evenly, resist the dynamic shocks of road conditions, and maintain compatibility with the camper’s existing structure. In practice, reinforcement is a carefully planned layer of improvements that complement, rather than override, the original design. It respects the frame rails, the deck surface, and the connection points where the overhang meets the main deck and the camper walls.
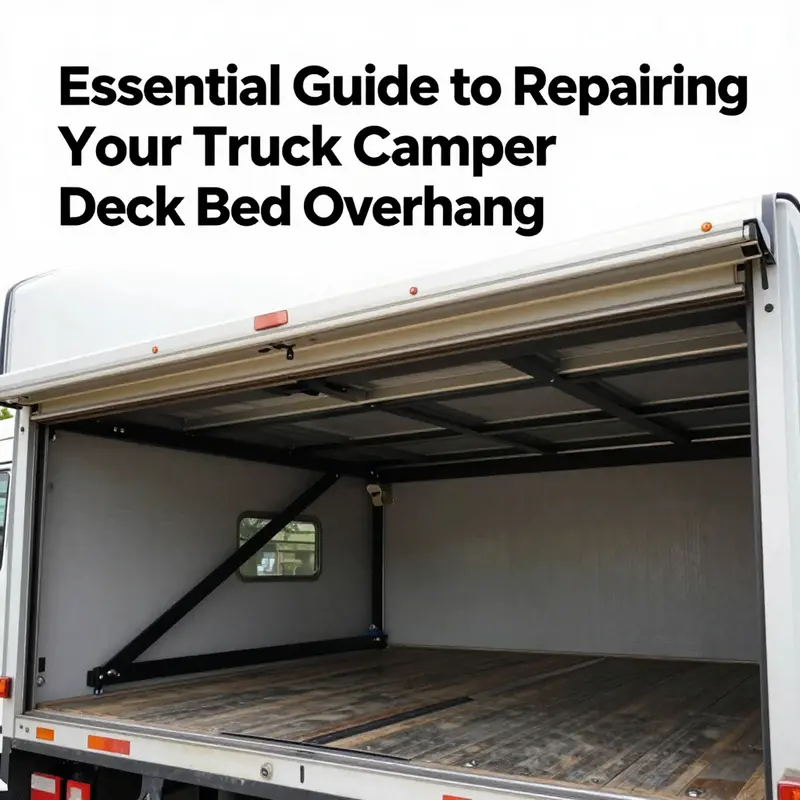
The most fundamental principle is to convert a susceptible, cantilevered surface into a trussed assembly. A cantilevered deck tends to bend at midspan when loaded or during rough road conditions. By introducing a rigid, load-distributing backbone underneath, you create a path for forces to travel into the chassis and frame rather than into the deck surface or fasteners. Steel often becomes the backbone of choice because it combines strength with predictable behavior under heat, cold, and corrosion when properly treated. The practical implementation begins with a precise assessment of the existing structure. Before you touch a hammer or drill, you measure the overhang’s length, note any sag, check for cracks where the deck meets the frame, and inspect the underdeck area for signs of water intrusion, rust, or previous repairs that might affect how new components will sit.
When the assessment reveals a usable baseline, the reinforcement plan comes into focus. You want to create a stiff, connected system that breathes with the vehicle, not a patchwork that isolates the overhang from the rest of the structure. A robust reinforcement usually involves three linked elements: a steel backbone integrated into the space beneath the overhang, reinforced mounting connections that tie the deck to the truck chassis with substantial hardware, and a careful selection of deck and fastener materials that resist movement, corrosion, and vibration over time. The most decisive advantage of steel backbones is their stiffness. A well-designed channel, angle, or tube that runs under the overhang and is bolted to the frame rails becomes a continuous member. It distributes loads from the overhang into the chassis as a unit, rather than relying solely on bolts through the deck or the original fasteners at odd angles.
Begin with the steel backbone. The exact cross-section depends on the weight the overhang carries, the distance from the anchorage points to the extreme ends, and the dynamic loads produced by highway travel. Angle iron, C-channel, or a rectangular tube can serve as the core. The piece should be cut to fit snugly beneath the overhang, with end cuts that align with surrounding bracing. The installation should use high-strength, corrosion-resistant fasteners. In most cases, through-bolts that penetrate into the frame rails are preferable to self-tapping screws, because they provide a deep, resilient bite into structural metal. When you bolt the backbone to the frame, you create a fixed, rigid path for loads to follow. This is not a cosmetic improvement; it’s a fundamental shift in how the overhang handles weight and vibration.
Next comes the mounting strategy for the entire deck and overhang. A reinforced deck must include robust mounting brackets at several key junctions where the deck meets the frame and where the overhang abuts the main deck. The goal is to eliminate stress concentrations—points where loads can concentrate and cause small cracks to propagate. gussets—triangular reinforcement plates—at the deck-frame junctions are a practical way to spread forces more evenly. The brackets themselves should be made from thick steel or a high-grade aluminum alloy, depending on weight considerations and corrosion risk. The fasteners chosen for these connections deserve equal attention. Longer, through-bolted connections with locking hardware, stainless steel or coated fasteners, and high-grade washers create a distributed clamping force that resists loosening under vibration. A gasket or silicone seal around fastener holes also helps shield the interfaces from water infiltration that could, over time, undermine the connection’s integrity.
Material choices play an equally important role in long-term performance. The reinforced deck may stay as a plywood or composite surface, but its strength and longevity are enhanced when you upgrade the under-structure and surface-to-deck interfaces. Marine-grade plywood or composite panels offer appreciable moisture resistance, but they must be matched with appropriate framing and bridging. For the backbone and bracing, you might consider aluminum or steel components that balance strength and weight. Aluminum decking, while lighter, is stiffer than standard ply in many configurations and resists corrosion well; however, it is more challenging to work with when it comes to forming precise joints for a rigid reinforcement. If you opt for steel-plated options, you should anticipate additional weight; this is a trade-off between ultimate load capacity and vehicle performance that must be weighed with a professional assessment of suspension and axle limits.
The installation should not rely on a single fastener pattern or a single point of attachment. Instead, design a matrix of connections that create redundancy. In manufacturing terms, engineers describe redundancy as a means to catch any small failure in one element by transferring loads to another. Practically, this means extra bolts, additional gussets at the corners where the overhang connects, and cross-bracing between joists or support members. A simple, well-placed cross-brace can dramatically improve the tri-axial stability of the deck by tying the overhang to the broader deck framework. The idea is not to make a rigid, unyielding block, but to maintain a controlled stiffness that remains compatible with the truck’s natural flex and the camper’s weight distribution.
Alongside the backbone and mounting strategy, vibration damping and load distribution deserve careful consideration. The overhang experiences the same road shocks as the rest of the camper, but its position relative to the chassis can amplify those shocks. A multi-point fastening approach, combining mechanical fasteners with an industrial-grade adhesive designed for metal-to-metal or metal-to-composite bonds, creates a layered, resilient connection. The adhesive adds a thin, uniform damping layer that helps absorb micro-vibrations and reduces the tendency for rattling over rough pavement. When applying adhesives, you must ensure the mating surfaces are impeccably clean and dry, and you must follow the cure times recommended by the adhesive’s manufacturer. This is an area where good technique pays big dividends in the long run: between bolt clusters, the adhesive can help distribute a portion of the load that might otherwise distress a single fastener.
No reinforcement conversation is complete without addressing corrosion control and environmental exposure. The overhang and its reinforcement endure wind-driven rain, road salt in winter climates, and the thermal cycling that accompanies day-night temperature swings. Each connection point, joint, and backing plate should be coated with a durable exterior-grade sealant or coating. Consistent application helps prevent water ingress that could corrode fasteners or promote wood rot in nearby sections. The coating is not a one-and-done fix; it should be inspected and refreshed on a cycle that matches the climate, typically every one to two years. When you detail the protective layers, you also safeguard the investment you’ve made in structural integrity. The final sealant choice should be compatible with both the decking material and the reinforcement metal. In practice, this often means using a marine-grade sealant or a high-quality exterior sealant that forms a flexible barrier against moisture and temperature cycling while remaining compatible with the underlying metals.
As with any modification of this magnitude, a professional assessment remains a prudent step. An engineer or experienced fabricator who specializes in vehicle-conversion structures can carry out a structural analysis tailored to your truck model, the camper’s weight, intended loads, and the specific geometry of the overhang. They can specify the exact cross-section for the backbone, the spacing for gussets, torque values for bolts, and a testing protocol to verify that the reinforcement behaves as intended under simulated driving conditions. This is not merely about meeting a standard; it is about ensuring the reinforcement harmonizes with your truck’s suspension, steering geometry, and braking performance. If you don’t want to rely on memory or general guidelines alone, you can consult authoritative resources that address vehicle modification safety and structural standards. In addition to technical references from engineering and automotive bodies, you can also find practical, experience-based guidance in respected online communities and manuals.
An integrated approach to reinforcement connects you with both technical know-how and practical know-how. The practical side comes from builders who have tested their methods on different models and under varied conditions. This chapter doesn’t aim to replace those field-tested experiences but to stitch them into a coherent reinforcement strategy that you can adapt to your own rig. It also connects the theory of structural reinforcement to the day-to-day concerns of owners: how to maintain the system, how to diagnose early signs of distress, and how to plan a robust maintenance schedule that keeps the overhang performing across seasons. The process begins with a careful plan, followed by precise, clean fabrication and meticulous assembly. It ends with a tested, stable deck overhang that can handle heavier loads and rough roads with less flex and less wear on the rest of the camper structure.
In closing the practical loop, remember that reinforcement is as much about the relationships between elements as it is about the elements themselves. The backbone must align with the frame rails; the brackets must sit flush with the deck; the gussets must spread loads smoothly into the surrounding structure. The sailors’ rule of thumb—stiff, evenly loaded, and properly sealed—applies here as well. When you approach the project with a measured plan, the right materials, and a willingness to consult professionals when needed, you transform a vulnerable overhang into a dependable part of your mobile home. If you want to explore additional, practitioner-focused perspectives on this topic, the Master Truck Repair Blog offers a broad range of insights that can complement your hands-on work. Master Truck Repair Blog
For authoritative guidance on structural modifications for vehicle-based living spaces, consider established engineering standards and industry resources. See the Society of Automotive Engineers for standards and safety guidance at https://www.sae.org.
Final thoughts
The effective maintenance and repair of truck camper deck bed overhangs are vital to ensuring fleet safety and operational efficiency. By inspecting for damage, addressing water intrusion and rot, replacing compromised sections, and reinforcing the overhang’s structure, fleet managers can extend the life of their vehicles while minimizing potential risks. Regularly scheduled inspections and proactive maintenance can significantly reduce costly repairs down the line, proving invaluable in high-stakes operational environments.

