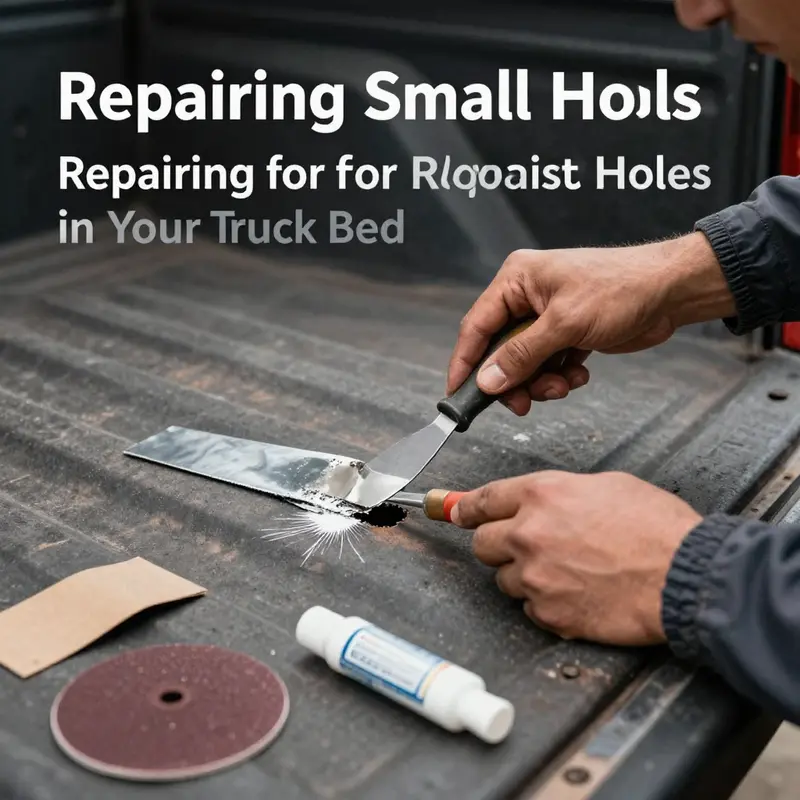
Repairing holes in a truck bed is a critical maintenance task that extends the life of your fleet’s vehicles. Whether you operate a logistics company or manage a construction fleet, understanding how to effectively repair and maintain truck beds is essential for ensuring operational efficiency and reducing costs associated with downtime. This guide delves into specific methodologies for addressing small, medium, and large holes, enabling you to keep your trucks in optimal condition.
null
null
Durable Patches: Mastering Medium-Sized Hole Repairs in a Truck Bed for Lasting Strength
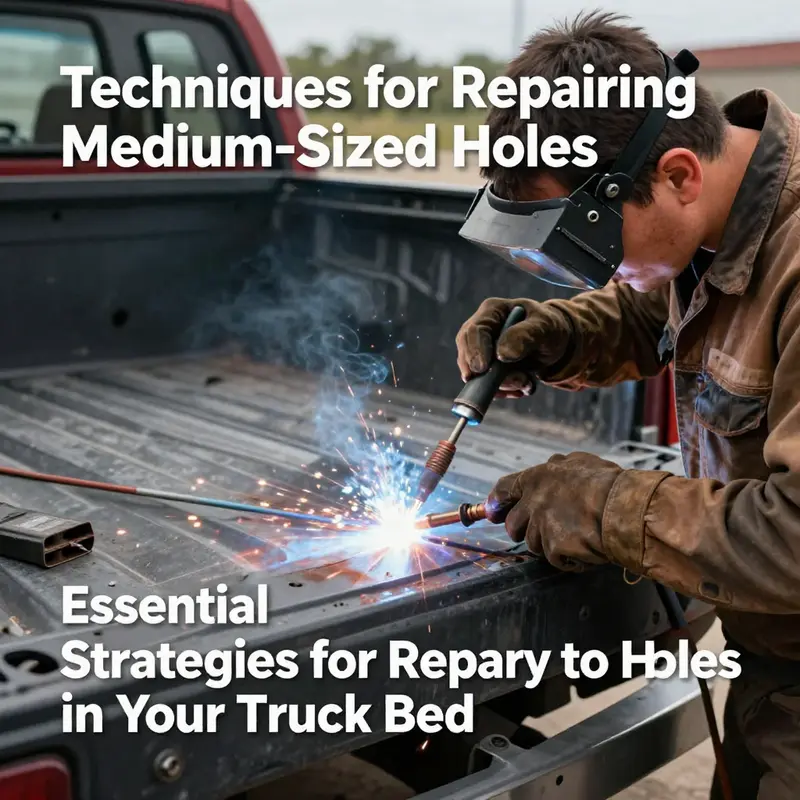
Medium-sized holes, typically ranging from about 5 mm to 20 mm in diameter, sit at a challenging crossroads for truck bed repair. They’re too large for quick filler fixes, yet not always practical to replace an entire panel. The goal is a repair that is not only visually seamless but also structurally sound, durable under load, and resistant to moisture and future damage. Achieving that balance requires a careful choice of patching strategy, surface preparation, and finishing, all tailored to the bed’s material and the location of the damage. The path you take hinges on whether the bed is primarily steel or aluminum, where the hole sits in the bed, and how much stress the repaired area will endure during loading, unloading, or sliding heavy components across the surface. In practice, two routes emerge as the most reliable: bonding a reinforced patch with a strong adhesive when welding isn’t feasible, or welding a patch for maximum strength when conditions and safety permit. The decision should be guided by both the environment and the long-term demands you place on the bed.
First comes meticulous surface preparation, the foundation of any durable repair. Cleanliness cannot be overstated. Oil, grease, and rust residues act like barriers, preventing adhesion and inviting corrosion to rebound beneath the patch. A degreaser or automotive cleaner is used to strip away the surface films, followed by a thorough wipe-down with clean lint-free cloths. Once the area is visually clean, a wire brush or light mechanical abrading around the hole helps create a micro-rough texture. That texture is essential; it gives the bonding agent something to bite into and reduces the risk of the patch lifting under load. Even if you plan to weld, this same roughened edge improves weld quality by providing a stable surface for the initial tack. After cleaning and abrading, remove any loose rust flakes and dust, and then re-clean the area so nothing interferes with adhesion or heat transfer during welding.
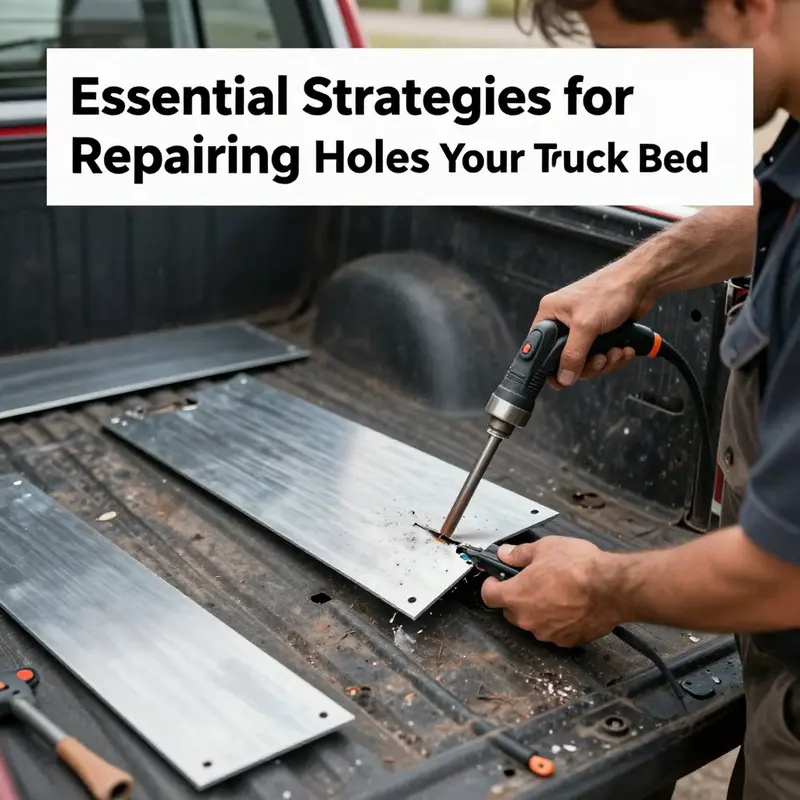
With the surface prepared, the patch material becomes the focal point of the repair. For medium-sized holes, cut a patch from a sheet of metal that matches the bed’s base material in thickness and composition. If the bed is steel, use steel sheet; if it’s aluminum, adapt with an aluminum patch. The patch should extend beyond the hole by a generous margin—ideally several millimeters on all sides—to spread any stress and reduce the chance of stress concentration at the hole edge. The corners are reinforced with small, rounded radii instead of sharp 90-degree corners, which helps prevent crack initiation along the patch perimeter. In some high-stress zones, such as near the top edge of a bed wall or in a location that bears frequent impact, a slightly larger patch with a backing reinforcement behind the hole can provide additional durability. The choice between a backer plate and a one-piece exterior patch depends on access and the level of force the repaired region will regularly experience.
If welding is part of your plan, the next stage becomes more technical but also markedly stronger. A patch that’s welded in place is effectively integrated into the bed, producing a continuous, uniform surface that resists moisture intrusion and minimizes flex under load. A professional welder can complete a robust bond using either MIG (metal inert gas) or TIG (tungsten inert gas) techniques, depending on the base metal and the welder’s expertise. When welding, the patch is positioned over the hole and tack-welded in place to hold it while working around the perimeter. A consistent, even weld around all edges follows, with special attention paid to avoiding warping or burn-through. Post-weld, the seam is ground smooth to blend with the surrounding surface. A careful weld requires proper ventilation and PPE, especially in enclosed spaces, and it’s wise to avoid welding near fuel lines, electrical components, or heat-sensitive areas. A welder will also select a filler rod compatible with the bed metal to prevent galvanic corrosion at the joint, which helps ensure longevity in varying weather conditions.
If welding isn’t an option due to access, safety concerns, or the presence of proximate fuel lines, a high-strength adhesive route provides a viable alternative. Modern automotive-grade epoxies and metal-to-metal bonding agents can form bonds that are surprisingly strong when properly applied. The adhesive is applied in generous quantities to both the back of the patch and the inner surface around the hole. The patch is pressed firmly into place and held with clamps or weights while the adhesive cures. Curing time varies by product, but it commonly ranges from several hours to a full day; the goal is a solid bond before any load is introduced. In this approach, the patch usually lies flush with the bed surface, and the bond line becomes the structural element that joins the patch to the surrounding sheet. An important caveat with adhesives is environmental control: temperature and humidity can dramatically influence cure times and bond strength. If the repair occurs in a damp, cool environment, give the adhesive more time to cure and consider additional clamping to maintain contact until set finishes.
After either welding or adhesive bonding, the repair enters a finishing phase that transforms a mechanically solid patch into a surface that looks and feels like the rest of the bed. A first layer of auto body filler, often a flexible, speaks slowly to the compliance of the patch and surrounding metal. This filler is spread over the patch and the adjacent area to even out any minor irregularities and to create a uniform plane. Sanding begins with a coarser grit to knock down high spots and then progresses through finer grits—typically starting around 80- or 120-grit and finishing near 220-grit—until the repaired area sits perfectly flush with the original bed surface. Should any pinholes or tiny imperfections remain, a second filler layer can be applied and sanded to achieve a seamless transition.
Once the surface is truly flush, the next steps tackle corrosion resistance and color match. A rust-inhibiting primer is essential, especially when steel is involved. The primer seals the metal, prevents future oxidation at the seam, and provides a uniform base for the finish coat. After the primer cures, apply a color-matched automotive spray paint or a precise automotive finish that matches the bed’s factory color. In many cases, it’s practical to apply several light coats rather than a single heavy coat, which helps avoid drips and provides a deeper, more durable color. A final clear coat can add an extra layer of protection against UV exposure, stone impacts, and moisture infiltration. In all cases, allow thorough drying between coats and sand lightly between color passes if needed to maintain a smooth, professional look. If the bed is coated with a textured liner or a rubberized coating, a compatible topcoat that bonds to that finish might be required to preserve texture and adhesion characteristics.
The finishing stage isn’t merely cosmetic. It closes the door on water intrusion and retreating rust by creating a barrier that resists moisture and salt—common culprits in bed corrosion. It also preserves the bed’s load-bearing capability by ensuring the patch does not create a weak point or a snag that could catch a tool, a rope, or a heavy piece of equipment. The completed repair should feel like a single, continuous surface when you run your hand over it. A careful inspection should confirm there are no raised edges, no paint gaps, and no visible seam line that would collect debris during use. If you notice any movement under the patch or cracking in the paint over time, revisit the area promptly to assess whether the bond has weakened or the coating has failed and take corrective action.
Repairing medium-sized holes is also a chance to bring maintenance planning into sharper focus. Regular inspections of the truck bed, especially after heavy use or exposure to moisture, help catch early signs of wear that could lead to future damage. As a preventive measure, consider applying a bed liner or undercoating that provides an extra layer of moisture resistance and abrasion protection. Such coatings help distribute impact forces more evenly across the surface and reduce the risk of further cracking around patch work. Avoid dragging sharp or heavy objects directly across repaired zones; use loading mats or edge protectors where possible. Address small scratches or chips as soon as they appear—decreasing the likelihood that they’ll evolve into new corrosion sites around the patch. A disciplined routine keeps your fix from becoming a recurring maintenance item.
Budget and logistics also matter whenever you plan to repair medium-sized holes. If you’re balancing a tight schedule or a limited budget, you may lean toward adhesive bonding or rely on a skilled welder only for the most challenging cases. In either scenario, keeping a small stock of compatible patch material, a reliable degreaser, and the appropriate primer and paint can significantly shorten downtime. Planning ahead means you won’t be caught with a patch sitting on a shelf while the clock runs on a job you intended to complete in a single afternoon. For readers who want to weave this repair into a broader maintenance plan, consider exploring how to allocate resources over the life of a vehicle, including routine inspections and preventative coatings. A practical approach is to view the bed repair as part of a larger maintenance strategy rather than a one-off fix. For more on budgeting and planning, see budgeting for routine truck maintenance.
As you read this, you may be weighing the trade-offs between welding for ultimate strength and bonding for speed and safety. Each path has a logic that fits different scenarios. Welding creates an integrated seam with excellent load distribution, making it a durable long-term solution, particularly in areas subject to bending, vibration, or heavy load transfers. Adhesive bonding, while requiring more meticulous surface prep and curing control, can be an excellent option when welding access is blocked, when you want to avoid heat exposure near sensitive components, or when you’re aiming to minimize the risk of warping in thin or heat-sensitive beds. In many repair shops and for many owners who perform repairs themselves, a hybrid approach often proves effective: a backer plate or internal reinforcement used in conjunction with a welded exterior patch distributes stress more evenly, then finished with a proper seal, primer, and color coat. Regardless of the method chosen, the key is to ensure a flush, gap-free seam that resists moisture ingress and doesn’t become a lever for future corrosion. The patch must be bonded as securely as the surrounding metal and finished with the same care you would give to the rest of the truck bed.
To close the loop, consider the long view of upkeep. Medium-sized hole repairs, done with attention to material compatibility, surface prep, and a thorough finish, can extend the life of a truck bed and keep its appearance consistent with the vehicle’s overall condition. The steps above are not merely about filling a gap; they are about restoring structural integrity and preserving payload capability. When you next inspect the bed, you’ll notice the repaired panel sits in harmony with the surrounding surface, a testament to the value of methodical preparation and disciplined finishing. If you’re building a broader maintenance workflow, you’ll benefit from recognizing how repairs of this scale integrate with other routine tasks—like undercoating, liner maintenance, and inspections—so that each component reinforces the others, rather than competing for resources. For more on budgeting and routine maintenance scheduling, you can explore planning resources at budgeting for routine truck maintenance.
In the end, the medium-sized hole repair on a truck bed is as much about process as it is about patch material. When done with care, the repair yields a seamless, durable surface that can stand up to the demands of use and the rigors of the road. The combination of solid surface preparation, an appropriately chosen patching method, meticulous finishing, and thoughtful maintenance creates a repair that doesn’t shout for attention but quietly earns its keep every time the bed carries a load. If you’re looking for a broader connection to ongoing maintenance topics, the internal link to budgeting for routine truck maintenance offers a pathway to forecasting costs and planning preventive strategies that keep repairs like these from piling up. https://mastertruckrepairllc.com/budgeting-for-routine-truck-maintenance/
External reference for deeper technical grounding: https://www.autorepair.com/repair-guides/truck-bed-repair-techniques
From Worn to Warrior: Rebuilding a Truck Bed After Large Holes and Structural Damage
When a truck bed has large holes or clear structural damage, the impression is immediate: the bed has failed in a way that simple surface repairs can no longer disguise. The bed is more than a cargo plate; it is a critical part of the vehicle’s utility and, in many configurations, a mounting surface that supports the tailgate, tonneau cover systems, or bed-mounted controls. In a scenario like this, repairs demand a clear assessment of what is compromised, not just what looks obvious. The objective shifts from cosmetic patching to restoring structural integrity, ensuring the bed can carry loads safely, shed moisture, and resist further deterioration. The decision path starts with a careful appraisal of the damage and a recognition that the most economical fix in the short term may not be the best long-term value. A hole that has perforated through the metal and ripped away at the seam can jeopardize frame alignment, enable corrosion to spread along hidden channels, and undermine the bed’s ability to handle load without flexing or leaking. The repair strategy must balance strength, durability, and appearance, all while considering how the repair will endure road grime, water intrusion, and the occasional misstep of heavy tools sliding across the metal. In this light, the repair of large holes becomes a matter of engineering and craft, not merely patchwork.
A practical starting point is to quantify the extent of the damage. Measure the hole if there is one, identify whether the surrounding metal is thinned by rust, and check adjacent welds and seams for hairline cracks or spalling. If the surrounding metal remains solid, patching with a reinforced patch panel can be appropriate. If the metal around the hole has corroded to the point where the edges crumble under pressure, or if the hole has extended into a load-bearing region, the patch must be part of a broader strategy that rebuilds or replaces the compromised area. In short, large holes demand a repair plan that anticipates future challenges rather than a single-fix mentality. With that plan in mind, several pathways exist, each with its own implications for strength, appearance, and service life.
The first major route is metal patch repair. This approach starts with fabricating or selecting a patch panel from steel or aluminum that matches the original bed’s thickness and material as closely as possible. The patch is sized to cover the hole with clean, square edges that butt against undamaged metal. Edges must be deburred and cleaned, and the surrounding area should be free of rust and oil so welds can take hold. The patch can be secured in one of two ways: welding or riveting. Welding offers the strongest joint when done with proper technique and heat control, yielding a seam that, once ground smooth, becomes an almost invisible continuation of the bed’s surface. Riveting, while easier for a home shop and less demanding of heat management, provides solid attachment but may not always achieve the same level of structural continuity as a fully welded patch. Either method requires careful alignment and clamping throughout the process to avoid warping the panel and creating new high spots that would trap water or debris.
In practice, a patch repair proceeds with a mild amount of surface preparation. Loose rust, paint, and debris are removed from the surrounding area. A corrosion-inhibiting primer is applied to stifle future rust formation in those open ribs or the joints near the patch. The patch is then fitted, clamped, and tacked in place to hold its position. The tacks are then followed by continuous welds around the perimeter. After welding, the seam is ground flush with progressively finer abrasives to minimize ripples and create a uniform surface. The patched area is primed again to seal the welds and to provide a consistent base for paint. Finally, the color-matched automotive paint is applied to blend the repair with the rest of the bed. For added durability, some technicians reinforce the backside of the patch with a metal backing plate to resist flexing and to distribute load more evenly across the patch site. This reinforcement becomes especially important if the bed carries heavy, sharp-edged loads that could concentrate stress on the patch.
Beyond simple patching, there is a case for epoxy resin filling when the hole sits in a structurally sensitive zone. Epoxy can fill voids and create a solid, monolithic surface, but it carries caveats. Epoxy is excellent for filling gaps adjacent to frame rails or near load-bearing joints, where the goal is to restore rigidity without inviting a brittle weld joint. The process begins with meticulous cleaning of the hole and its margins, followed by proper mixing of the epoxy resin to the recommended viscosity. The resin is poured or applied with a spreader to ensure an even fill and to avoid air pockets. The cure time is critical; temperatures outside the specified range can weaken the bond or extend the curing period beyond practical expectations. Epoxy filling should be viewed as a complementary step in certain repair scenarios—specifically when the structural integrity around the hole benefits from filling rather than a patch alone. It is not a universal substitute for metal repair, and in some instances the patch may still be necessary to restore the metallic continuity of the bed surface.
When the damage is larger still or the structural member itself has suffered, patching gives way to more substantial strategies. A second pathway is the patch-panel approach that uses a larger cut-out and replacement of a portion of the bed wall. This method is often necessary when rust has penetrated beyond a single hole to the adjacent seams or ribs. The process begins with careful removal of the compromised section using appropriate tools to avoid distortion of the remaining metal. The patch panel is then cut to fit, with considerations given to the exact width of the metal and its joint geometry to ensure a snug, gap-free fit. Tack welds hold the patch in place while the alignment is verified across several points to maintain levelness and proper curvature. The full weld around the patch edges follows, and the seam is ground smooth. After welding, the area is primed, filled as needed, and painted to match the surrounding surface. The advantage here is a robust, continuous metal surface without the micro-movements that can occur with a smaller patch. The patch panel approach also opens the door to more precise control of the bed’s contour, which is crucial when the damage sits near a mounting point or a curved edge that must retain precise geometry for a bed cap or tailgate alignment.
In some cases, the damage is so extensive that a full restoration becomes the more prudent option. This is not merely a patch; it is a rebuild. The process involves removing the damaged section and installing a new panel formed to match the bed’s original geometry. The new panel is measured, cut, and fit with meticulous care. Spot welding or continuous welding along the edges secures the replacement, followed by grinding to a seamless surface. Anti-corrosion treatment is applied to exposed edges, and a comprehensive repaint completes the restoration. This approach provides the strongest possible outcome for long-term durability and is often the most predictable path when the bed has suffered repeated impacts or corrosion that has compromised the bed’s structural rails and internal supports.
In situations where the damage extends to frame rails or other load-bearing elements, the repair must be undertaken with a heightened sense of safety and an appreciation for safety standards. The integrity of the entire structure can hinge on the correctness of the repair. In such cases, professional input becomes not a luxury but a necessity. A certified auto body shop brings expertise in welding technique, metallurgy, and the structural implications of the repair. They can verify alignment using precise measuring tools, ensure that penetrant testing does not reveal hidden flaws, and confirm that the repair meets industry safety expectations. This is especially important for trucks used in commercial applications or those that carry heavy loads or operate in hazardous environments. The cost of a professional restoration is often offset by the peace of mind that comes with knowing the repair has been executed to a standard that supports both safety and durability over time.
With any of these approaches, prevention remains a central consideration. Large holes and structural damage are rarely isolated incidents. The best outcomes result from a repair plan that melds temporary stabilization with long-term protection. After completing a major repair, it pays to apply an anti-corrosion coating or a robust bed liner system. This protective layer helps shield newly repaired seams and edges from moisture and abrasion, while also simplifying future maintenance. A bed liner or rubberized coating reduces the likelihood that sharp tools or heavy loads will gouge fresh metal and create the next opportunity for corrosion to take hold. Regular inspection mirrors the preventive spirit of the repair: look for signs of bubbling paint, rust sprouts near rivets and seams, or any new deformation that suggests new stress points. Address these early, and you will extend the life of the repair as well as the service life of the truck as a whole.
The choices described here articulate a path from initial assessment to final refinement. They reflect a pragmatic philosophy: large holes demand not just patching but a solution that restores the bed’s geometry, anchors its strength, and shields it from moisture and fatigue. The decision to patch, panel, epoxy-fill, or replace hinges on the size and location of the damage, the material of the bed, and the owner’s goals for strength and appearance. In all cases, the work should be performed with control of heat, restraint in motion, and respect for surrounding components. For those who want to connect practical steps to broader expertise, the Master Truck Repair blog offers ongoing discussions about bodywork and structural considerations in truck maintenance. Master Truck Repair blog
If you are contemplating these repairs yourself, approach the task with a clear sequence and a respect for safety. Work in a well-ventilated space, wear appropriate protective gear, and keep a clean, organized workspace so that tools and cut panels do not become hazards themselves. The bed’s geography is important: corners, seams, and support ribs each play a role in how a patch or panel behaves under load. Take the time to verify alignment at every stage, especially before welding or riveting, because an out-of-square repair will not only look odd but can lead to new leaks, misalignment with the tailgate, and premature failure of the repair. In adopting these practices, you not only fix a hole; you reaffirm the bed’s function as a durable, protected cargo platform that can withstand the rigors of daily use and the unpredictable nature of road wear.
For readers seeking additional depth, it’s useful to consult broader resources on metal repair and structural integrity. The MotorTrend Truck Bed Repair guide provides context on approaching larger repairs with a view toward safety and long-term durability. While not truck-specific for every detail, the guide frames essential considerations about material compatibility, heat management during welding, and the dangers of compromising structural members. You can explore these broader guidelines at the external resource linked here: https://www.motortrend.com/cars/trucks/repair-guides/truck-bed-repair-tips/
Final thoughts
Incorporating these repair strategies can significantly enhance the longevity and functionality of your truck fleet. From addressing small holes to managing more extensive structural damage, a proactive approach can mitigate downtime and reduce costs. Regular maintenance and timely repairs are crucial to ensuring your vehicles remain operational and dependable.

