Maintaining optimal visibility is paramount for fleet operations, particularly for those managing Ford trucks in dynamic environments like construction, mining, and logistics. Clogged windshield washer tubes can significantly hinder safety and efficiency. Understanding the problems that lead to these clogs, following effective repair methods, and implementing preventative maintenance strategies are crucial for minimizing downtime and enhancing vehicle performance. This article delves into identifying issues, providing a step-by-step guide for repairs, and sharing essential tips for preventive care, ensuring your fleet remains operational and safe on the road.
Clear Vision Restored: A Thorough Diagnostic and Repair Narrative for Clogged Windshield Washer Tubes on Ford Trucks
The windshield washer system is a quiet guardian of safety, yet it can become a stubborn obstacle when the tubes that carry washer fluid to the spray nozzles clog or fail. In Ford trucks, as in many modern vehicles, the path from the reservoir to the nozzles traces a route under the hood and sometimes beneath the vehicle. Debris, dirt, or fluid that has begun to freeze in cold weather can accumulate, creating bottlenecks that rob you of a clear view in rain, sleet, or dusty conditions. When visibility is compromised, the instinct is to squeeze the washer button and hope for the best. But a systematic approach rests on understanding how the system is supposed to function, where the weaknesses usually lie, and how a careful sequence of checks and modest repairs can restore reliable operation without unnecessary expense. This chapter threads together a practical, Ford‑specific diagnostic mindset with hands‑on repair steps that balance effectiveness with preserving the integrity of the original components. The ultimate goal is more than just a quick fix; it is a durable solution that respects the system’s design, prevents reoccurring clogs, and keeps the windshield clean during every drive, rain or shine.
The first sign of trouble can be subtle: the fluid level in the reservoir seems adequate, the pump whirs or clicks when activated, and yet nothing paints the windshield or the spray comes in a weak, scattershot pattern. In such moments, it is tempting to jump straight to replacing parts. But a disciplined diagnostic path helps separate symptoms from root causes and avoids replacing parts that are still perfectly serviceable. In Ford trucks, as in many vehicle families, the root causes of washer problems cluster around a few core areas: the fluid reservoir and its contents, the spray nozzles, the hoses and tubing, the washer pump and its electrical feed, and the related control components such as fuses, relays, and grounding. Each region offers a telltale clue about whether the system is simply blocked, misdirected, or electrically inoperative.
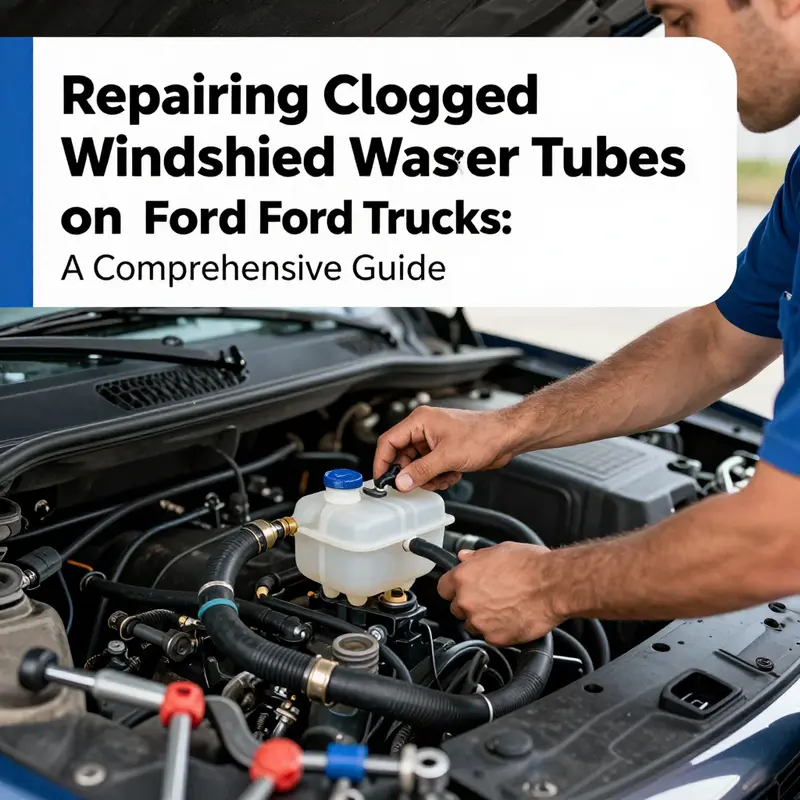
Begin by checking the reservoir, for it is the lifeblood of the entire system. A low level is an obvious, almost trivial culprit, but more nuanced issues lurk within the fluid itself. Contaminated fluid—whether it carries grit, algae, or rust—can coat the interior of hoses and nozzles, turning a once‑free flow into a stubborn clog. Freezing is another common saboteur in colder climates. If you park overnight in freezing temperatures, the fluid may partially or completely freeze within the tubes, occluding the line and impeding flow when you need it most. Inspect the reservoir visually for color, consistency, and sediment. If the fluid looks suspicious or has an unusual odor, drain and replenish with clean, vehicle‑appropriate washer fluid. The level, the clarity, and the absence of a milky or muddy appearance all matter because they reflect the system’s readiness to deliver when commanded.
Next, turn attention to the spray nozzles themselves. A nozzle that is plugged with dirt, ice, or dried residue is more than a nuisance; it can direct the spray away from the windshield or reduce the amount of liquid delivered. A simple but essential maneuver is to inspect each nozzle, looking for visible obstructions. If you can gently poke a fine pin or a thin wire into the nozzle without forcing it, you can often clear a minor clog. In some cases, compressed air can be a gentler, more effective solution. If the nozzles are still obstructed after such care, the tubing feeding them may be the source of the problem rather than the nozzles themselves. A visually clean nozzle is not a guarantee of good spray, because the blockage may be upstream in the line. This is where the broader inspection—following the tubing path from the reservoir to the base of the windshield—becomes essential.
The truck’s washer lines usually run along the hood area and can extend under the body towards the spray points. Where a line travels, a kink, a pinch, or a soft crack can form a bottleneck that limits or stops flow entirely. A careful visual sweep is warranted: look for crushed sections where the line might have been pinched by a heat vent, a moving hood, or a nearby component. If a line is cracked or separated at a connector, fluid can leak out or air can enter the system, both of which degrade performance. Depending on the model year and trim level, some lines are more accessible with the hood raised and others require a little more exploration beneath the vehicle. In any event, a patient, methodical inspection is the best way to distinguish a simple blockage from a more serious line failure.
When the reservoir, nozzles, and hoses all pass visual inspection, testing the washer pump and its electrical supply reveals whether the system’s heart is beating. If the pump runs but no fluid is dispatched, the problem lies either in the pump’s ability to create pressure or in the conduit that delivers the fluid to the nozzles. Electrical faults often hide in plain sight: blown fuses, a faulty relay, or a corroded wiring connection can interrupt power to the pump, producing a vivid but misleading symptom—a pump that sounds normal but fails to move liquid. A quick check of the relevant fuse and relay in the fuse box is an efficient way to rule out this category of trouble. If the pump operates intermittently or stops altogether, it may indicate an aging motor or debris that has found its way into the pump’s intake. In such cases, the solution might involve cleaning and reseating the pump assembly, or, if necessary, replacing the pump with a unit of compatible specification.
The wiring harness deserves just as much attention as the mechanical parts. Corrosion at ground points can interrupt the electrical circuit and mimic a failing motor. Loose or damaged connectors can be hard to diagnose because the symptom is often elusive—an occasional spray when the vehicle is in the right position or vibrations that momentarily reestablish contact. A careful inspection of the harness, connectors, and the ground path from the pump to the chassis will reveal these subtle faults. If corrosion is found, cleaning or restoring the connection, followed by a solid mechanical reseating, can restore dependable operation without replacing major components.
The flow path may still be free of visible obstruction, yet a fluid dispense problem persists after the pump runs. This scenario invites checks for the integrity of hoses and a check valve along the path. A cracked hose, a disconnected line, or a failed check valve can all prevent the proper pressure from reaching the nozzles. In older Ford models, the pump itself can be the source of a low‑pressure condition. When a pump spins but struggles to deliver adequate volume, the device may be worn out, clogged internally, or experiencing an internal leak. Its replacement, while more involved than cleaning, can restore a previously reliable supply. Each of these possibilities underscores the importance of aligning expectations with the model’s design and with the condition of the components.
Clear, stepwise thinking also points toward preventive care. A disciplined maintenance approach is the best defense against recurrent clogs and frustrating failures. Start by using windshield washer fluid that has the right formulation for your climate. In cold regions, a winter blend helps prevent freezing within the lines and nozzles. Regularly inspecting the system for cracks, wear, and detachment is a simple habit that pays off in reliability. A clean reservoir, fresh fluid, and a quick look at the tubing route can avert the buildup of residue and the slow creep of grime that becomes a nuisance over months of use. When you perform this kind of upkeep, you not only maintain function but also extend the life of the hoses and the pump. If the vehicle is older, a proactive approach that treats potential weak spots—such as aging hoses, brittle fittings, or a pump with high miles—can prevent a mid‑season failure from leaving you stranded with dirty glass.
For those who seek a practical, hands‑on reference that aligns with these steps, a detailed DIY windshield repair guide for truck owners offers a complementary walkthrough. It provides a grounded, scenario‑based perspective that mirrors the logic described here while walking through the same tasks in a slightly different sequence and with visuals. See it here: DIY windshield repair guide for truck owners. As you read, you may find the emphasis on careful inspection and gradual testing to be directly applicable to your Ford truck’s washer system, regardless of the exact model year.
Even with a disciplined approach, certain issues demand more than in‑frame tinkering. The possibility of a faulty pump or a degraded check valve is not unusual in older equipment. When the pump fails to generate enough pressure, even a clean path cannot compensate for the lack of motive force. The same applies when the check valve becomes weak and leaks, allowing fluid to backflow or air to intrude along the line. Replacing these components with compatible parts is often the most reliable solution, provided the parts are chosen carefully to match the vehicle’s specifications and the system’s needs. The repair flow increasingly emphasizes quality over speed: using genuine or high‑quality aftermarket parts ensures compatibility and long‑term reliability. In Ford truck service manuals and reputable repair resources, you will find model‑specific diagrams that guide you through the exact routing of hoses, the precise locations of connectors, and the tested electrical pathways for the washer subsystem. Following those diagrams helps prevent guesswork and reduces the risk of creating new leaks or misrouted lines.
A final layer of consideration concerns the broader electrical ecosystem that powers the washer system. In many vehicles, the washer pump is integrated with a network of circuits that share power with other accessories. A blown fuse or a degraded relay can mimic the symptoms of a pump failure, yet fixing the electrical fault resolves the problem without touching the hydraulic side. Similarly, a damaged ground connection can cause intermittent operation, undermining reliability in wet weather when you need the system most. The diagnostic logic, then, moves back and forth between hydraulic and electrical examinations, confirming at each step that the subsystem is meeting the required specifications. It is not unusual to discover that the most effective repair is actually a combination: replacing a worn pump while simultaneously tightening a corroded ground, or cleaning a clogged connector that had become a site of micro‑arcing. This kind of integrated approach reflects the reality of modern vehicles, where multiple subsystems share responsibilities for safety and performance.
As you progress through the diagnostic process, keep a running mental map of the system’s expectations. The pump should activate with a clear, steady spray, the fluid should reach the nozzles with consistent pressure, and the nozzles should direct fluid evenly across the lower windshield area. When any one of these expectations is not met, retrace the steps with a more focused check of the most likely source of failure in that specific symptom. The journey from a grimy or blocked tube to a renewed and reliable spray is most often a sequence of small, deliberate improvements rather than a single dramatic intervention. The value of patience here cannot be overstated: careful inspection, gentle cleaning, precise reassembly, and measured testing create a durable repair that minimizes the chance of new leaks or future clogs.
Looking ahead, the careful reader will recognize that the windshield washer challenges discussed here are not isolated to a single make or a single year of Ford trucks. The core principles—verify fluid level and quality, inspect nozzle housings, trace the line for damage, test the pump and its electrical feed, and address any obstructive debris—translate across many platforms. A comprehensive approach that respects the system’s hydraulic and electrical complexities is the most reliable path to restoration. For readers who want to expand their knowledge beyond the stepwise repairs described here, the broader technical framework includes manufacturer manuals and industry‑standard references that illustrate how the washer system interfaces with other vehicle subsystems. Such resources provide diagrams, diagnostic codes, and model‑specific cautions that help ensure every repair aligns with the vehicle’s engineering design. The result is not only a momentary restoration of function but a durable restoration of safety and driver confidence, season after season.
External reference note: For a broader technical framework on multipurpose washer systems used across various heavy vehicles, including trucks and buses, see the technical context in the following external resource: https://www.sae.org/publications/technical-papers/content/2025-01-1234/ .
Tracing the Vein of Visibility: A Ford-Truck Guide to Repairing Clogged Windshield Washer Tubes
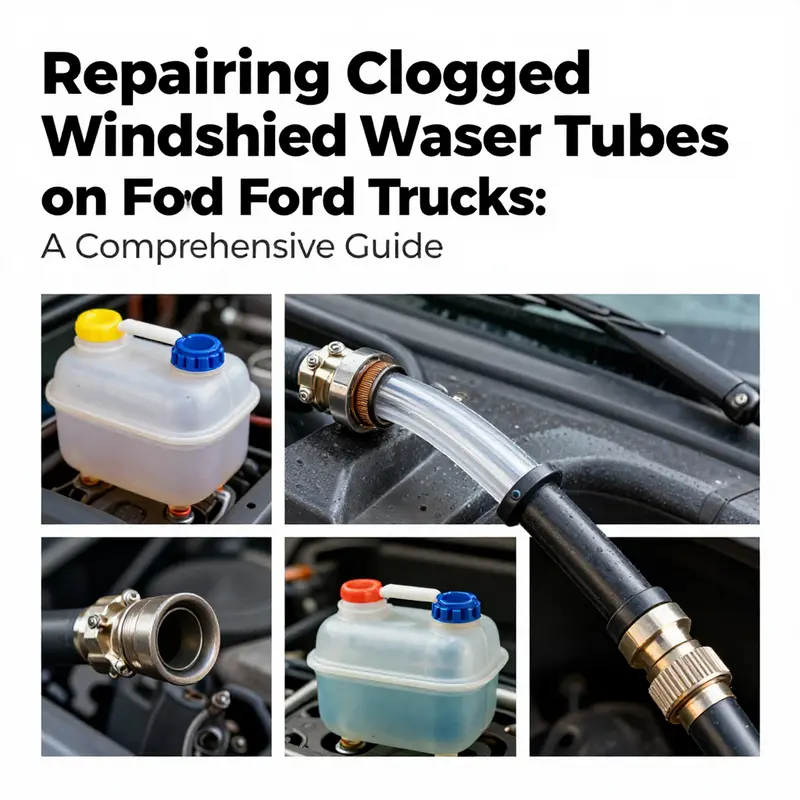
When you turn the windshield washer on a Ford truck, the goal is simple: a clear spray arc that wets the glass just where you need it, even in rain or dust. But the path from the reservoir to the nozzles is a network of tiny hoses that can clog and kink, especially in older models or in engines that live where weather or road grime is a constant companion. In Ford trucks, these tubes tend to run from the reservoir under the hood toward the firewall and then into the cowl area at the base of the windshield. Debris, dirt buildup, or even a bit of frozen fluid in cold weather can settle into the bends and junctions, choking the flow. The result is a spray that sputters or stops altogether on one side, or a feeble stream that refuses to reach the glass. Most drivers discover the issue only when visibility is suddenly compromised, and the instinct is to assume a failed pump or a blown fuse. Yet a common culprit lies closer to home: the clogged tube itself. The diagnosis, in many cases, starts with listening. If you turn on the system and hear a steady hum from the pump but see no fluid, the blockage has likely formed downstream of the pump. If no sound or a weak whirr accompanies the nozzle, the problem might be more widespread, including a loose connection or a kinked line. This subtle distinction matters because it guides where to look first and how to approach the repair with care rather than force. In discussions among Ford truck communities, a frequent observation is that a clog on one side, particularly in the 2009–2014 F-150 range, is a classic symptom of debris accumulating in the tubing near the firewall or cowl area. That single-sided symptom helps you map the likely route of the obstruction and plan a methodical clearance without tearing apart the entire windshield system. With that frame of reference, the repair becomes an exercise in careful access and controlled clearing rather than a brute-force rebuild. The goal is to restore smooth, even flow to both sides while preserving the integrity of every connection. The path to that goal starts with a clear plan and a respect for the fragile tubing that weaves through the engine bay and into the wheel wells and cowl. Begin with confirmation of the problem, then proceed to a careful, methodical access to the tubes, and finally apply a sequence of clearing techniques that respect the parts and the weather you’re working in. A practical approach blends diagnostic observation with hands-on clearance. Step one is to confirm what you’re dealing with. If you’ve just turned on the washer and one side is spraying, or neither side is producing fluid, don’t dismiss the possibility of a clog in the tubing or a nozzle. A working pump, indicated by that familiar hum, suggests the obstruction sits downstream of the reservoir. This distinction matters, because it tells you to focus on the hoses and junctions rather than chasing an unresponsive pump. The Ford community’s notes emphasize this nuance, and a careful technician will use it to avoid unnecessary tests or replacements. The next phase is to access the washer tube connections. The reservoir usually sits under the hood, and two rubber hoses depart from it toward the firewall. On Ford trucks, these tubes often travel behind the cowl panel near the base of the windshield. The cowl is a plastic panel that sits just below the glass, and it protects the area where the tubes enter the cabin. Access requires lifting the hood and removing the weather stripping around the front edge of the cowl. A trim removal tool or a flat screwdriver—used gently—will release the panel without harming the clips or the surrounding finish. Once the cowl panel is out of the way, you’ll see the hose connections where the tubes meet the pump and where they exit toward the nozzles. A note from a 2016 Ford service guide highlights a particularly useful access point: pushing in on the clip holding the cowl in place can reveal the middle of a tube junction on the driver’s side, a common site for blockages to accumulate. This small point of access can save you from a lot of digging and frustration. With the tubes exposed, the process becomes a careful balance of disassembly and inspection. You can disconnect the hose at the pump end or the nozzle end, depending on what’s most convenient in your configuration. The first move is to test for the blockage by blowing into the tube or using a low-pressure puff of air. This simple technique can push out loose dirt or residue, often restoring a clear path without additional tools. If the initial air blast doesn’t clear it, a thin wire, a pipe cleaner, or a bent paperclip can be used to probe gently into the lumen. The key is to avoid forcing anything sharp or rigid that could nick or cut the interior of the hose. If the push-and-probe method doesn’t do the trick, a mild rinse can help dissolve or loosen the debris. A warm water flush, or a solution of water and a small amount of vinegar, is often enough to dissolve calcium or mineral buildup left behind by old washer fluid. A careful flush can use gravity and flow to scrub walls clean, while a gentle swirl of the tube helps dislodge stubborn chunks. Throughout this stage, risk management matters. Do not exert excessive pressure that could rupture the hose or dislodge a critical connector. The goal is to reestablish a smooth interior surface that fluids can glide through, not to force the clog past its weakest point. If you rely on tools, keep them soft and flexible; ordinary bent paperclips or flexible wires work well when used carefully. The moment the tube is clear, you’ll want to verify the path ends at the nozzle and that the flow continues unobstructed. The reassembly phase should begin with reconnecting all hoses securely. It’s easy to test fit and leave a clamp unseated, only to discover a leak once the reservoir is filled. Replacing the cowl panel and reattaching the weather stripping are essential steps in restoring the protective seal and ensuring that the tubes remain correctly routed. With the hardware back in place, refill the washer reservoir with clean fluid, ideally a winter-appropriate blend if the climate calls for it. Then test the system again, aiming to spray evenly from both sides. The success indicator is straightforward: a consistent, respectable stream that reaches the full width of the windshield without hesitation or a weak pulse. The moment you observe uneven spray or a return to a clogged feel, retrace your steps. Sometimes the nozzle itself is the culprit, not the tube. Debris or dried fluid can clog the tiny orifices at the nozzle head, so a quick check with a pin or a fine needle can clear grime from each nozzle. A loose or misrouted hose can also mimic a clog by starving a side of fluid. In that sense, the repair is as much about verifying the integrity of the connections as it is about clearing a blockage. It helps to approach the task with a sense of preventive care. Use a windshield washer fluid that’s appropriate for your environment—winter blends, for instance, resist freezing and reduce crystallization that can contribute to early clogging. Regularly inspecting and cleaning the nozzles, and flushing the entire system with clean water on a semiannual basis, can curb residue buildup. The goal is not merely to fix a current blockage but to preempt future ones. Consider timing your maintenance with seasonal changes; the shift to winter fluid is a natural reminder to inspect hoses, clips, and the cowl. If the blockage recurs or you notice cracks, leaks, or a damaged connector, it’s reasonable to seek professional help. In rare cases, the internal tubing can fracture or become detached from fittings, which would require a more extensive repair or replacement of the tube assembly. Throughout this process, the local Ford service manual and community guidance can serve as valuable references. A legitimate service manual resource may offer diagrams, torque specs, and cautions tailored to your model year, helping you avoid common missteps. For broader do-it-yourself windshield care and related truck maintenance guidance, you can consult a practical guide that compiles common repair steps for truck owners. That resource provides a broader frame for the everyday maintenance routines that keep the washer system reliable, without drifting into the specifics of any single model. If you want to see a concise, model-informed walkthrough in a format that complements this discussion, consider the DIY windshield repair guide for truck owners, which offers additional context and tips for readers who want to expand their toolkit and confidence. For readers who prefer a direct reference, a straightforward online guide can be found here: https://mastertruckrepairllc.com/diy-windshield-repair-guide-for-truck-owners/ and is a useful companion to the Ford-specific steps outlined above.
In this repair, a patient, router-like approach pays off. Treat every hose, clip, and junction as a potential weak link rather than assuming a single cause will solve the whole system. The problem is seldom a single failure; more often it is a triad of debris buildup, a stiffened length of hose, and a misrouted path that limits the spray. The patient method—confirm, access, clear, reassemble, test, and then maintain—maps well onto the rhythm of Ford trucks and their washer networks. While the overall strategy remains universal, the practical steps gain in value when you tailor them to the nuances of your particular model and year. The 2009–2014 F-150s, for instance, respond well to careful cowl access and attention to the junction near the driver’s side. Paying attention to the order in which you work can prevent accidental damage: start by verifying the pump is sound, then focus on the hose network, then the nozzle heads. The result is a steady spray that returns you to clear visibility with minimal downtime and no guesswork.
For readers who want to connect this specific repair to a broader DIY mindset, consider the value of keeping a short, well-labeled diagram of the washer line routing in your glove box or under the hood. A simple map helps you retrace steps quickly if a future clog occurs. It also makes it easier to spot a kink or twist that could become a problem later, especially after a battery disconnect or a routine engine service that can jostle the hoses out of place. The broader takeaway is that the windshield washer system is not an isolated component; it sits at the intersection of the engine compartment, the cowl, and the windshield’s view. Its health depends on attention to the path the fluid takes and the cleanliness of the path it travels. A small amount of preventive care—the right washer fluid, periodic nozzle cleaning, and a semiannual flush—can extend the life of the tubes and keep the system performing smoothly through tougher weather. This approach aligns with the practical ethos of many Ford-truck owners who value clear, consistent visibility and a straightforward, hands-on repair culture. If you’re new to this kind of maintenance, start with the basics and take your time. The goal isn’t to rush a repair but to restore a reliable fluid path that preserves safety and performance. By combining careful diagnosis, mindful access, and gentle clearing techniques, you can conquer a clogged windshield tube without resorting to costly replacement or invasive disassembly. And as you gain confidence, you’ll find that the same careful, methodical approach applies to other small but essential systems under the hood, reinforcing a broader habit of proactive maintenance that serves any Ford truck over the long haul. For a more expansive view of DIY windshield care and related truck maintenance topics, you can explore additional guidance at the linked resource that compiles practical repair insights for truck owners, which complements the model-specific considerations discussed here.
External reference: https://www.ford-trucks.com/forums/1183708-windshield-washer-clogged-on-one-side.html
Clear Winds, Clear Vision: Repair and Preventive Care for Ford Windshield Washer Tubes

A Ford truck is built to endure long stretches, harsh weather, and work-site grime, but the windshield you depend on for visibility is only as reliable as the washer system that keeps it clean. The washer network is a compact labyrinth of a reservoir, rubber hoses, and tiny nozzles aimed at the base of the windshield. When a tube becomes blocked, spray patterns narrow, or the stream simply stops, visibility can drop in an instant. This chapter doesn’t promise a miracle fix for every truck, but it does lay out a clear, methodical approach to diagnosing and repairing clogged windshield washer tubes on Ford trucks. It also emphasizes how regular, simple maintenance can keep the system flowing freely, season after season, so you aren’t caught off guard during a critical drive. The goal is not to chase repairs in a panic but to develop a workflow you can trust, one that respects the truck’s design while accommodating the realities of the road and the weather you’ll encounter along the way. The path from reservoir to nozzle is usually straightforward, but a clog can arise from a handful of predictable sources: dirt, debris, lingering residue from old fluid, and in winter, frozen fluid that hardened into a plug. Understanding these causes helps you anticipate trouble before it becomes a distraction at the windshield line of sight.
To approach a clogged tube with confidence, begin with a mental map of the system. The reservoir sits under the hood, often in a translucent container marked with indicators. From there, a network of hoses threads toward spray nozzles near the windshield base. In Ford trucks, the routing can vary a bit by model year and trim, but the principle remains the same: one reservoir, several hoses, a handful of spray points, and enough bend points for debris to collect. Blockages most commonly foul a segment where the hose makes a sharp turn or where the nozzle itself gathers dried fluid. A careful, patient examination of the entire path is the first step toward restoring reliable spray. You won’t fix what you can’t observe, and you won’t observe what you don’t take the time to inspect. With that mindset, you can move from suspicion to a targeted repair that preserves hose integrity and prevents future failures.
The process begins with visual and tactile assessment. Open the hood to access the washer fluid reservoir and trace the hose line forward. Look for any obvious kinks, cracks, or signs of leaks that would indicate a compromised line. A crack or disconnection near a hose clamp can collapse pressure and invite air, making a clog seem worse than it is. If you notice damaged hoses, plan for a straightforward replacement rather than a temporary fix that may fail later. If the lines appear intact, the next step is to determine whether the blockage lies closer to the reservoir or near the nozzles. This can be inferred by noting how the fluid displays at the nozzle when you activate the system. If you get a weak spray on both nozzles but hear the pump pressurize, the issue is often within the hoses or at the connection points. If one nozzle shows no spray while the other operates normally, the culprit is more likely the nozzle itself or a branch of tubing that feeds that side.
With a rough diagnosis in hand, proceed to a controlled attempt to clear the obstruction. A practical and widely used method is to blow compressed air through the tube. Start by disconnecting the hose at the nozzle end—near the windshield—so you can observe whether air pressure pushes through the line. Use a portable compressor or a service station air supply at a gentle, controlled pressure. The idea is to push loose debris toward the reservoir or out of the line, not to shove it deeper into the system. Begin from the reservoir end and work toward the nozzle, allowing gravity and the fluid path to assist. If air pressure clears a light clog, you should feel the line come alive as the spray returns with renewed volume. If you encounter resistance or the nozzle keeps coughing out a weak stream, stop and reassess. Forcing air through a tight bend or a deteriorating hose can damage fittings or the hose itself. Remember to monitor pressure closely and never exceed a level that feels strained for the tubing or clamps. If air alone doesn’t clear the blockage, a flush becomes a sensible next move.
Flushing the line is a simple, low-risk method to dislodge stubborn residue. Disconnect the tube from the reservoir end and run a gentle stream of clean water through the tube, or a mild detergent solution if the water alone isn’t doing the job. Use a small brush or a bent metal wire, like a paperclip, to carefully loosen debris settled inside the tube. The goal is to loosen and rinse away matter without injuring the lining of the hose. After flushing, reconnect the tube and attempt another activation of the washer. If the spray improves, you’re close to full restoration; if not, the blockage may extend farther along the line or reside at the nozzle. In this moment it can help to inspect the nozzles themselves with a light touch of a pin or a slender needle to clear any dried residue that may have clung to the spray holes. A nozzle clogged with dried fluid can negate the effect of a re-cleared hose, so combined nozzle and hose attention is the most reliable route back to even spray coverage.
No matter which cleaning method you employ, test the system with the engine running and the fluid at normal operating level. A working pump is more effective when it has a ready supply of fluid and the system isn’t fighting an air leak. If one side still shoots unevenly, the problem may be a kink in the hose that prevents adequate flow, or a partially blocked internal connector. This is the moment to pause, re-check all hose connections, visually inspect the entire length, and confirm the integrity of clamps that keep the hoses in place. It’s easy to overlook the connectors tucked under the cowl or along the inner fender, but they are typical failure points after years of vibration and heat cycling. When you reassemble, ensure each clamp is snug but not over-tight. A clamp that bites too hard can pinch the hose and create a new restriction that mimics a clog, while a loose fitting invites air intrusion and pressure loss.
Once you have the line cleared and the nozzles unclogged, reattach all hoses and run a full system test. Activate the washer with the engine running and with the vehicle on a level surface to observe uniform spray. In the course of this test, take note of spray reach, pattern, and whether both nozzles deliver evenly. If you notice a stray spray that doesn’t target the glass correctly, recheck the nozzle position and the spray holes for misalignment or dried fluid build-up that could cause a scattered jet. If you reach a point where the return is inconsistent, don’t assume the worst next time out. A simple recheck of hoses and clamps, plus a fresh push of cleaner through the nozzles, can recover performance without replacing parts.
Even when the system works again, prevention matters as much as repair. Preventive maintenance for windshield washer tubes on Ford trucks is a straightforward discipline that pays dividends in visibility during demanding seasons. The fluid you choose matters. In colder climates, opt for a winter-grade washer fluid with antifreeze properties, but avoid blending formulas that can leave residues that cling to plastic lines. In milder or arid environments, fluids designed to cut through road film and bug splatter will help maintain clarity without relying on harsh solvents that can degrade hoses. Regularly checking the reservoir level is simple maintenance that pays for itself when you’re tempted to run on empty. A low fluid level not only reduces cleaning effectiveness but can force the pump to operate dry, which accelerates wear. A monthly inspection, or before a long trip, ensures you won’t encounter a shortage when you need the system most.
Clean nozzles deserve equal attention. Debris can accumulate in the spray holes, reducing pressure and throwing the stream off target. A pin or needle is usually enough to clear this obstruction; avoid sharp tools that could gouge the nozzle tip. If you find persistent clogging, it’s worth removing the nozzle assembly to inspect the interior passage and verify that nothing is wedged inside. Likewise, hoses should be checked for cracks, brittleness, or signs of aging. A cracked hose is more likely to kink or split, creating air pockets that undermine pressure. Replacing worn hoses promptly preserves system integrity and reduces the odds of a future clog.
Incorporating a simple maintenance cadence helps Ford truck owners stay ahead of trouble. Inspect the hoses and nozzles at least every few months, especially before and after winter or dusty seasons. Clean the nozzles as part of the routine, and keep the reservoir cap secure to prevent contamination. Always use the appropriate climate-specific fluid, and never fill the reservoir with plain water in freezing conditions—ice can form within the tubes and potentially rupture hoses or the reservoir itself. If you drive in a stage where temperature swings are dramatic, consider flushing the lines before the onset of winter to reduce the chance of frozen blocks forming inside the hoses. It’s a small habit with a big payoff: consistent spray when you need it most, uninterrupted visibility on the road, and reduced risk of a sudden, uncomfortable distraction that can compromise safety.
For more detailed guidance and model-specific notes, you can explore deeper discussions that cover a wide range of windshield systems and the common failure patterns observed on Ford trucks. If you want a longer, hands-on walkthrough that aligns with practical maintenance for a DIY-minded owner, you can refer to a broader, truck-focused windshield repair guide that emphasizes clear, actionable steps and careful problem-solving. This deeper resource complements the steps outlined here and reinforces the idea that windshield care is a measure of preparation as much as repair. In practice, the combination of careful diagnosis, controlled clearing methods, and disciplined preventive maintenance keeps the system reliable year-round. The goal is not only to fix a blockage but to cultivate a routine that preserves the integrity of the entire windshield washer network so that you keep a clear line of sight no matter what the road throws your way. If you want to read a concise, practical guide to these kinds of repairs crafted for truck owners, you can follow this recommended DIY windshield repair guide for truck owners: DIY Windshield Repair Guide for Truck Owners.
As you apply these principles, you’ll notice the difference that deliberate maintenance makes. The system that once faltered under pressure will stand up to weather and grit with more consistent performance. And when a dedicated routine pays off with reliable spray, it becomes not just about repair but about readiness—a small investment of time that yields clearer days on the road. For model-specific nuances and additional tips, consult the vehicle’s service manual and keep a log of the maintenance actions you perform. The windshield washer system is a surprisingly robust yet modestly complex part of the truck’s overall reliability, and respecting its limits can extend both the life of the hoses and the clarity of your view through the windshield. If you’d like to cross-check broader Ford guidelines, the official Ford Owner’s Manual resource offers a comprehensive reference that aligns with the maintenance practices discussed here: https://www.ford.com/owners/manuals/.
Final thoughts
Maintaining a functional windshield washer system is critical in ensuring safety and efficiency for your fleet. By identifying common issues, properly repairing clogged tubes, and implementing regular preventive maintenance, fleet managers and operators can avoid unnecessary downtime and enhance overall vehicle reliability. Investing in the maintenance of each truck will lead to a more productive and safe operation. Stay proactive, and keep your trucks roadworthy.

