Importance of Maintaining Your Truck: Addressing Deep Scratches
Maintaining the visual appeal and integrity of your truck is not just a matter of aesthetics; it’s crucial for preserving its value and function over time. Deep scratches on a truck can significantly detract from its appearance and may even lead to rust and other structural issues if left unaddressed. Fleet managers and trucking company owners know that a well-maintained vehicle reflects professionalism and reliability in the eyes of clients. When you consider how to repair deep scratches on your truck, you’re not only enhancing its vehicle appearance but also investing in your truck maintenance strategy. Keeping your trucks in optimal condition can lead to longer service life and higher resale value, ultimately impacting your bottom line. By prioritizing the repair of these imperfections, you uphold the standards of quality that your business represents, ensuring that your fleet remains a beacon of excellence in the industry. To further explore effective strategies for truck maintenance, check out our article on budgeting for routine truck maintenance.
Common Causes of Deep Scratches on Trucks
Understanding the causes of deep scratches on trucks can help fleet managers and operators prevent further damage and reduce repair costs. Here’s a detailed list of common causes:
- Abrasive Debris: Trucks operating on construction sites are often exposed to gravel, rebar fragments, and metal shavings, which can cause significant scratches.
- Heavy Loads: Carrying excessively heavy loads can increase ground pressure, making it more likely for trucks to scrape against road surfaces or obstacles like curbs and manholes.
- Environmental Hazards: On job sites, tools, steel beams, or concrete rubble can fall onto trucks, leading to scratches. Being aware of surroundings during loading/unloading is crucial.
- Poor Road Conditions: Potholes and loose aggregate on access roads contribute to deep scratches, especially if vehicles must navigate these poorly maintained areas frequently.
- Mechanical Failures: Issues during cargo handling, such as dragging loads or misaligned trailers, can lead to underbody damage, causing unsightly deep scratches.
- Inadequate Training: Operators may lack proper training on maneuvering large vehicles in tight spaces, increasing the likelihood of avoidable damage through contact with obstacles.
- Improper Loading/Unloading Practices: Using ramps with sharp edges or failing to secure cargo properly can result in shifts that cause scratches during transport.
For more insights on truck maintenance, you can learn about budgeting for routine truck maintenance and discover fleet maintenance tips.
When it comes to repairing deep scratches on trucks, user reviews and experiences provide valuable insights that can help fleet managers, trucking company owners, and operators in construction and mining industries. Here’s a summary of the most practical tips shared by users based on their real-life applications:
Understanding Scratch Types
- Scratch Depth Matters: Users emphasize the importance of assessing the scratch depth before attempting repair. Clear coat scratches (the most superficial type) can often be treated with common household items like toothpaste or polishing compounds. In contrast, deeper scratches that penetrate the color layer may require specialized tools or professional refinishing.
- For very light scratches, products like non-gel toothpaste have proven effective. Users report success using a damp microfiber cloth to rub a small amount of toothpaste in circular motions, which can significantly reduce the appearance of these minor blemishes.
- Two-Step Repair Process: For more severe damage, a two-step process is often recommended. This involves using a rubbing compound followed by a polish to restore the shine. Users advise caution with deeper scratches that expose the primer or metal, as these typically require professional touch-up paint for adequate repair.
Effective Repair Products
-
3M Scratch Removers: User testimonials highlight the effectiveness of 3M products, particularly the 3M Electric Scratch Remover. Many truck owners have found that this tool delivers consistent results for larger surface areas, such as bumpers and side panels. Additionally, the 3M Tape Scratch Remover is noted for its ability to eliminate adhesive residues and hazing left from protective films.
-
Gel-Based Scratch Removers: Users have expressed satisfaction with gel-based scratch removers, especially when used on vertical surfaces. These products can effectively fill deep imperfections, allowing for a smoother finish. Regular maintenance with UV-protective products not only helps in scratching but also reduces fading.
Cautions and Recommendations
- It’s crucial to use the appropriate pad and compound during the scratch repair process. Overly aggressive compounds can lead to paint burn-through, which can complicate repairs further.
- Users recommend applying repair products with soft sponges and emphasizing the importance of buffing with a clean microfiber cloth after application to achieve the best results.
Conclusion
Incorporating these practical tips from other truck owners can greatly enhance the effectiveness of scratch repairs. Whether dealing with minor scuffs or deeper scratches, understanding the type of damage and employing the right tools and techniques can lead to successful repairs. For comprehensive guidance on maintaining your truck, consider exploring budgeting for routine truck maintenance or DIY scratch removal for trucks.
These experiences highlight the value of learning from fellow truck owners, ensuring that costly repairs can be minimized through informed DIY efforts.
Tools Needed for Repairing Deep Scratches on Trucks
When aiming to repair deep scratches on a truck, having the right tools and materials is essential for achieving professional results. Below is a detailed list of tools and materials you’ll need to properly address deep scratches, yielding a smooth and durable finish.
Essential Tools and Materials
| Tool/Material | Function Category | Description of Use |
|---|---|---|
| Sandpaper (80-2000 grit) | Sanding | Required to smooth out the edges of deep scratches and prepare the surface for further repair. Coarser grits remove old paint, while finer grits level out the surface for a seamless transition. |
| Body Filler | Filling | Used to fill in deep scratches that penetrate through the paint to the metal. It restores the original contour of the panel and requires mixing with a hardener to ensure solid curing. |
| Plastic Spreader | Filling | Helps in applying body filler evenly into the scratch and smoothing it out to prevent air bubbles while ensuring a flat surface. |
| Touch-up Paint | Spraying/Painting | Specifically matched to your truck’s color, this paint is essential for covering the filled area, ensuring an unobtrusive repair. |
| Primer | Spraying/Painting | Applied to any bare metal after sanding, to enhance adhesion of the paint and to prevent rust. |
| Dual-Action Polisher | Polishing | Used to polish the painted area for a smooth finish after the paint has cured, making it blend seamlessly with the surrounding surfaces. |
| Foaming Pads | Polishing | Paired with a dual-action polisher, these pads are used for varying levels of polishing, from aggressive cutting to fine finishing. |
| Clear Coat Sealant | Protection | Provides a protective layer over the repaired area to safeguard against UV radiation and moisture, extending the repair’s lifespan. |
| Cleaning Agents | Preparation | Essential for cleaning the damaged area before applying fillers and paint, removing contaminants such as oil and dirt to ensure proper adhesion. |
| Masking Tape | Protection | Used to cover unaffected areas around the scratch to prevent any accidental overspray during painting. |
Conclusion
Having these tools and materials will empower you to effectively repair deep scratches on your truck. Proper preparation and the right execution technique significantly enhance the quality and durability of your repairs. If you want additional details on repairing truck surfaces, visit this guide. For ongoing maintenance guidance, learn more about budgeting for routine truck maintenance.
Visual Aid
Below is a chart depicting the essential tools categorized by their function, which can help in organizing the repair process better. 
Using the right tools is vital in ensuring effectiveness and longevity in scratch repair.
Comparison of Scratch Repair Kits
To assist fleet managers and trucking company owners in choosing the right scratch repair kit, here is a comparative table summarizing various scratch repair kits available in the market, including their pros, cons, price range, and user ratings.
| Product Name | Type | Price Range ($) | Pros | Cons | User Ratings (1-5 stars) |
|---|---|---|---|---|---|
| Fix It Pro Pen | Scratch Repair Pen | 0.50 – 5.00 | Easy application, portable, quick fix for minor scratches | Not suitable for deep or wide scratches, may fade over time with UV exposure | 4.3 |
| Quartz Renew Kit | Quartz & Porcelain Scratch Repair Kit | 24.99 | Restores shine and repairs surface scratches | Only for surface-level damage; not for deeper scratches | 4.6 |
| Fix It Simoniz Scratch Repair Kit | Comprehensive Scratch Repair Kit | 24.99 | Multiple tools for deeper repairs | Requires more time and skill; learning curve for beginners | 4.2 |
| Smart Sourcing Car Repair Paint Pen | Automotive Touch-Up Paint Pen | 0.01 – 1.00 | Cost-effective, widely available, good for minor damages | Limited color matching options; may not blend perfectly | 3.8 |
| Scratch Repair Pen | Clear Coat Scratch Repair Filler | 0.01 – 1.00 | Affordable bulk option, designed for quick fixes | Low-quality batches possible; limited durability | 3.7 |
| Multipurpose Car Repair Pen | Multipurpose Car Repair Pen | 0.10 – 2.00 | Versatile use across various surfaces, easy to use | May leave residue if not applied properly | 4.0 |
| Ningbo Yinzhou Scratch Repair Pen | Clear Car Scratch Repair Pen | 0.01 – 1.00 | High availability, low cost per unit, suitable for commuters | Not ideal for deep scratches or long-term protection | 3.9 |
Summary
Choosing a scratch repair kit involves considering factors such as the type of scratches being dealt with, the ease of application, and overall effectiveness. For further information on maintaining your fleet, learn more about routine truck maintenance or optimizing fleet size and maintenance for small fleets here.
Comprehensive Guide to Repairing Deep Scratches on Trucks
Deep scratches on trucks can be unsightly and can also lead to more significant issues if not addressed promptly. Fleet managers and operators need a reliable approach to repair these damages effectively. This guide will provide step-by-step instructions for repairing deep scratches, ensuring clarity and ease of understanding.
Step 1: Assess the Damage
Before beginning any repair work, assess the damage to determine the depth of the scratch:
- Surface Scratch: Only affects the clear coat.
- Mild Scratch: Reaches the base color coat but does not expose the metal.
- Deep Scratch: Exposes the metal or plastic beneath.
Professional evaluations are often advisable when assessing significant damage. Refer to ABRA’s guidelines for detailed assessments if needed.
Step 2: Gather Necessary Tools and Materials
You will need specific tools to ensure a professional finish:
- Automotive Degreaser: To clean the area.
- Sandpaper: Various grits (800, 1200, 2000)
- Body Filler: For deep scratches (e.g., epoxy-based fillers)
- Color-Matching Paint: Custom color for the vehicle
- Clear Coat Spray: To protect repair work
- Polisher/Buffer: For finishing touches
- Microfiber cloths: For cleaning
- Dust Mask and Gloves: For safety
For more detailed tool recommendations, visit the Car Care Guide.
Step 3: Clean the Affected Area
Using an automotive degreaser, clean the area around the scratch:
- Apply the degreaser generously over the scratch and surrounding paint.
- Wipe with a microfiber cloth to remove dirt, grease, and wax.
- Allow the area to dry completely before proceeding.
Step 4: Sand the Scratch
Sanding helps smooth the damaged area:
- Start with 800-grit sandpaper to gently feather the edges of the scratch. This makes the transition from the damaged to the undamaged area smoother.
- Gradually move to 1200-grit, then 2000-grit sandpaper, wet sanding where appropriate, until the surface feels smooth.
- Be cautious not to sand too deeply into the surrounding paint.
Step 5: Apply Body Filler (If Necessary)
For deep scratches exposing metal:
- Mix the body filler according to the instructions provided on the package.
- Apply the filler to the scratched area using a plastic spreader, ensuring it is level with the vehicle surface.
- Allow it to cure as per manufacturer guidelines.
Step 6: Prime the Area
Once the body filler has cured:
- Apply an epoxy-based primer to the repaired area. This step is crucial to prevent rust and enhance adhesion for the paint layer. Allow it to dry completely before proceeding.
Step 7: Paint the Area
For color matching:
- Use a color-matched spray paint specific to your truck’s color code.
- Spray in thin layers, allowing each coat to dry before applying the next. This typically involves 2-3 coats of paint.
- If you are inexperienced, consider using professional services for custom color-matching, as outlined in the MotorTrend guide.
Step 8: Apply Clear Coat
Once the paint has fully cured:
- Apply a clear coat layer over the painted area to add shine and protect against the elements.
- Follow the same process as with the paint, applying multiple thin coats for the best finish.
Step 9: Buff and Polish the Surface
To enhance the repair finish:
- Use a high-speed polisher with a cutting compound to buff the area. This can help blend the repainted area with the surrounding paint.
- Finish with a polishing compound and a soft cloth to provide a smooth, glossy final appearance.
Step 10: Final Inspection
Once the area is completely dry, inspect your work:
- Look for unevenness in color or texture.
- If the finish is not acceptable, consider repeating the sanding, painting, and clear coat steps.
- For optimal results, consult professionals for any additional work needed.
Conclusion
Repairing deep scratches on trucks is a meticulous process requiring careful preparation and execution. For fleets, regular maintenance and prompt repairs can extend the lifespan of vehicles. To understand more about maintenance budgeting, check out our article on budgeting for routine truck maintenance. With the right tools and techniques, fleet managers can ensure their trucks remain in top condition, both aesthetically and functionally.
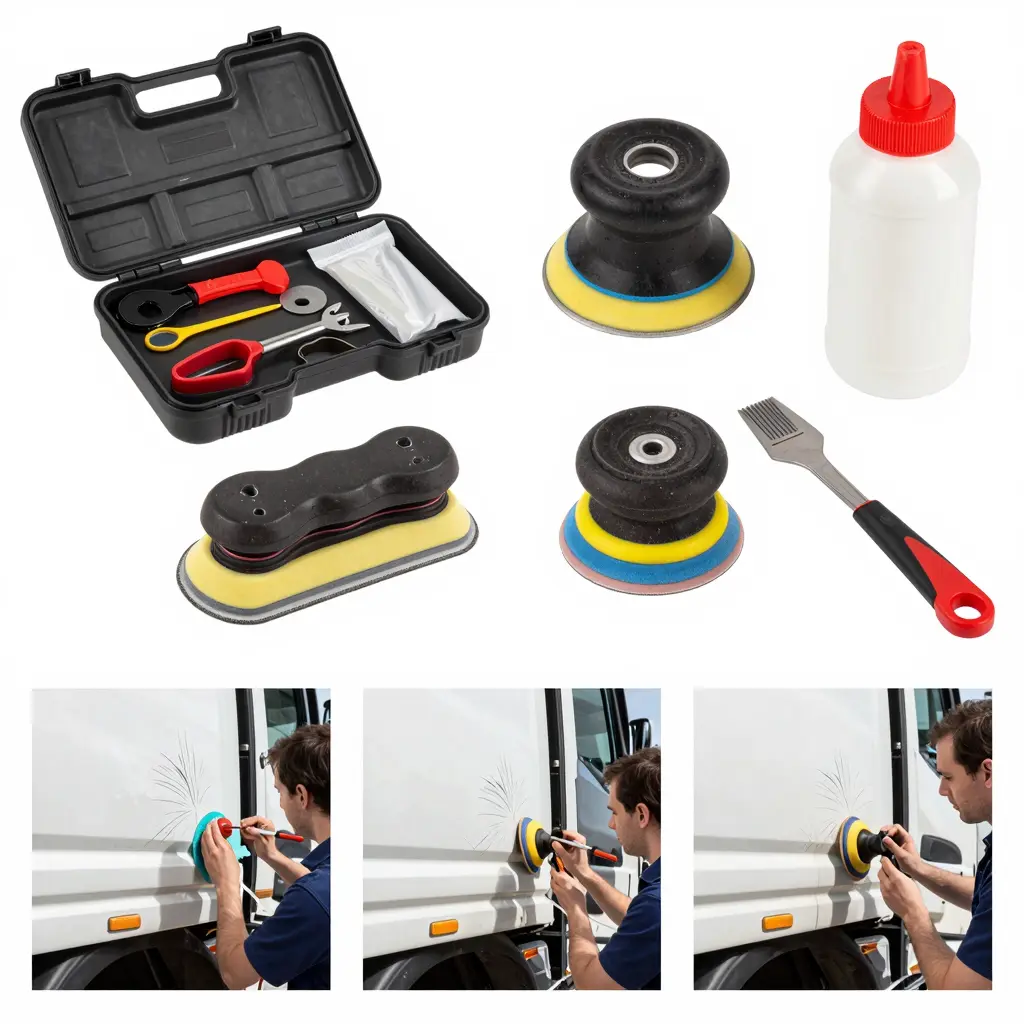
This image illustrates the scratch repair process for trucks, including the essential tools and steps involved in effectively repairing deep scratches on truck surfaces. Perfect for fleet managers and trucking company owners looking to enhance their maintenance practices.
Frequently Asked Questions about Truck Scratch Repairs
Can I repair deep scratches myself?
Yes, you can repair deep scratches on your truck yourself, particularly if the scratch hasn’t penetrated all the way through to the metal. For such repairs, it’s advisable to use a comprehensive repair kit that includes primer, automotive paint, and a clear coat.
The process usually involves these steps:
- Prepare the area: Clean and dry the damaged surface thoroughly.
- Sand down the scratched area: Use fine sandpaper to smooth the edges of the scratch.
- Apply primer: This helps to prevent rust and ensures the paint adheres properly.
- Paint: Select the right shade that matches your truck’s color, and apply it carefully.
- Clear coat: Finally, apply a clear coat to protect the area and enhance the finish.
For very deep scratches that expose the base material, it may be wise to consult professionals to avoid further damage. Learn more about DIY scratch removal for trucks.
How much does it typically cost to repair scratches?
The cost to repair scratches on trucks can vary substantially depending on whether the truck is a traditional fuel vehicle or an electric truck, as well as the severity of the scratch.
Based on a recent survey for 2023, here’s a summary of the average costs:
| Repair Type | Fuel Truck Cost (USD) | Electric Truck Cost (USD) | Notes |
|---|---|---|---|
| Light Scratches | $400 – $700 | $800 – $1,500 | Higher costs for electric trucks are due to more expensive components. |
| Deeper Scratches | $1,000 – $3,000 | $1,000 – $3,000 | Costs are similar for both fuel and electric trucks. |
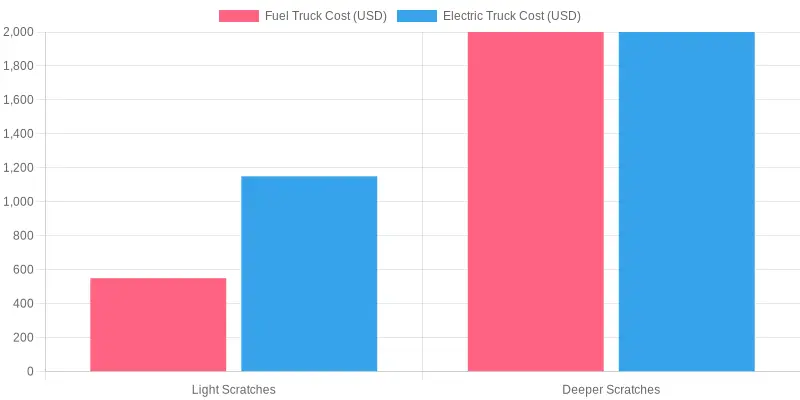
Knowing these costs can help fleet managers and trucking company owners budget for repairs effectively. Consider reviewing your maintenance strategies to keep expenses under control. Learn more about budgeting for routine truck maintenance.
Are there any long-term effects of scratches if left unrepaired?
Absolutely. Left untreated, scratches can lead to rust formation and further deterioration of the truck’s body. Moreover, a truck with visible scratches may suffer from a reduced resale value. Regular maintenance and timely repairs can save on costs in the long run, as well as maintain a professional appearance for your fleet.
What are the best products for DIY scratch repairs?
For DIY repairs, using high-quality touch-up paint and scratch repair kits is recommended. Look for products from reputable brands that specifically cater to automotive repair. These kits usually include everything from primer to clear coat, ensuring comprehensive repair results.
By understanding these common questions, truck owners can make informed decisions regarding scratch repairs, helping to maintain their vehicles efficiently and economically.
Repairing Deep Scratches on Trucks
Deep scratches on trucks can detract from their appearance and, if left untreated, can lead to further damage. Addressing these imperfections efficiently not only enhances the aesthetic value but also reflects good maintenance practices critical for fleet managers and trucking company owners.
Steps for Repairing Deep Scratches:
- Assess the Damage: Determine the severity of the scratch to choose the appropriate repair method.
- Clean the Area: Wash the affected area thoroughly to remove dirt and grease.
- Sand the Scratch: Use fine-grit sandpaper to smooth the edges of the scratch, blending it with the surrounding paint.
- Apply Primer: If the scratch exposes bare metal, apply a primer suitable for the truck’s paint type.
- Paint Application: Use a matching paint to fill in the scratch, applying in thin, even layers.
- Clear Coat: Finish with a clear coat to protect the paint and add gloss.
- Buffing: Once dry, buff the area lightly to blend the new paint with the original.
Importance of Routine Maintenance
Regular maintenance is crucial for keeping your fleet in optimal condition. According to an expert from the American Trucking Associations,
“Regular preventive maintenance is not optional-it’s a legal and ethical imperative. Following manufacturer schedules, conducting daily pre-trip inspections, and using telematics to monitor engine health can reduce breakdowns by up to 40%.”
- Dr. Linda Chen, Chief Safety Officer, American Trucking Associations.
Investing in preventative measures not only improves the reliability of the fleet but also extends the lifespan of the vehicles, reducing long-term costs.
For more on maintaining your fleet, check our resource on budgeting for routine truck maintenance and optimizing fleet size and maintenance for small fleets.
Conclusion: Prioritize Repairing Deep Scratches on Your Trucks
Maintaining the integrity of your trucks is not just about aesthetics; it directly impacts operational safety and value retention. Repairing deep scratches on truck surfaces is a critical task that fleet managers and trucking company owners cannot afford to overlook. These scratches expose underlying metal to corrosion, which not only leads to structural weaknesses but can also diminish the vehicle’s market value. According to the National Truck Safety Council, unrepaired deep scratches can reduce resale value by up to 15%. Furthermore, prompt repairs enhance customer perception and contribute positively to your brand image.
Thus, investing in professional repair solutions becomes paramount. If you are seeking quality repairs, look no further than Summit Fairings. They specialize in custom-fit solutions that not only restore your truck’s appearance but also improve its performance and longevity. Their precision-engineered products ensure a perfect fit and long-lasting protection for your vehicles. Don’t let superficial damage compromise your fleet-consider Summit Fairings today to safeguard your investment and uphold your operational excellence.

