Rust on truck wheel wells represents a significant concern for fleet managers, trucking company owners, and operators in heavy-duty industries such as construction and mining. Addressing this corrosion not only preserves the aesthetic appearance of the vehicles but also ensures their structural integrity and longevity. This article serves as an authoritative guide that delineates the systematic process of assessing, removing, and repairing rust in truck wheel wells. Each chapter provides crucial insights and techniques tailored to safeguard your investment, enhance your fleet’s operational capability, and reduce long-term maintenance costs.
Spotting and Scoping Rust: Evaluating Truck Wheel Well Damage
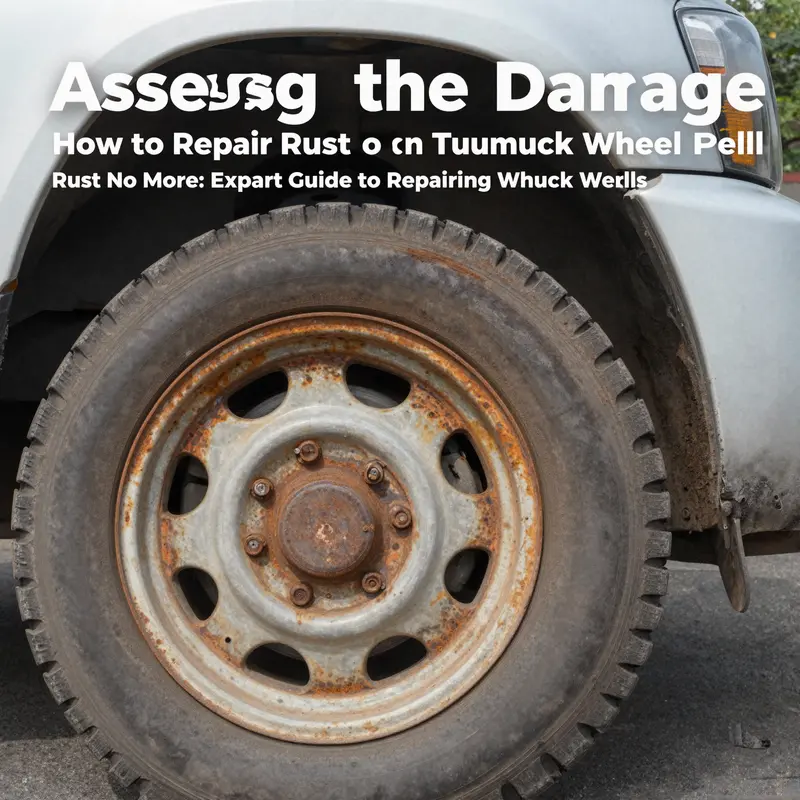
When it comes to repairing rust on a truck’s wheel well, the first—and most critical—step is a meticulous evaluation of the affected area. The wheel well endures constant exposure to moisture, salt, gravel, and debris, all of which accelerate corrosion. Overlooking even a small patch of surface rust can allow it to deepen, eventually threatening structural integrity and leading to costly panel replacement. This chapter guides you through a detailed assessment process, blending hands-on inspection with practical diagnostic methods.
Begin by thoroughly washing the wheel well with a degreasing cleaner to remove road grime and brake dust. Dry the area and shine a flashlight at various angles to reveal faded paint, bubbling undercoat, or irregularities in the panel’s contour. Light reddish-brown specks beneath peeling paint usually indicate superficial rust; while these spots can be addressed at home, their presence suggests that debris has breached the protective layers. Run your fingers gently across the metal: any rough or flaky texture confirms oxidation beneath the surface.
Next, focus on deeper damage. Press gently around suspected rust spots—if the metal flexes or gives under slight pressure, the corrosion has compromised the underlying structure. Dark pits or small holes signal advanced pitting, where oxidation has eaten through the metal. These areas require more than a simple wire-brushing; they may demand filler or even panel section replacement. Examine mounting points for accessories like fender liners and splash guards. Rust at these junctions can undermine the wheel well’s support and alignment, leading to uneven tire wear or suspension issues.
Don’t forget to inspect inside the wheel well, behind splash shields, and along seams where water tends to collect. Use a borescope or mirror to peer into hard-to-reach crevices. Look for signs of blistering or raised sheets of undercoating—these indicate trapped moisture and potential hidden rust. Pay special attention to the lip of the wheel arch, where paint meets bare metal. This edge is prone to chipping from gravel impacts, allowing corrosion to take hold.
Once you’ve identified and categorized rust as either superficial or structural, map out your repair strategy. Surface rust—characterized by light discoloration and minor flaking—can be treated with progressive sanding, a rust-inhibiting primer, and touch-up paint. Structural rust, marked by significant pitting, holes, or weakened metal, demands professional intervention for patch welding or panel replacement. In either case, documenting the damage with photographs helps track progress and ensures no area is overlooked when you begin repairs.
Budgeting time and resources is essential. Small rust spots might be addressed over an afternoon with basic tools: wire brushes, sandpaper, rust converter, filler, primer, and paint. Larger areas, or those affecting mounting points and seams, will require welding equipment or professional body shop services. Planning ahead prevents interruptions and keeps your truck on the road longer. For tips on allocating funds toward regular truck upkeep—including rust control—see our guide to budgeting for routine maintenance.
With a clear understanding of the severity and scope of wheel well rust, you’re equipped to choose the right tools and techniques. The next chapter will walk you through safely removing rust, preparing the metal surface, and applying treatments to halt corrosion in its tracks. By investing time in a precise assessment, you set the stage for durable repairs and long-lasting protection.
External Reference: https://www.autoblog.com/2024/05/17/truck-wheel-well-rust-repair/
From Surface to Shield: A Cohesive, Long-Lasting Repair Method for Truck Wheel Wells
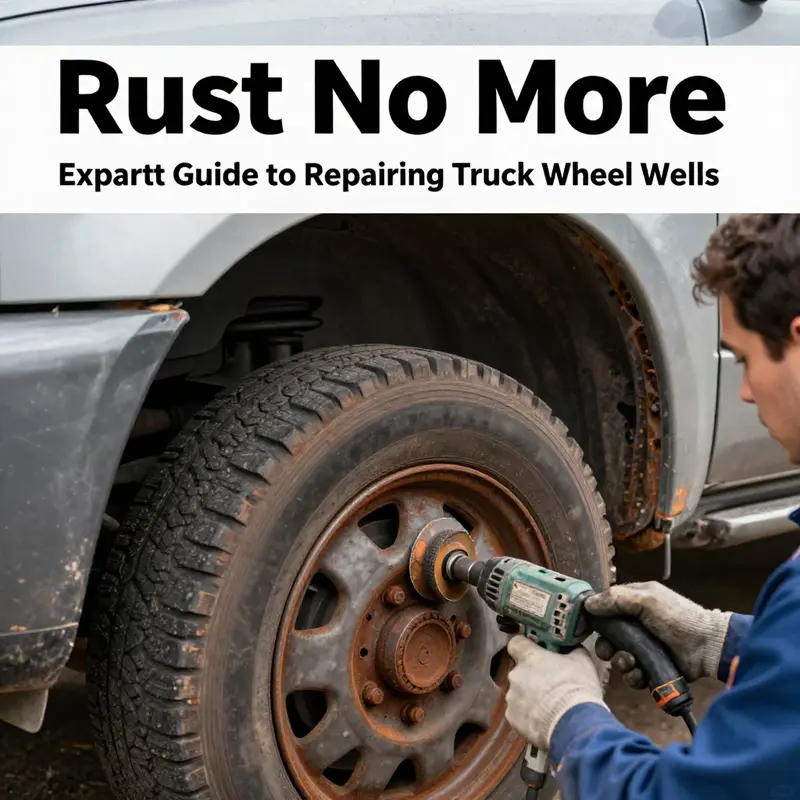
The wheel well of a pickup or work truck is a front-line defense against the elements. It is where moisture, salt, gravel, and mud meet metal, and where every road vibration tests the strength of the sheet metal that forms the wheel opening and its surrounding panels. When rust takes hold here, it is not just an eyesore; it is a signal that the metal’s protective skin is thinning and that structural integrity may be in play if the corrosion has breached through or compromised mounting points. A careful, integrated repair approach can revive both appearance and durability. The task begins with a clear eye for detail and ends with a finish that resists future exposure. In this chapter, the aim is to weave the steps into a single, continuous process rather than a sequence of isolated tasks. Read as a narrative of repair, the process mirrors how a seasoned technician would treat wheel-well rust: assessment, removal, treatment, restoration, protection, and finally a durable seal against the elements. It is a journey that respects the relationship between aesthetics and engineering, because a wheel well that looks reborn yet remains vulnerable to moisture will soon fade again. That is why we anchor the repair in the first principle: never rush the surface preparation. The metal must be clean, bare, and ready to bond with primer and filler. And the environment matters too. A clean, dry, well-ventilated space with good lighting makes the difference between a repair that looks factory-fresh and one that is merely passable. For the driver who uses a truck not just for show but for work, the goal is to maintain a wheel well that performs as well as it looks. The road throws a steady stream of challenges at this area: road salt in winter, road grime in summer, and the constant flexing as the suspension and body panels move with every mile. The repair must acknowledge this dynamic, resisting not only the surface rust but the tendency for new rust to form if any moisture is allowed to linger or if the surface is not properly sealed. The best approach is practical and patient, a slow-burn method that yields a durable shield rather than a quick fix. To begin, we consider how to assess the damage with honesty and precision. A careful look at the wheel well reveals a spectrum of possibilities: light surface rust that clings to the topmost layer of paint and bare metal, pitting that bites into the skin of the metal, and deeper corrosion that may have found its way to mounting points, braces, or the edges of the panel where water tends to pool or splash from the tire. The first step is to define the scope: is this rust cosmetic, or has it compromised the steel? If the rust is superficial, the repair can be completed with relative ease and can blend seamlessly with the surrounding factory finish. If there are pits or small holes, or if the metal has thinned to the point where mounting hardware is loosened or distorted, the repair becomes a more complex mix of removal, reinforcement, and possibly panel replacement. In the best-case scenario, the rust is localized and remains above or just at the surface of the metal. In the more challenging cases, the rust has progressed, and the decision must be made whether a patch panel or a larger section needs replacement. The assessment also includes a check for structural integrity. The wheel well is more than a cosmetic feature; it is part of the truck’s body structure and supports, albeit indirectly, the fender and adjacent panels. If the rust has affected mounting points, the area should be treated with heightened scrutiny. If structural members show signs of weakening, it is prudent to involve a professional with welding or panel fabrication capabilities. The aim is not to scare but to establish a baseline: what can be repaired in a way that will hold up under daily use, and what would be better served by replacement. Once the scope is established, the removal of rust becomes the focal point. The actual removal is a blend of technique and persistence, a careful balance between aggression and control so that you do not erase the contour of the wheel well or risk gouging the metal. Start with the simplest tool, a wire brush, and a hand-held or powered device that can knock away loose rust and flaky paint. The goal at this stage is to strip away everything that flakes, flakes that harbor moisture beneath and may signal deeper corrosion. After the loose material is cleared, the work shifts to a grinding or sanding approach. An angle grinder equipped with a flap disc or a sanding pad can reach into corners and along the edge where the tire tread meets the wheel well. The operator should use progressively finer grits—from 80 or 120 to 220—until the metal surface is clean, smooth, and free of visible rust. Patience here is essential. Rushing over the surface can leave hidden pockets of rust that will surface later as flash rust or as a failure of the repair. Throughout the removal phase, it is critical to maintain a clean environment. Dust, oil, and grease can contaminate the surface and prevent primers from adhering correctly. A thorough wipe-down with a degreaser or a brake-cleaning solvent ensures that the metal is ready for the next phase. With the surface free of rust and ready for treatment, the next stage focuses on protection. Treating the area for future rust is essential. Automotive-grade rust inhibitors or anti-corrosion primers create a barrier between the metal and the atmosphere. These products are designed to bond with the metal, neutralize residual moisture, and provide a solid foundation for subsequent layers of filler, primer, and paint. The key is to apply in thin, even coats and to let each coat dry completely before applying the next. The process protects not just the repaired patch but also the surrounding metal, which could be vulnerable if left unsealed around edges or joints. The chemistry of the treatment is straightforward: a reactive layer forms on the bare metal, closing micro-porous channels and inhibiting water ingress. In practice, this means a dry, dust-free surface ahead of the primer, with the area allowed to cure as per the manufacturer’s instructions. Once the rust inhibitor has cured, the repair can advance to the restoration of the surface that has been lost to rust. This is where decisions about fillers or patch panels come into play. For small dents or superficial pits, a high-quality epoxy-based filler can be applied in very thin layers. The trick with filler is to work in thin applications and to cure fully before sanding. Layering is the rule here; many professionals apply several thin layers rather than a single thick one to avoid cracking or shrinkage as the filler cures and flexes with the vehicle. Sanding must be meticulous in this phase. Sand the repaired area to match the surrounding contours, using progressively finer grits and ensuring the repair line disappears under the finish. In cases where rust has caused more substantial metal loss, a patch panel becomes the correct solution. A patch panel is a crafted piece of metal cut to fit the damaged region. It is welded into place with precise, small welds that minimize distortion. The welds should be ground smooth to avoid creating a high point that will trap moisture or compromise the finish. The result should be a stable, uniform surface that, once primed, behaves like factory metal. The path from filler to paint is a short but crucial transition. Priming the repaired area is essential because primer not only anchors the surface but also helps prevent flash rust on any bare metal exposed by the repair. The primer should be a high-build automotive primer designed to seal and fill minor imperfections while providing a uniform base for color. The approach is to apply the primer over the entire repaired area and the surrounding metal to ensure a seamless blend, especially where the repair meets the original paint line. After the primer has dried according to the instructions, the paint layer begins. The color-matching process is often the most delicate part of wheel-well repair because wheel wells can be shaded differently by lighting and by the proximity to the wheel. The goal is to achieve an even, factory-like appearance that does not draw the eye to the repair. Many shop practices involve multiple thin coats rather than one thick layer, with sanding between coats to remove dust nibs and to ensure a smooth, consistent finish. A clear coat completes the process, adding UV protection and a durable hard gloss that stands up to road debris and sunlight. The clear coat also helps to seal the paint and reduce micro-scratches that can accumulate in a wheel-well environment. The final cosmetic phase should balance gloss with texture, so the repaired area reads as a natural extension of the surrounding metal rather than a separate, obvious insert. Sanding between coats is part of this discipline, and a final light wetsanding can bring the area to a level of smoothness that mirrors the factory finish. The curing phase is not to be rushed. Many finishes require 24 to 72 hours to reach full hardness, during which time the vehicle should be protected from moisture and contaminants. A slow cure yields a tougher surface and reduces the risk of microcracking. After the finish has cured, a protective undercoating adds a final layer of defense. A rubberized undercoating or a bed-liner style spray can help seal the wheel well from spray, salt, and chips that may be kicked up by the tires. This coating does not replace proper rust prevention but complements it by creating an outer shield against the elements. The narrative of repair would be incomplete without addressing the practical realities that come with the job. The wheel well is located in a space that is difficult to access fully, and the corner where the wheel arch meets the fender line often hides imperfections. This is where careful inspection after the repair matters most. Look for any stretching or shrinking of metal around the welded patch, any rippling caused by heat, and any signs that moisture remains trapped under the surface. If a customer is aiming for a long-lasting solution, they should not hesitate to re-check the area after a few weeks of driving, especially in damp or salty environments. Occasionally, the most durable fix will require bringing the vehicle into a controlled environment with a spray booth and specialized equipment. In those cases, the repaired section can be baked or cured with controlled heat, ensuring the primer and paint bond is maximized and that the finish is uniform. This is the environment where professionals typically excel, and it can dramatically extend the life of the repair, particularly on vehicles that operate in harsh climates or see heavy use. The ethical and practical dimension of wheel-well repair is to recognize the value of doing it right the first time. A rushed repair that is susceptible to chipping, cracking, or early rust return ends up costing more in time, materials, and potential structural concerns than a slower, thorough approach from the outset. It also helps to consider the long-term protective strategy. Beyond the immediate repair, a plan for ongoing maintenance can keep the wheel well in good condition for years. Regular inspections for signs of moisture intrusion, promptly addressing scratches and chips in the paint, and applying a protective coating in the wheel-well vicinity can all contribute to a longer service life. In addition to maintenance, preventative measures can be integrated into routine vehicle care. A careful wash and dry of the wheel wells, particularly after winter driving or off-road use, reduces salt and grime buildup. When accessible, sealing joints and seams with an appropriate sealant helps guard against water ingress at the edges. Even something as simple as keeping the tire treads in good condition minimizes the amount of spray that the wheel well receives, reducing how much abrasive material can wear down the finish over time. The narrative of repair is, in practice, a dialogue with the vehicle. It asks you to respect the metal’s history—the spots that have rusted tell a story about how the truck has lived and where it has traveled. The repair should acknowledge that history while providing new lines of defense, a seamless blend that feels natural rather than patched. It is a craft that combines mechanical skill, surface chemistry, and an eye for color and texture. It also invites a measure of humility: some situations defy a simple fix and demand professional intervention or even panel replacement. When rust has penetrated into structural areas or when the patch needs to be welded into place, a skilled technician is essential. The most dependable repairs leverage professional equipment and controlled conditions to ensure that welds are strong, that heat distortion is minimized, and that the paint finish is durable. Yet even when professional help is required, the underlying principle remains the same: create a clean, properly primed, and sealed surface, then apply a finish that seals out moisture and stands up to UV exposure and road wear. For readers who want to connect with ongoing resources and communities, a useful step is to explore established repair literature and practical guides. A reliable path is to visit a retained, reputable automotive information hub that maintains a catalog of wheel-well repair guidance and best practices. That resource can provide updated instructions, safety tips, and troubleshooting notes that align with current industry standards. It is worth noting that the field evolves as new coatings, primers, and application techniques emerge. As you absorb the approach described here, keep in mind that the core of a successful wheel-well rust repair is a cohesive sequence: assess, remove, treat, repair, prime, paint, seal, and protect. The careful practitioner plans ahead for the factors that drive durability, from material compatibility to edge treatment and curing times. The job becomes less about a single moment and more about a sequence of decisions that build a resilient finish. For readers who want to anchor their work in a broader context, a helpful path is to engage with the broader automotive maintenance community. A quick way to find related discussions, tutorials, and examples is to browse the resources offered on a dedicated automotive repair blog, which collects experience from many truck owners and repair technicians. The chain of knowledge from those conversations can reinforce best practices and illuminate the subtleties that make a wheel-well repair stand up to the rigors of road life. If you want to explore a concise compendium of the practical steps described in this chapter, you can follow a simple route: start with a clean slate, remove rust to bare metal, treat the area with an inhibitor, fill or patch as required, prime the surface, apply color, seal with a clear coat, and finish with a protective undercoating designed for wheel-well exposure. The wheel well deserves nothing less than an approach that mirrors the care given to the truck’s other critical systems. It is a space that experiences frequent exposure to moisture and debris, a place where the vehicle’s body meets the road and where the integrity of the repair will prove itself on every mile. In the end, the goal is to restore a wheel well that not only looks right but performs reliably under the conditions that the truck encounters day after day. The steps interlock, the layers bond, and the result is a repaired section that resists the return of rust for years to come. For readers seeking additional guidance or a community of practice, a resource worth exploring is the Master Truck Repair blog, which hosts practical discussions on repair techniques, maintenance routines, and real-world experiences from truck owners and technicians alike. This resource offers a bridge between theory and hands-on application, helping you translate the principles discussed here into actionable outcomes. Master Truck Repair blog: https://mastertruckrepairllc.com/blog/. Through dialogue and shared experience, the wheel-well repair journey becomes less daunting and more reproducible, enabling a repair that stands up to the demands of life on the road. External resource for broader context and current industry practices can be consulted for additional validation and technique refinement. For further reading and a contemporary perspective on wheel-well rust repair, see the external guide curated by automotive professionals, which presents a step-by-step approach aligned with industry standards and practical field experience: https://www.autoblog.com/2025/09/12/truck-wheel-well-rust-repair-guide. This external reference complements the process outlined here and can help you compare the described method with additional scenarios and tips from working technicians in the field.
Sealing, Shielding, and Sustaining: The Ultimate Finish for Rust-Free Truck Wheel Wells
Thorough Surface Preparation and Cleaning
Every lasting repair begins with impeccable preparation. After sanding away residual primer dust and smoothing your body filler, it’s crucial to remove any lingering oils, dirt, or metal particles. Reach for a quality degreasing solvent formulated for automotive use. Apply it liberally over the wheel well, wiping in overlapping passes with clean lint-free cloths. Allow the solvent to flash off completely; moisture or residue trapped beneath primer or paint compromises adhesion and invites future corrosion.
Once the surface feels clean and dry, take a moment to inspect the contour. Light should dance across the metal—any dull spots could signal hidden contaminants. If you spot them, repeat the cleaning process. Your goal is a pristine, bare-metal canvas ready to bond with protective coatings.
Applying a Rust-Inhibiting Primer
With the wheel well now spotless, it’s time to lay down a robust rust-inhibitor primer. Select a primer specifically engineered for metal surfaces exposed to moisture and road debris. Holding the spray gun six to eight inches from the panel, apply thin, even coats. Each pass should overlap the previous by roughly 50% to avoid drips and ensure uniform coverage. Aim for two to three coats, allowing five to ten minutes of flash time between layers. This primer forms a molecular barrier against oxygen and water—the twin catalysts of rust.
Temperature and humidity play a pivotal role in primer performance. If you’re working in cooler climates or high-humidity environments, extend the flash times and consider a slower-curing formula. Refer to the manufacturer’s guidelines, but err on the side of patience. A fully cured primer can take up to a full day, depending on conditions, but that waiting period pays dividends when it comes to durability.
Executing the Topcoat Application
The next stage blends protection with aesthetics. Choose a topcoat that matches your truck’s factory or custom finish. Mix the paint according to the ratio specified by the paint supplier, ensuring thorough agitation. If using a spray system, maintain consistent air pressure—typically between 29 and 32 psi at the gun—to achieve a fine, atomized mist.
As you spray, follow a steady, sweeping motion. Begin and end each pass off the edge of the wheel well to prevent buildup at the start and finish points. Apply two to three coats, waiting for each layer to flash off. Light sanding with ultra-fine 1500-grit paper between coats can help smooth out minor imperfections, but avoid aggressive abrasion that could expose primer.
After the final coat, allow the paint to cure according to the product instructions—generally 24 to 48 hours under ideal conditions. Fully cured paint offers maximum hardness and chemical resistance, which is essential for a high-wear area like a wheel well.
Adding a Rubberized Undercoating for Maximum Impact Resistance
While primer and paint provide chemical protection, they lack the impact absorption needed to fend off stone chips and gravel. Enter rubberized undercoating: a flexible, durable layer that clings to contours and deflects flying debris. Spray the undercoating evenly over the painted wheel well lip and inner surfaces, typically in one or two coats. Its elastomeric nature means it won’t crack under flex or temperature shifts.
Once applied, this undercoating also dampens road noise, giving you a quieter ride. Check for runs or sags immediately after spraying; if detected, smooth them out with a gloved hand or spray a quick additional pass before the product skins over.
Establishing a Routine Inspection and Maintenance Plan
A flawless repair shines brightest when coupled with vigilant maintenance. Inspect your wheel wells at least twice a year, ideally after winter or extended rainy seasons. Look for any breaches in the undercoating, faded paint spots, or early rust bubbles around welded seams or panel edges. Promptly touch up small chips with matching primer and paint to prevent moisture ingress.
Budgeting for routine upkeep avoids larger expenses down the road. Consider setting aside a modest annual service fund dedicated solely to underbody inspections and minor rust repairs. This proactive approach ensures that small blemishes never evolve into structural threats.
For further guidance on long-term truck maintenance planning, explore our detailed budgeting strategies in this guide to budgeting for routine maintenance of heavy-duty trucks.
External Resource
For professional-grade insights into preventing and repairing rust across your entire vehicle, refer to this comprehensive resource from Car and Driver: https://www.caranddriver.com/features/a47893165/how-to-prevent-and-repair-rust-on-trucks/
Final thoughts
Repairing rust in truck wheel wells is not merely a cosmetic endeavor—it is vital for maintaining the operational efficiency and safety of your fleet. By implementing the methods outlined in this article, fleet managers and commercial operators can significantly extend the life of their trucks while minimizing replacement costs. Robust rust repair solutions not only enhance appearance but crucially defend against deterioration caused by environmental challenges. Investing time and resources into routine maintenance of rust-prone areas like wheel wells ensures your fleet remains capable and ready for any task it faces.

