Dealing with rusted and snapped bolts in truck beds presents significant challenges for fleet managers, trucking companies, and construction operators alike. The integrity of trucks and their components is vital for operational efficiency and safety. Often, rust can compromise the longevity and functionality of essential hardware, necessitating effective strategies to address these issues. This comprehensive guide will introduce four critical methodologies to repair rusted truck bed snapped bolts that help ensure continued reliability and minimize downtime. We will cover the use of penetrating oil to free stuck bolts, the application of heat for stubborn cases, the role of bolt extractors in simplifying removal, and advanced techniques featuring hydraulic splitters and EDM for particularly difficult situations. Together, these strategies can equip operators with the tools necessary to maintain their vehicles effectively.
Penetrating Oil as the First Line of Defense in Repairing Rusted Truck Bed Snapped Bolts
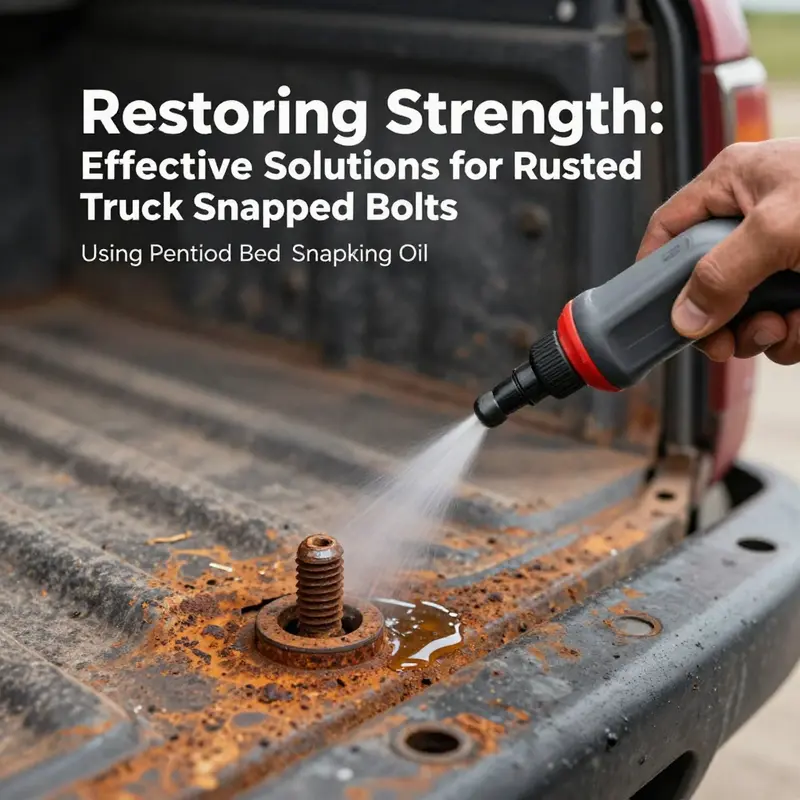
Rusted bolts in a truck bed present a stubborn blend of frustration and opportunity. When a bolt has snapped off flush or just below the surface, the instinct is to wrench harder. Yet the real head start comes from patience, a careful plan, and the disciplined use of penetrating oil as the first line of defense. This chapter threads those principles together in a single, practical arc. It treats the journey as a careful renovation rather than a punch-and-swing recovery, because the goal is not merely to remove the bolt but to preserve the integrity of the threaded hole and the surrounding metal. The process begins with preparation, proceeds through a sequence of controlled steps, and ends with a secure, corrosion-aware reassembly. In this way, the rusted bolt in the truck bed becomes not a terminal obstacle but a solvable maintenance task that restores the bed’s usability and longevity.
First comes the quiet intelligence of prep work. A clean work area is not a cosmetic luxury; it is the foundation for successful penetration and extraction. Dirt, grease, and loose rust act like sieves that keep moisture and air trapped in contact with metal. They also inhibit the penetrating oil from reaching the most stubborn interfaces where the bolt meets the bore. So, begin by wiping away surface grime with a clean rag. If the bed is particularly grimy, a mild degreaser can be used, followed by another wipe to ensure the area around the broken bolt is dry and free of oil slicks. This is not a stage to rush. A clean groove around the bolt helps the oil do its work instead of simply sitting on top of the rust. When the surface is prepped, apply the penetrating oil directly to the broken bolt and the surrounding threads. The oil should seep into every crevice, so a small brush or an applicator tip is valuable. The goal is to bathe the rust and the thread interfaces, giving the oil a steady lane to travel. After the first application, let it soak for at least 15 to 30 minutes. If the rust is heavier or the bolt has sat for years, more time is reasonable—a longer soak can be productive, especially when the bolt is deeply embedded in a stiff, ferric lattice of rust.
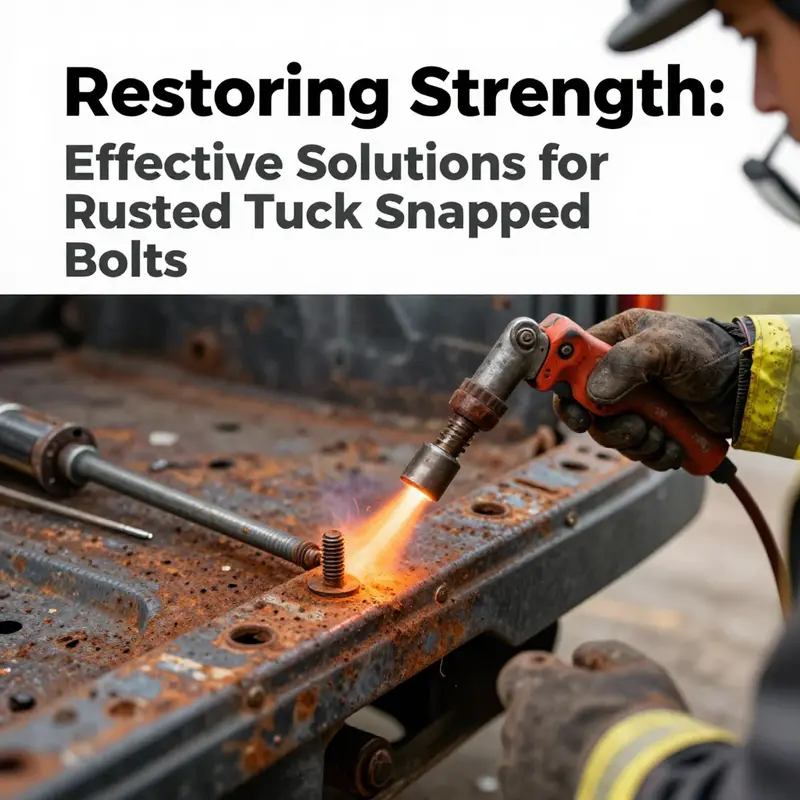
The second part of the strategy is to respect heat as a cooperative ally rather than a rogue element. After the penetrating oil has had its initial chance to work, introduce warmth to the area. A heat gun or a modest propane torch can gently warm the metal around the bolt. The idea is not to melt anything or to scorch paint; it is to exploit the different rates of expansion between the bolt and the surrounding metal. So, apply heat evenly for a minute or two. You should be able to touch the metal and feel warmth without discomfort. This mild expansion helps break the rust’s mechanical grip, loosening the bond so the bolt can begin to turn. The moment you notice the surface becoming too hot, or if the paint shows signs of distress, back off. Overheating is not a badge of progress; it is a signal that you could be risking nearby trim, wiring, or structural elements. Cooling down is essential before trying to turn the bolt any further.
A subtle but often overlooked technique follows heat: gentle tapping. While the metal is warm, use a light hammer and a punch or drift pin to tap around the perimeter of the broken bolt. This vibration helps to disrupt the stubborn rust bonds and also encourages the penetrating oil to intrude a bit deeper into the joint. The tapping should be even and controlled—not a sharp, forceful blow, but a sequence of soft taps that propagate micro-movements through the rust. When you combine this micro-vibration with the oil’s lubricating effect, you create a more forgiving path for the bolt to back out. It is a moment when patience yields practical leverage. If the bolt shows any sign of giving, you might be tempted to try turning it immediately. Don’t rush. A small, incremental turn is better than a forceful twist that might strip threads or snap the bolt further.
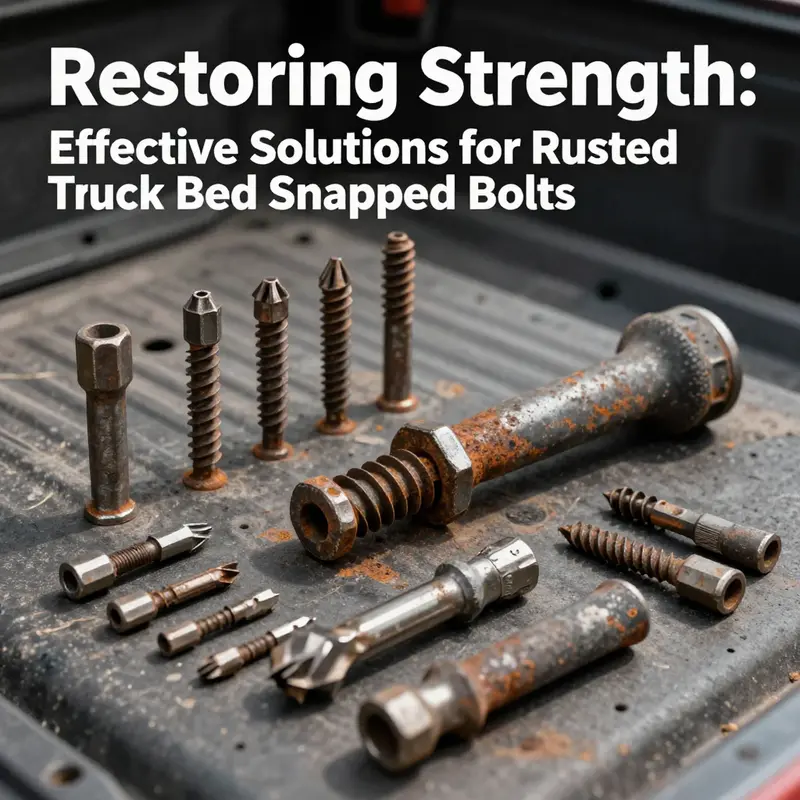
When the moment of truth arrives, the extraction phase begins. If any portion of the bolt is exposed after the prior steps, a properly sized extractor can be engaged. Use a left-hand or reverse-threaded extractor that matches the bolt’s diameter and the hole’s depth. The drill for the extractor must be aligned with the center of the broken bolt; a pilot hole slightly smaller than the extractor helps ensure a clean bite. The turning action is counterclockwise, as with standard extractors, but the key is to maintain steady pressure rather than abrupt torque. If the extractor begins to grab, back it out slowly and re-apply penetrating oil to re-lubricate the interface. In some cases, the bolt will resist extraction despite best efforts. That is not a failure of your approach but a signal that the bolt has fused with rust to a degree that requests a more decisive, yet still cautious, tactic.
When the bolt refuses to cooperate, drilling from the center outward becomes the most practical alternative. Start with a small pilot hole centered on the broken piece. The goal is to grind away the core of the bolt without disturbing the threads in the surrounding bore. Progressively larger drill bits can be used, each time verifying the center alignment and depth. As the interior of the bolt is hollowed out, an easy-out style extractor that matches the new bore diameter can be employed to retrieve the remaining material. It is important to maintain precision during this phase; a wobbling drill can widen the bore or damage the threads. If the center is breached or the drill wanders, pause and re-check alignment before continuing. Precision is the quiet partner of persistence here.
Once the stubborn piece is removed, the bed’s hole is not yet ready for a new bolt. The hole must be cleaned thoroughly to remove rust fragments and debris. A wire brush attached to a hand drill, or a spent air blast, can clear the porous surfaces inside the bore. After cleaning, inspect the threads with a careful eye. If the threads show gouges or severe corrosion, a thread chase or tap might be required to restore the proper geometry. This step matters because a compromised thread invites future problems, including improper torque and reduced clamping force. If the hole is restored to good condition, you can proceed to install a new bolt. Choose a bolt of the same material and grade as the original, and verify the correct diameter and length for the hole. Anti-seize compound or a light thread-locking compound can be considered as a preventive measure, but only if the manufacturer’s specifications permit it. In many cases, a light application of anti-seize helps future disassembly but should be used sparingly on critical load-bearing fasteners. When the new bolt is in place, tighten it to the torque specification recommended by the vehicle’s manufacturer, applying even force in a crisscross pattern if there are multiple bolts involved. This ensures uniform clamping and minimizes the risk of warping or uneven load across the bed.
The end of one bolt is not the end of the maintenance story. The practical repair of rusted truck bed fasteners is as much about long-term care as it is about the immediate extraction. After completing the installation, inspect the surrounding metal for any signs of more extensive corrosion. Treat nearby surfaces with a light protective coating if appropriate, and consider keeping the area clean and dry to reduce future rust formation. If you live in a climate with heavy moisture or road salt, periodic inspection of the bed’s anchors can save time and expense later. The most reliable results come from a cycle of inspection, cleaning, and light protection over the year rather than a single, one-off repair.
This approach to penetrating oil as the first line of defense is not merely an isolated tactic. It sits at the intersection of practical mechanics and preventative maintenance. The scene in a truck bed is common enough to merit a thoughtful, repeatable routine. A single bolt replacement can restore a bed’s functionality, but the broader value comes from cultivating good habits. That means choosing a high-quality penetrating oil and using it with patience, adopting heat judiciously, recognizing the role of gentle tapping, and knowing when to advance to drilling or extraction with the right tools. It means understanding that the goal is to preserve the surrounding threads and metal, not to force a stubborn piece out at the expense of the hole or the bed’s frame.
For readers seeking additional context on broader truck-bed maintenance and practical repairs, the Master Truck Repair blog offers a repository of hands-on guidance that complements the techniques described here. Exploring aligned topics can reinforce the mindset of careful, methodical work rather than rushing to disassembly. You can learn more by visiting the Master Truck Repair blog.
In circumstances where the bolt proves exceptionally recalcitrant, or where the hole’s integrity is uncertain, it is prudent to consider professional assistance. While penetrating oil, careful heating, and measured extraction can solve many cases, there are situations where a specialist with the right equipment can salvage the hole and the surrounding structure without risking collateral damage. The key is to recognize limits and to proceed with tools and techniques that respect the bed’s material and the vehicle’s overall safety. Taken together, the sequence described here presents a practical path forward that emphasizes control, patience, and respect for metal. It is a method built on observation, proper lubrication, and disciplined application of heat and force—an approach that yields reliable results while minimizing the chance of further harm to the truck bed.
For readers who want a deeper dive into bolt removal methods beyond penetrating oil, a detailed external reference can provide broader perspectives and alternative strategies. This resource covers a range of scenarios and tool options, including how to approach deeply embedded bolts and how to apply extraction techniques with safety and precision. You can review it here: https://www.mechanicsfiles.com/how-to-remove-a-broken-bolt-from-a-truck-bed/.
null
null
Harnessing Bolt Extractors to Rescue a Rusted Truck Bed: Mastering the Art of Freeing Snapped Bolts
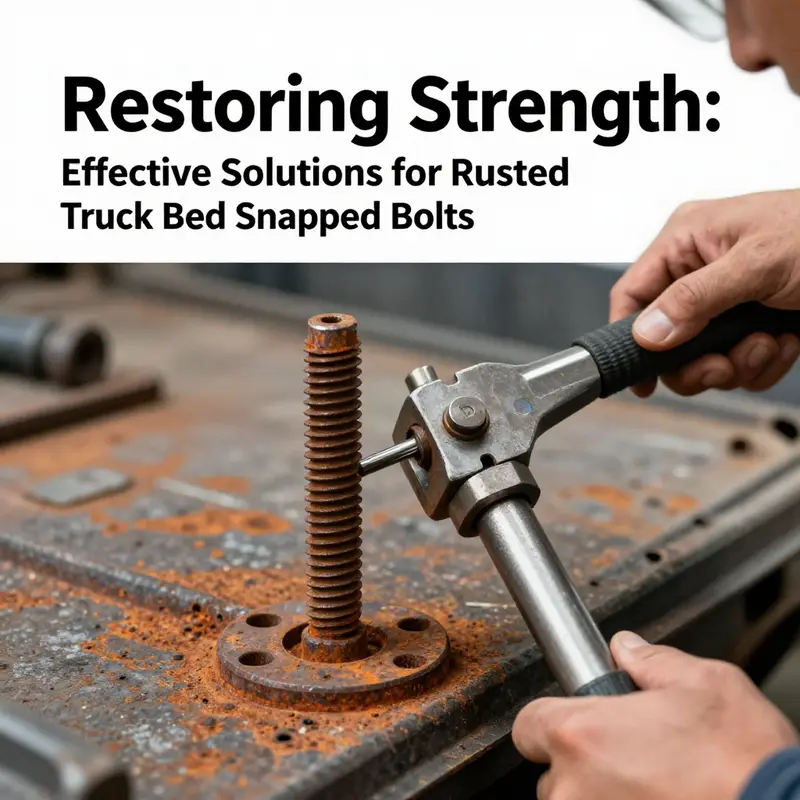
The moment a bolt snaps in a rusted truck bed can test patience. A seized fastener locks the bed hardware in place, and the temptation to wrench harder may lead to additional damage. A proper bolt extractor set becomes a careful, predictable tool that preserves threads and enables a clean repair. This chapter outlines a measured approach to freeing a snapped bolt while maintaining the bed structure and preparing for a secure reassembly.\n\nBefore extraction, apply penetrating lubricant and allow it to work. The goal is to loosen corrosion bonds gradually rather than forcing the bolt. When accessible, drill a precise pilot hole centered on the bolt and of a diameter slightly smaller than the extractor. Keep the drill perpendicular and work slowly to avoid wandering. The extractor then bites into the bolt as you apply steady counterclockwise torque, pulling the broken piece out without tearing the threads in the surrounding metal.\n\nIf the hole threads are damaged, clean and rethread or install a thread insert such as a helicoil. Choosing a bolt of the correct grade and diameter for reassembly is essential, with torque applied evenly to avoid distortions. After removal, inspect the cavity, remove burrs, and prepare for the new fastener so the bed carries load safely. For more practical guidance and real world examples, consult a trusted repair resource.
Cracking Rust’s Grip: Advanced Methods for Releasing Snapped Truck Bed Bolts with Hydraulic Splitters and EDM
Rust can turn a simple bolt removal into a long, grinding chase, especially when the bolt has snapped off cleanly in a truck bed. The scene is all too common: a stubborn chunk of metal hidden beneath primer and weathered paint, threads corroded shut by years of moisture, grit, and road grime. In such moments, the usual wrenches and steady hands aren’t enough. You need to think like a surgeon and a designer, blending brute force with precision, and sometimes inviting a specialized tool into the operation. This chapter moves beyond the basics and into advanced techniques that save the surrounding material while extracting the snagged bolt. It explores two powerful approaches—hydraulic bolt splitters and electrical discharge machining (EDM)—not as substitutions for the fundamentals, but as carefully chosen escalations when simpler methods falter. The goal is simple in intent and complex in execution: free the broken bolt without ripping into the hole, keep the surrounding metal intact, and set the stage for a reliable reinstall with matching hardware. To place these tools in context, think of the repair as a chain of increasing finesse. Start with penetration and lubrication to coax movement from the rust. If the bolt remains stubborn, controlled heating can break the bond. If a portion of the bolt still sticks out, a correctly sized extractor can be run counterclockwise to coax it free. A breaker bar or a high-torque impact can deliver the final nudge. And if the bolt is truly frozen or its shank unusually thick, the hydraulic splitter or EDM offers a path that minimizes collateral damage. The narrative of repair then returns to a straightforward conclusion: clean the hole, restore the threads if needed, and install a new bolt with the same grade and fit as the original. In all of this, safety remains the backbone of any strategy. Eye protection, gloves, and hearing protection when using power tools or hydraulic equipment are non-negotiable. The work environment should be well lit, dry, and free of clutter that could catch a wrench or a hose under pressure. Even with advanced tools, a measured approach is essential. Rushing the process increases the risk of nicking the hole, warping surrounding metal, or leaving residual debris that can compromise future bolt seating. The sequence described here is not a parade of gimmicks; it is a disciplined progression designed to preserve the bed, maintain alignment, and yield a repair you can rely on for thousands of miles of grit and weather. As you plan this stage of the repair, keep in mind a practical touchpoint for future projects: budgeting for routine truck maintenance. A thoughtful allocation helps ensure you have access to specialized tools when they’re needed rather than scrambling to borrow or improvise. For a broader lens on maintenance budgeting, you can explore this resource: budgeting-for-routine-truck-maintenance. While the toolbox you assemble for hydraulic splitting or EDM is not inexpensive, the investment pays back in safer repairs and longer service life for critical bed components. The core idea is to match the method to the problem, not to force-fit a single technique into every scenario. The following discussion unfolds in that spirit, outlining how hydraulic splitters and EDM work in practice, what they demand of the operator, and when they should be trusted as the route to success rather than as a last resort.
Hydraulic bolt splitter technique
At the heart of a hydraulic bolt splitter is a straightforward principle: apply enormous, controlled pressure to the bolt shank until it splits. This split can occur along the bolt’s length, typically from the inside out, allowing the remaining fragments to be removed with minimal violence to the hole. The preparation for this method begins with careful access. The broken bolt may sit at the base of a threaded hole in steel or aluminum, sometimes recessed behind a lip of metal or a patch of undercoating. You need a clamp or mounting ring that fits securely around the exposed portion of the bolt and aligns with the splitter’s ram. The alignment is critical; the device must press squarely along the bolt’s axis to force the crack through the metal evenly, rather than causing a tidal wave of shear that could distort the hole. Once the splitter is secured, hydraulic pressure is built gradually. There’s a moment of quiet as the system ramps up, then a decisive crack as the bolt begins to split. The beauty of this approach is that the process concentrates force along the axis of the bolt, reducing the risk of turning and tearing the hole’s threads or lifting the surrounding bed skin. In many cases, the bolt separates cleanly, and the pieces pull away with little more than a wrench’s turn to remove any stubborn stubs. A critical advantage of this method is its restraint. Conventional methods, such as drilling, hammering, or twisting with an extractor, carry a higher likelihood of punching into the hole or causing heat-affected zones that complicate rethreading. The hydraulic path, when done with care, preserves the integrity of the threaded bore and the surrounding metal, which is especially valuable when the bolt threads feed into thick steel or reinforced bed supports. The procedural rhythm is deliberate: secure the splitter around the bolt, verify alignment with the axis, initiate the hydraulic cycle, monitor the split’s progression, and stop as soon as the bolt yields. If the bolt splits into two pieces, the extractor end may be usable only for the advisory portion or may simply be removed as scrap after extra fragments are freed. The incremental nature of the approach also provides a safety margin. If the material around the bolt shows any sign of cracking or warping, operators can pause, reassess, and adjust the grip rather than pushing ahead blindly. The endgame remains: a clean, salvageable hole that can be retapped if the threads are damaged and a solid seat for a replacement bolt that matches the original grade and size. In the broader care of the bed, every step is an opportunity to prevent future corrosion. After the bolt removal, the bore should be cleaned to remove metal dust and chips. A light pass with a thread-restoring tool or tap can reestablish clean, true threads, especially if the bore has developed a minor burr or ovality during the split. The surface around the bore should receive a fresh coat of paint or protective sealer to thwart moisture ingress, particularly in exposed locations along the truck bed’s side panels. If the bolt hole shows more extensive damage, you may consider stepping up to a helicoil or another insert that preserves threaded engagement without enlarging the bore. That, in turn, allows a properly chosen replacement bolt to achieve the required clamping force and torque without risking pullout due to a compromised thread. EDM technique
Electrical Discharge Machining, or EDM, is a more specialized, high-precision approach to stubborn bolts that refuse to yield to mechanical means. EDM does not rely on physical torque or cutting tools that bite into the metal. Instead, it uses a precisely shaped conductive electrode and a series of electrical discharges to erode the bolt away from the surrounding material. The electrode is crafted to mirror the bolt’s geometry but scaled to fit within the constrained access that often exists in a truck bed. The process begins with careful setup: the electrode is positioned so that the discharges target only the bolt, not the bore’s walls or any nearby fasteners. The power and timing are controlled with sophisticated equipment that monitors the erosion process in real time. As discharges occur, micro-pockets of metal are removed from the bolt, gradually reducing its diameter until the shank can be lifted clear. Because EDM relies on electrical erosion rather than heat or mechanical shear, it tends to keep heat transfer to the surrounding material to a minimum. This is a key advantage when the surrounding bed edges are painted, anodized, or otherwise sensitive to heat. EDM is also remarkably precise, which makes it an attractive option in cases where the bolt sits in a deeply recessed pocket or near critical structural features. That said, EDM is not a universal fix. It requires specialized equipment and experienced technicians who can interpret the process, adjust parameters, and avoid collateral damage to heat-sensitive conduits or thin-walled sections in the bed. The operational realities of EDM mean it is usually reserved for hard-to-reach or deeply embedded bolts, or for situations where other methods would risk deforming the hole or the bed’s surrounding structure. If EDM is pursued, expect a measured workflow: conduct a pre-check to confirm the bolt’s metallurgy and the hole’s material, select a conductive electrode shaped to the bolt’s geometry, and execute controlled discharges while maintaining a safe distance from flammable materials and fuel lines. EDM’s strength lies in its non-contact, minimal-mechanical-stress nature; it makes possible what often seems impossible when rust has fused the bolt into its seat. It is an option most often exercised by professionals who have both the equipment and the training to calibrate the process to the bed’s material and to the bolt’s exact dimensions.
Practical applications and decision-making considerations
The cardinal rule when you’re faced with snapped bolts in a rusted truck bed is to avoid forcing the issue beyond a point where the surrounding metal remains pristine. Hydraulic splitters and EDM should be understood as part of a graduated toolkit. The choice between them hinges on accessibility, bolt geometry, and how deeply the bolt is seated. If you can shoal the area around the bolt and secure a robust grip on the exposed portion, a hydraulic splitter is often the best first advanced step. It delivers tangible leverage with a relatively straightforward setup and minimizes heat transfer. If, on the other hand, the bolt is deeply embedded, the head is flush with the surrounding material, or the bore shows signs of deformity that would be aggravated by mechanical force, EDM becomes the more prudent route. In either case, professional supervision is strongly advised. These techniques demand precise control and a disciplined approach to safety. The operator must monitor the tool’s alignment and pressure, prepare for unexpected outcomes—such as a split that proceeds unevenly or a shard that kicks loose—and have a plan for debris management and for preserving thread integrity once the bolt is removed.
After the bolt is removed, the hole’s integrity becomes paramount. Debris must be cleared thoroughly, and the threads inspected for wear, burrs, or misalignment. A light threading tap may be necessary to reestablish clean engagement. If the bore shows any signs of ovality or reduced diameter, a re-drill and re-tap may be required for a reliable bite. When replacing the bolt, it is important to match material and grade to the original specification. A bolt that is too soft or too short will jeopardize the clamping force and could fail under load. Tightening torque should follow the manufacturer’s specification, and the sequence should be consistent with other fasteners in the bed to ensure even clamping pressure. A crisscross pattern is a standard way to achieve this without introducing distortion to the hole or the bed’s edge. In the broader arc of maintenance, this is a reminder that rusted bolts are not just a one-off issue; they are a symptom of exposure, neglect, or aging hardware. The path forward is to re-establish a corrosion-resistant barrier and to implement a preventive approach that reduces the likelihood of a return visit from the same problem. This includes proper sealing of the bolt hole, regular inspection for rust and paint blistering, and a schedule for periodic checks of all bed fasteners. The repair is complete not when a bolt is installed, but when the bed’s integrity is restored, the bolt seat is clean and true, and the clamp holds firm under load. The practical outcome is reliable performance and the peace of mind that comes with knowing the bed can bear loads without the bolt failing mid-use.
From a narrative standpoint, the advanced techniques discussed here do not replace the basic steps of rust treatment and careful extraction. They augment them, offering powerful options when ordinary tools fail or when the risk of damage to the bed becomes unacceptable. The decision to escalate to a hydraulic splitter or EDM should be grounded in a careful assessment of access, bolt geometry, and the bed’s structural role. In the end, the aim is not to demolish rust with brute force but to outsmart it with precision and controlled force. That mindset—treating the bolt as a component within a larger system and choosing the method that minimizes collateral damage—defines a higher standard for rust repair in modern trucks. It is a standard that respects the bed’s value, preserves its alignment, and keeps the truck ready for work rather than sidelined by a stubborn rust problem.
As you move through this repair, consider the bigger picture of maintenance planning. A strategic approach that includes budget-aware maintenance planning, careful material selection, and disciplined execution can dramatically improve outcomes. For those who want a practical starting point on budgeting for routine maintenance, the internal resource linked earlier offers a framework to allocate funds for tools, parts, and professional services when specialized equipment like hydraulic splitters or EDM is warranted. Keeping a portion of your budget earmarked for rare repairs helps you avoid delays and keeps critical systems—from the bed’s fasteners to the frame’s integrity—within safe, serviceable limits. And when you read about these methods or watch a tutorial, you’ll see that the underlying principles apply far beyond one bolt. The same disciplined approach can be applied to other structural fasteners that resist conventional removal, ensuring your truck remains a reliable workhorse capable of withstanding the harsh realities of daily use.
External resource: For a practical, visual guide on hydraulic bolt splitters, see this tutorial: https://www.popularmechanics.com/cars/a38149650/hydraulic-bolt-splitter-tutorial/
Final thoughts
Addressing rusted and snapped bolts in truck beds is a necessary skill for ensuring the longevity and efficiency of any fleet. Utilizing penetrating oil can effectively loosen rust, while heat application proves to be advantageous for stubborn cases. Bolt extractors streamline the removal process and advanced techniques, such as hydraulic splitters and EDM, provide solutions for the most challenging situations. By mastering these techniques, fleet managers and operators in sectors such as construction and logistics can maintain their vehicles, enhancing operational efficiency and reducing downtime. Investing in proper maintenance techniques ultimately leads to safer, more reliable transportation, reflecting positively on your business’s profitability and reputation.

