Breakdowns are an inevitable part of operating a fleet. Knowing how to address common repairs can significantly minimize downtime and costs. This guide provides practical emergency repair techniques for truck fuel lines, cooling systems, fuel tanks, valve springs, and fan belts. Each chapter will delve into specific solutions, ensuring that truck fleet managers and operators are well-equipped to handle roadside emergencies efficiently, keeping your operations running smoothly.
Fuel Line Break or Leak: A Hands-On Roadside Stopgap to Keep Your Truck Moving
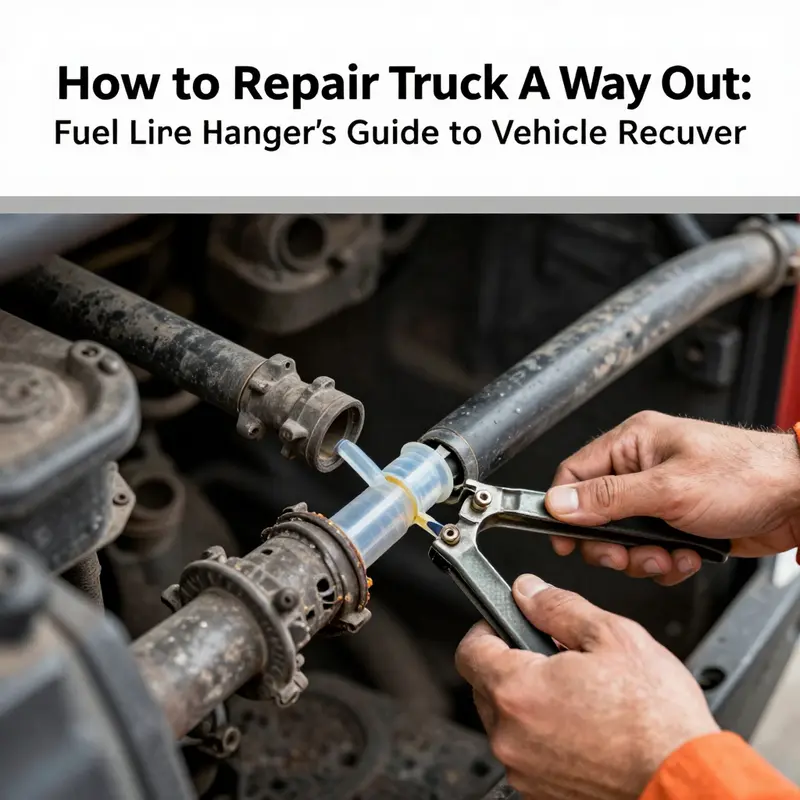
A fuel line break or leak in a heavy truck is more than an annoyance; it is a safety hazard that demands calm handling. Gasoline vapors are highly flammable, and the heat of an exhaust manifold or a stray spark from electrical systems can ignite them. Even a small seep near the fuel tank or evaporative system can create a dangerous plume inside the cargo area or cabin if fumes accumulate. The aim is not battlefield-level repair, but a careful, temporary fix that lets you reach a safe, well-equipped space where professionals can complete a durable repair. In the moments after you notice a leak, your priorities shift to safety, control, and time management. You must move the truck only if you can do so without increasing the risk, and you should have a plan in place for powering down, isolating the source, and preventing a flare-up. The following steps outline a practical, ethically cautious approach to buying you time while preserving greater safety.
First, safety comes before all else. Stop the truck in a place with open space and good ventilation, away from any ignition sources. Turn off the engine, then disconnect the negative battery terminal to minimize the chance of sparks. If you have a buddy, have them help by monitoring for smells, smoke, or pooling fuel, and by keeping bystanders clear. Do not restart the engine until you have surveyed the area and ensured there is no active leak that could flash. While you wait, use a flashlight to trace the line from the tank to the fuel rail or intake manifold, following clamps, joints, and hoses. A leak often shows as a wet spot or a persistent odor, but fuel can seep in ways you cannot immediately see. If you find the break, you can plan a temporary seal only if the section is a simple crack or a small hole and you have the materials to secure a short-term stopgap without trapping fumes inside the engine bay.
Next, assess whether a replacement is feasible at the roadside. If the damaged segment is cracked, brittle, or punctured beyond patching, it should be replaced with a proper line designed for your truck’s make and model. Use OEM or high-quality aftermarket lines that fit the exact diameter and end fittings. The goal is to reinstall a continuous path for fuel with fittings that can be tightened to the correct torque specification. Inspect all fittings and clamps along the route of the line, including any rubber hoses connected to it. If a connector shows wear, replace it as well. Tighten clamps evenly and confirm that the line seats fully into every ferrule or barb without gaps. A secure seal here matters; a loose end can leak under pressure, while an under-torqued clamp can shift, creating another leak while you are moving.
Once you have a replacement on hand, plan the install with care. Depressurize the system according to the vehicle’s service manual or, in its absence, by carefully loosening a fuel rail connection only after the battery is disconnected and all ignition sources are eliminated. Remove the damaged section with steady hands, avoiding contact with dripping fuel. Install the new segment and reconnect hoses and clamps in the same order they were removed. When possible, use factory-specified clamps and ensure their threads seat cleanly. Do not over-tighten, which can crack fittings or strip threads. After installation, recheck every connection for alignment and clearance, making sure no portion of the line rubs against a moving part or sharp edge.
Testing is not a step to skip. Reconnect the battery, crank the engine briefly, then observe the repaired area with the engine idling. Look and listen for any sign of leakage or fuel smell around the new segment. If safe, pressurize the system by briefly running the pump and watching for new seepage as the line fills. If you detect a drip, stop the engine again, re-tighten clamps, or reseat the hose ends. If the leak persists despite a clean installation, do not continue driving; arrange for a tow or a professional roadside service. The priority is to prevent a fire risk and avoid trailing fuel along your route, which can put people and property at risk.
In many roadside situations, a temporary seal may be the only option when a full replacement cannot be completed on site. These are stopgap measures, not permanent fixes. For small cracks, you can use a combination of a clean surface, a compatible sealant, and a tight wrap to reduce seepage long enough to reach a repair facility. Some improvised methods include wrapping the damaged area with clean cloths, securing with wire, and applying a fuel-compatible sealant or epoxy after the surface is dry. In a pinch, a pliable, temporary seal from a nonmetallic tape or other approved material can help, but it must be compatible with fuel and engine heat. If you end up using any temporary method, monitor the area closely and do not rely on it beyond the shortest possible timeframe. A temporary fix is a bridge, not a destination.
Moving beyond the mechanical, acknowledge the big-picture planning that makes roadside repairs less harsh in the long run. Keep a well-curated emergency toolkit at all times, and make sure you have a spare fuel line as part of your stock. Maintain a careful inventory of critical components and know where to source parts quickly in a given region. A practical habit is to carry a simple set of tools and materials: plastic or rubber tubing that matches the line diameter, wire or hose clamps, epoxy or a sealant, cloths, soap, and even chewing gum, as anecdotal as that sounds. These items, when used correctly, can buys you the minutes needed to get to a safer place for a proper fix. The American authorities emphasize that while temporary repairs are standard practice, they must be followed by professional service as soon as possible. Roadside guidelines consistently highlight the safety-first approach described here and encourage drivers to seek legitimate, skilled support rather than attempting to drive a vehicle with compromised fuel lines.
The broader plan for any driver facing this emergency is to minimize exposure to fuel vapors, to isolate the vehicle from ignition sources, and to move only under conditions that are safe and legal. Your vehicle should be parked in a well-ventilated area, on stable ground, and preferably away from traffic. If fumes are strong, evacuate the vehicle and call for professional assistance. When you are ready to resume travel, do so with the understanding that a bare patch or a temporary seal protects you only until you reach a workshop where a complete replacement can be performed with the correct parts and procedures. To support ongoing preparedness, consider building an emergency repair fund for truck owners, which can cover the costs of parts, fuel, and labor during roadside repairs. Read more about this strategic planning in our detailed guide at the linked resource: building an emergency repair fund for truck owners.
For those who want to deepen their understanding of fuel leaks and their risks, a broader safety resource explains why leaks pose such life-threatening hazards and why prompt, professional repair is essential. Learn more from this external resource: Why fuel leaks are a problem.
The road can demand quick thinking and steady hands, but the right approach keeps your crew safe and preserves the integrity of the vehicle. If you follow careful safety protocols, use high-quality replacement components, and verify every clamp and connection, you can reach a service location with confidence. In the end, you gain not just time, but the assurance that you have done everything possible to prevent a dangerous situation from worsening. The path from the roadside stop to a professional repair is a measured, disciplined journey—one that respects the seriousness of fuel-system integrity and the shared responsibility of keeping heavy trucks moving safely.
Finding a Way Out on the Road: Diagnosing and Temporarily Fixing Water Hose and Cooling System Leaks
On a highway, a cooling system leak signals a real risk. Coolant puddling near the front of the engine often points to a failing water pump seal. Begin with a patient inspection: look for cracked hoses, bulges, soft spots, and verify clamps are tight. Replace damaged hoses with the correct diameter and material; if you can’t find an exact fit, use a temporary reinforced hose as a stopgap and replace soon. After installation, confirm clamps are secure and recheck after a few miles. For small leaks, a temporary soap treatment and fabric wrap can slow loss but is not a fix; monitor closely and seek proper service. If a pump shows persistent seepage, minimize driving, keep coolant level up, and head to a service point with the engine off when possible. A tow is safest for major leaks. Preventive steps include upgrading to reinforced hoses, checking the radiator, thermostat housing, heater-core lines, and the drive belt, and maintaining an emergency kit. External resource: https://www.autoblog.com/2026/02/03/truck-leaking-coolant-common-causes-how-to-identify-them/
Fuel Tank Damage: Road-Ready Tactics to Get Your Truck A Way Out
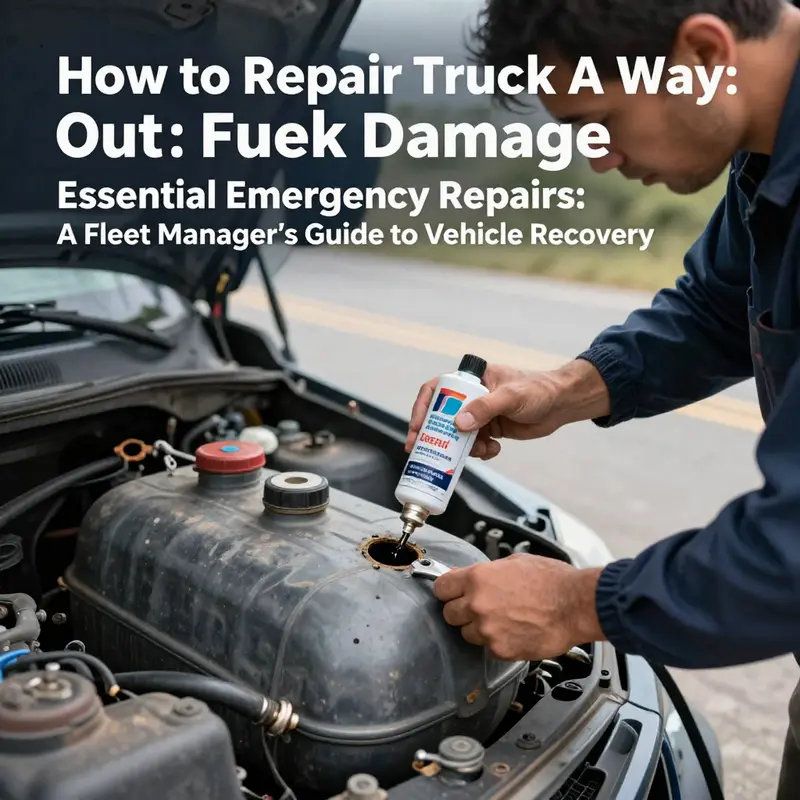
On a lonely stretch of highway, a dented or leaking fuel tank can turn a routine haul into a stalled dilemma in seconds. Yet with the right mindset and a disciplined sequence, you can move from danger to safety and, crucially, to the next repair bay. The fuel system holds its power and peril in the same container, so every action must be guided by one constant: safety first. A small mistake or hurried patch can ignite vapors, ruin the tank, and turn a roadside stop into a far worse emergency. The following approach mirrors what seasoned operators and roadside guides recommend: drain, assess, decide, and seal, while keeping the engine off, the area ventilated, and ignition sources far away. This is not a permanent fix, but a carefully executed temporary strategy designed to reduce risk and buy time until a professional service can take over.
Begin with safety as the baseline. The tank’s contents are flammable, and even residual vapors can pose a serious hazard in confined spaces or near heat, sparks, or static discharge. For any repair-minded move, you must completely drain the tank into approved, sealed containers. Do not attempt anything while fuel remains. Do this in a well-ventilated area, away from people and ignition sources. A siphon pump or a manual drain through the filler neck can accomplish this, but the key is to minimize vapors and ensure there is no open flame or spark nearby. Once the tank is empty, you can breathe a little easier, and the risk of ignition drops dramatically. The moment of truth arrives when you identify the damage itself: is it a pinhole, a crack, a dent with a crevice, or a larger perforation that compromises structural integrity? The answer will guide the repair path and determine how long you can safely rely on the temporary fix.
Once you can see the damage, a careful assessment becomes your most valuable tool. Small holes or surface cracks may be addressed with a fuel-tank–appropriate adhesive, designed to tolerate gasoline or diesel and to bond to metal or coated surfaces. Thorough cleaning is essential. Degrease the area to remove oil, dirt, and fuel residues. A light sanding then roughens the surface, giving the adhesive something to grip and curing more predictable. Follow the adhesive’s instructions to mix and apply, usually with a careful 1:1 ratio and generous coverage over the damaged area. Allow the repair to cure fully, and remember that temperature and humidity can influence curing time. In cool conditions, extend the cure time; in heat, monitor closely to avoid overheating the area and compromising the bond.
If the damage is more substantial—larger holes, deformation around the mounting, or structural compromise—the best course is to arrange for welding by a qualified professional. The tank must be thoroughly cleaned and purged before any welding begins. Vapors trapped in the metal can ignite during heatwork, so the purge is not optional; it is a core safety step. A welded patch, installed with a patch of the same material as the original tank, can restore integrity when done by a trained welder. If you must consider a temporary stopgap while awaiting a pro, you should treat it as a bridge to safety rather than a real fix. Do not rely on makeshift patches that truly are only meant for sealing minor leaks for a short drive. Keep in mind that any patch or sealant used in this context should be chosen for fuel compatibility and applied according to manufacturer directions.
In the bleakest scenario—no professional help available and a hole that cannot reasonably be welded on-site—a temporary seal can still keep you moving, but only for a short distance under careful constraints. Some travelers resort to old-school methods like applying a thick layer of soap, a dab of chewing gum, or even a bolt with a rubber washer tapped into the hole. These are classic roadside makeshifts that help you reach the next safe stop, not a durable solution. If you do employ a temporary patch, test it with a leak check after repositioning the vehicle or shifting weight, using water or a small amount of compressed air to look for bubbles. Any sign of seepage means you stop and reassess; a patch that leaks at all is not doing its job and could lead to a dangerous situation.
A practical test after any repair is essential. After you reassemble or patch the tank, perform a careful leak test. A pressure test with air or a water-submersion test can reveal weaknesses that aren’t obvious at first glance. Look for bubbles, dampness, or a sudden change in smell near the repaired area. If everything stays dry and still, you have achieved a level of confidence that your temporary fix is holding. Then you can plan your route toward the nearest qualified service facility rather than pressing your luck with a fragile patch. As you drive, monitor the area during refueling or any second chance at a secure lid or access panel. If you see a drip or a damp spot, stop and re-evaluate immediately. These checks aren’t luxuries; they’re the difference between a quick leg to the shop and a dangerous roadside emergency.
Even when the immediate danger is managed, the event should prompt a broader safety mindset. Carrying the right tools helps you stay on the right side of safety and keeps you from panicking in a roadside moment. A well-stocked emergency kit—including a basic degreaser, appropriate solvents, a durable cloth, a piece of cloth for dampening, soap, and a small supply of epoxy or a compatible fuel-tank sealant—becomes a lifeline. The toolkit should also include nonconductor gloves and eye protection, plus a flashlight for after-dark operations. A spare fuel cap, a stubby wrench, and a few rope or tie-downs can facilitate safer positioning and securement during a temporary repair. And while gum and soap are to be treated as last-minute fixes, they nonetheless highlight a broader point: the value of improvisation is real only when backed by safety discipline and a clear plan for professional intervention.
The value of preparation should not be underestimated. Even if you manage to seal a small hole and drive to the nearest shop, a proper professional assessment will determine whether the tank is compromised beyond a patch or if a replacement is due. The experience also reinforces a broader lesson about maintenance. Quick, well-executed roadside repairs are rarely about triumph over a stubborn fault; they are about buying time safely and ensuring that you reach a facility where a permanent solution can be applied. In the long run, planning ahead reduces the frequency and severity of such incidents. Consider the routine maintenance of the fuel system as part of your overall fleet reliability plan, and integrate this mindset into your travel and dispatch routines. For a broader approach to staying ahead of breakdowns, many readers find value in budgeting and planning resources that address routine maintenance and contingency funds: Budgeting for Routine Truck Maintenance.
Finally, the road is unforgiving, but it also teaches discipline. When a fuel-tank issue arises, you are carrying more than metal and fuel—you carry a decision that your safety and the safety of others comes first, that you will not chase a false sense of speed at the cost of a serious hazard, and that you will reach out for professional help as soon as possible. Keep your eyes open for signs of wear, keep a cool head in emergencies, and remember that a temporary patch is a bridge to safety, not a destination. If the repair is handled with care and followed by a proper inspection, you preserve more than your cargo—you preserve your crew, your vehicle, and your route to the next safe harbor. For further practical guidance on fuel-system safety and emergency procedures beyond the repair, explore additional industry resources and case studies online.
External resource: https://www.autorepairhelp.com/fuel-tank-repair-emergency
null
null
Fan Belt Breakage on the Road: A Practical Temporary Fix to Keep Your Truck Moving
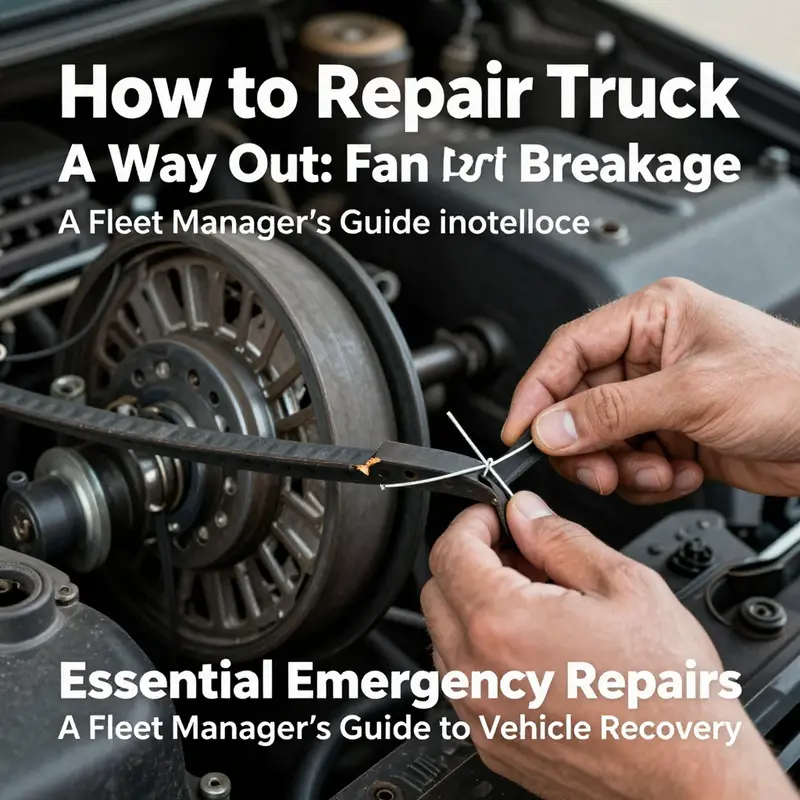
When a truck’s fan belt snaps on a quiet stretch of road or in a less-than-ideal rest area, overheating can escalate in minutes. The engine works harder to compensate, the temperature gauge climbs, and the risk of warped seals or bearing damage rises with every mile you try to push forward. In that moment, the goal isn’t perfection or a guaranteed repair; it’s safety, control, and just enough mobility to reach a safe location or a proper shop. The temporary fixes described here are grounded in real-world roadside practice. They are not substitutes for a new belt, but they can buy critical time in situations where waiting isn’t an option. The most reliable approach centers on two proven improvizations: a splice using iron wire (or a steel cable) and a backup using nylon rope. Each method has its own constraints, but both share the same core principles—be deliberate, prioritize safety, and understand that these are stopgap measures, not final repairs.
Begin with the basics: before you touch anything, ensure the engine is completely off and cool. Engage the parking brake, remove the keys, and if you can do so safely, disconnect the battery to minimize the chance of accidental startup while you work. Wear gloves to protect your hands from sharp edges and hot metal, and keep loose clothing and hair clear of pulleys and belts. The goal is to avoid injury and prevent you from creating a worse mechanical situation while trying to fix a belt that’s broken or frayed.
The iron-wire splice, by far the most commonly used emergency option, works because a tight, continuous loop around the pulleys can be achieved with a short, strong connector. Start by locating the broken ends of the belt and carefully trimming away any frayed material. You want clean, straight edges so the splice seats evenly on the pulleys. Drill small holes at each end of the belt where you’ll join the two fragments. The holes don’t need to be large—just enough to accommodate a piece of iron wire or steel cable that can pass through both ends. Thread a robust wire through the holes and twist it securely so the two ends draw together in a tight loop. The goal is a connector that won’t pull loose under tension and vibration, but is still able to flex as the belt moves around the pulleys. When you install the spliced belt, route it carefully around all pulleys as you would a normal belt. The tension should be close to normal, but never so tight that it strains the bearings or risks snapping the wire under load. Start the engine at a low idle, watching the fan’s rotation. Listen for any abnormal noises, and observe for misalignment or belt slip. If the belt holds and the fan spins smoothly, you have a temporary path forward, but you must replace the belt with a new one as soon as you reach a safe location.
If iron wire isn’t available or if you’re worried about metal near hot engine components, a nylon rope can serve as a backup. Use several strands of strong nylon cord, twist them tightly together to form a makeshift rope capable of carrying the belt’s load. Secure the ends of the broken belt to the rope with sturdy clamps or by tying multiple tight knots around the belt ends. The knots must be secure and the rope should bear the same bend radius as the original belt. Install the rope-filled belt in the same routing as the original, paying close attention to how it seats on the pulleys. Tighten and tension carefully to avoid excessive strain on any single bearing. Start the engine, monitor the fan’s operation, and listen for grinding or wobbling that could signal misalignment or binding. If the fan spins without unusual noise and the temperature remains stable during a brief test run, you’ve achieved a viable temporary fix for limited distance. Remember, the nylon rope solution is also provisional and the belt will need replacement with a proper new part as soon as you can safely do so.
Across both methods, several critical steps anchor safety and effectiveness. First, ensure the engine is off and cool before any contact with moving parts. Second, check the fit with the pulleys after inserting the splice or rope; the belt should ride cleanly and not rub on bearings or housing. Third, once the temporary belt is in place, test it at short intervals—avoid long idle runs or high RPMs—and observe for any shifting, slipping, or heat buildup. Fourth, understand that these repairs do not restore the belt to its original strength. Strain, heat, and vibration will continue to wear the improvised connection. Plan to replace the belt with a genuine new one at the earliest safe opportunity, ideally after reaching a repair facility that can confirm proper tension and belt type.
In a broader sense, this approach reflects a philosophy of roadside resilience. The research backing these techniques highlights their acceptance by industry guides as legitimate temporary support during emergencies. The emphasis is on getting you out of immediate danger and into a place where the vehicle can be serviced without risking further harm. If you carry an emergency toolkit, you already know that a roundup of simple, sturdy materials can make a difference. The core toolkit items—wire or rope, clamps, a means to drill or punch small holes, and a basic set of hand tools—become the difference between a roadside standstill and a stable, controlled approach to the next steps. And because practicality is never built from theory alone, the shared advice from veteran drivers and roadside guides remains consistent: never gamble with cooling systems and never attempt a permanent repair with makeshift materials in a way that could invite a catastrophic failure.
As you approach the possibility of a long trip or a remote leg where a workshop isn’t near, a broader preparation becomes worth mentioning. Consider building an emergency repair fund for truck owners to cover quick parts, tools, and even rental tow expenses when needed. This practical precaution aligns with the broader aim of staying mobile and safe while you navigate toward professional help. For more on this concept, you can explore further resources about financing and planning for roadside contingencies, including practical guidance on how to set aside funds for unexpected repairs, which complements the technical know-how you’ve started to develop here.
Beyond the belt itself, the experience of improvisation on the road emphasizes the importance of not overextending a temporary fix. Track how long the improvised belt holds under real conditions, monitor temperature, and stay aware of signs that the belt’s grip or the tensioner’s behavior is deteriorating. If a second breakdown occurs, or if the engine temperature climbs despite the makeshift repair, stop and reassess. In those moments, prioritize a safe stop, a call for assistance if needed, and the shortest, safest route to a service location. The temporary fix should be a bridge, not a substitute for a proper belt replacement.
The knowledge shared here is reinforced by official road-safety and roadside-emergency guidance, which underscores the principle that temporary repairs are part of a broader, safety-first approach to vehicle maintenance on the road. For drivers facing such emergencies, this guidance acts as a compass: move with caution, protect yourself and others, and get the vehicle to a qualified technician as soon as feasible. If you want to pursue more on the philosophy behind emergency roadside repairs and the practical steps that accompany them, you may consult the official roadside emergency resources that outline standard procedures and recommended practices for temporary fixes. Building a mental map of these options before you encounter a breakdown helps keep fear at bay and improves decision-making in the moment.
In the end, the fan belt emergency route is about time, control, and clear judgment. A well-executed splice with iron wire or a solid nylon-rope backup can buy you the minutes needed to reach a safe stop and call for help or head toward a repair facility. It is not a license to neglect the preventive maintenance that keeps belts in service longer. It is, instead, a realistic, disciplined response to a disruption that cannot be turned back with a wrench alone. As with all aspects of road travel in heavy-duty work, preparation compounds the chance of a successful outcome: keep spare belt inventory, carry the right tools, review the procedures so you aren’t learning them on the fly, and remember that the ultimate cure is a proper replacement in the shortest safe window possible.
For readers seeking a practical, supportive resource that delves into broader preventative maintenance and emergency planning, consider reviewing materials on how to prepare for roadside repairs and how to build a savings buffer for unexpected breakdowns. And as you plan future trips, reflect on how these temporary techniques fit into a broader maintenance strategy, ensuring you’re ready for whatever the road delivers next. Finally, for official guidelines and comprehensive roadside protocols, see the Roadside Emergency Response Guide.
Internal resource: building an emergency repair fund for truck owners. This concept can help you stay proactive and reduce downtime when faced with a sudden mechanical snag on the highway.
External reference: For official guidelines and comprehensive roadside protocols, consult the Roadside Emergency Response Guide (external link): https://www.trucking.org/resources/roadside-emergency-guide-2026
Final thoughts
Incorporating emergency repair strategies into your fleet management practices can significantly reduce downtime during critical breakdowns. Understanding how to address common failures—such as those related to fuel lines, cooling systems, fuel tanks, valve springs, and fan belts—provides operators with the tools needed for effective on-the-road solutions. By equipping your team with these emergency repair techniques, you enhance not only the operational efficiency of your fleet but also ensure the safety of your drivers in unexpected situations.

