In the trucking industry, maintaining the integrity of truck bed liners is crucial for safeguarding cargo and enhancing vehicle longevity. Fleet managers and transport operators often encounter issues such as uneven application, overspray, or damage to spray-on truck bed liners. Recognizing the significance of a well-maintained liner, this article provides a structured approach for assessing damage, repairing both wet and partially cured liners, and addressing fully cured issues. By mastering these repair techniques, operators can ensure their fleet remains in top condition, optimizing performance and reducing long-term costs associated with replacement and repairs.
Diagnosing Damage Before Repair: A Thorough Assessment of Spray-On Truck Bed Liners

Assessing damage in a spray-on truck bed liner repair is more than a quick glance and a dab of filler. It is a diagnostic ritual that separates a lasting fix from a repeated job. These coatings bond directly to the metal substrate, forming a protective, seamless barrier at the molecular level. When that bond is compromised, moisture can find its way under the film, rust can begin to form, and the very purpose of the liner—the shield it provides against abrasion and corrosion—wanes. A careful assessment, therefore, is not just about what you see at the surface. It’s about understanding how deeply the problem runs, what caused it, and what repair path will restore long-term performance rather than offer a temporary patch. As you read this, keep in mind that every repair scenario is unique, and the quality of the assessment will set the stage for whether you can salvage the existing coating or need to reapply the liner in full.
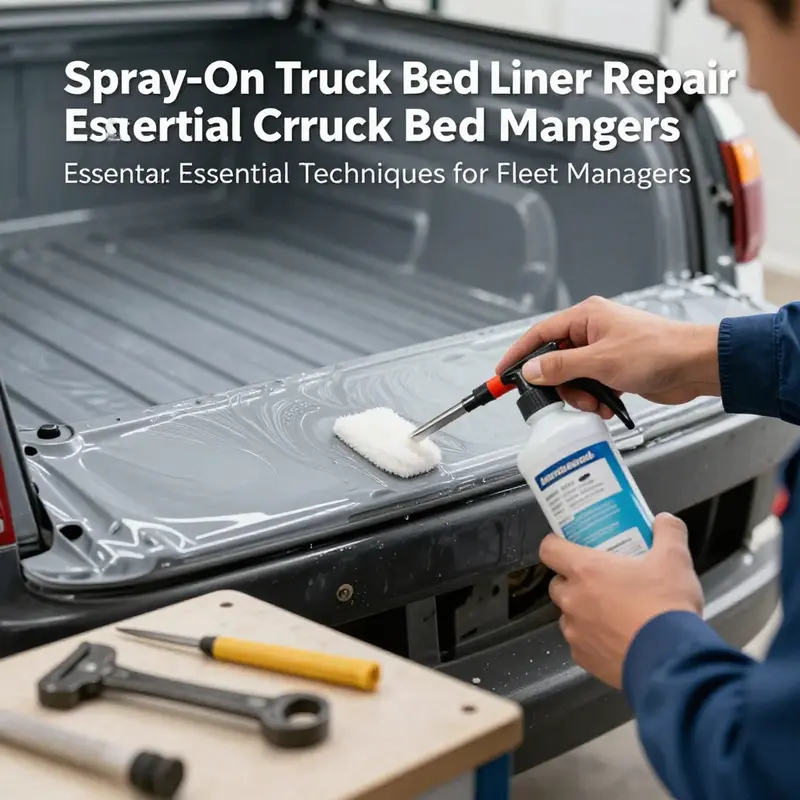
The assessment begins with a keen eye and a deliberate touch. Visual inspection gives the first clues—the microcracks that thread along edges, chips that betray a hard impact, peeling edges where the coating lifts away from the metal, any bubbling that suggests moisture under the film, and areas where the coating seems to have lost its adhesion and separated from the substrate. Pay particular attention to the corners and edges. These zones endure the most stress during loading, unloading, and regular entry and exit from the cargo bed. The texture in these areas often reveals the most about the integrity of the bond. While the naked eye can identify obvious failures, a tactile check complements the visual scan. Running a gloved finger along seams and high spots can reveal dull or rough patches that signal a weak spot where the liner may be pulling away or where the substrate teeth have begun to fail under stress. A careful, patient evaluation prevents you from chasing symptoms with superficial fixes, only to watch the problem reemerge in a few weeks or months.
Step two in the diagnostic sequence moves beyond surface observations to non-destructive testing. The hammer tap test, sometimes called a tap test, provides a simple yet powerful read on adhesion. Gently tapping the surface with a rubber mallet or a small hammer, you listen for the quality of the sound. A solid, uniform tone typically indicates good adhesion across the tested area. A hollow, dull, or hollow-sounding response, in contrast, points to delamination or partial separation of the liner from the metal substrate. The test is most informative when performed in a grid pattern that includes suspected trouble spots, such as corners, high-traffic zones, and any area where the coating shows swelling, blistering, or lifting. Keep the instrument light in hand and the test area small at first; intensifying pressure or striking too aggressively can create a new source of damage. The goal is to map out where the bond holds and where it does not, so that you can prioritize repair actions and avoid unnecessary material removal in zones that are still sound.
Non-destructive testing also serves as a bridge to more quantitative measurements. For some projects, a deeper evaluation through adhesion testing provides a numerical anchor for decision-making. Specialized adhesion testers or pull-off gauges measure the tensile strength of the bond between the liner and the metal. The data obtained from these tests offer a concrete benchmark—whether the adhesion strength meets or exceeds the manufacturer’s specifications. In practice, if the measured adhesion strength falls below a reasonable threshold, commonly around 150 psi or higher depending on the product and its approved service, a plan for repair or reapplication becomes clear. While this step may require access to professional tools or a technician, it delivers essential clarity about the feasibility of patching versus full remediation. It also informs you about how aggressively you must pursue surface preparation before any recoat, because adhesion is the sum of many variables: surface cleanliness, mechanical profile, and the chemistry of the material itself.
Understanding the root cause of damage is the fourth pillar of the assessment. In many cases, a poor outcome begins before the spray even cures. Inadequate surface preparation—insufficient cleaning, incomplete sanding, or inadequate etching—can leave pockets of residue or unevenness that undermine adhesion. Repeating the same mistakes during a patch repair often leads to a patch that lifts again under load. Conversely, mechanical shocks—rough cargo, dropped items, or repeated heavy loading on rugged terrain—can produce localized failures that may look minor but actually signal broader issues within the coating’s base layer or its interaction with the substrate. The assessment keeps you from treating symptoms in isolation. If the root cause is systemic, a localized repair will be a bandage, not a solution. This is why the diagnostic phase should document not only what is observed but also the likely origin of each defect, so future repairs can be targeted to the underlying problem rather than the symptom.
When the surface reveals its secrets, the repair pathway becomes clearer, though the path itself may be complex. The complexity is a direct reflection of the coating’s state. If the liner is still in a wet or wet-set stage, the approach is entirely different from a fully cured layer. In the wet stage, excess material can be blotted away, blended, or gently corrected with the appropriate thinner or cleaning agent that the manufacturer approves. If the liner has progressed to partial cure, light sanding—using a fine grit such as P180 to P220—can even out high spots and smooth rough areas without damaging the surrounding coating. In this transitional window, the objective is to preserve as much of the original film as possible while creating a uniform base for reapplication. The instructions in the assessment emphasize a careful sequence: clean, degrease, recoat with consistent technique, and ensure that the timing aligns with the material’s cure status to optimize adhesion and finish.
But once the coating has fully cured, the decision tree sharpens. Minor imperfections such as blistering or small runs can sometimes be addressed by careful sanding and a very thin touch-up over the affected area. Sanding should begin with a finer grit, such as P320, to reduce the risk of creating new high spots or scratches that could trap contaminants. After sanding, clean the surface meticulously with isopropyl alcohol or a dedicated prep solution to remove dust and oils. Any touch-up material should be applied with a consistent technique, ideally using the same type of liner and, when possible, the same batch. The aim is to achieve a smooth, uniform interface that blends with the larger area without forming abrupt transitions or color mismatches. Color and texture matching become part of the assessment at this stage, and the more precise your repair, the less noticeable it will be when viewed from a distance.
For larger issues or more conspicuous mistakes, the assessment may conclude that a full or near-full removal is necessary. In those circumstances, a chemical stripper designed for polyurea or urethane bed liners is deployed carefully, following the label’s directions. Penetration time is brief but real, often in the 15–30 minute range, after which a plastic or metal scraper removes the softened coating. The residual film is then scrubbed away with a degreaser, and the surface is re-sanded with a finer grit to leave a profile that will receive new spray. Sanding, cleaning, and re-priming—followed by a reapplication using proper equipment and technique in a controlled environment—become the path back to a robust, uniform finish. The decision to remove is not taken lightly. It hinges on the extent of delamination, the degree of contamination, and the feasibility of achieving a reliable bond in the affected area. In some cases, attempting to salvage a heavily damaged section while leaving other portions intact may introduce mismatch risks that jeopardize the entire bed’s performance. When in doubt, the assessment should lean toward a conservative, long-term approach: remove, prep, and reapply if necessary to restore the liner’s protective function.
Throughout this diagnostic journey, safety remains a constant companion. Work in a well-ventilated space, wear protective gloves and goggles, and follow the chemical handling guidelines appropriate to the materials at hand. The goal is not merely to repair but to restore performance without exposing yourself or the vehicle to unnecessary risk. Documentation of findings supports the repair plan. Note the exact locations of delamination, the results of the tap test, the quantitative adhesion readings if obtained, and the root-cause hypotheses. This record becomes a guide for future maintenance and helps prevent repeating the same missteps during reapplication. It also prepares you for conversations with professionals should you decide that a professional technician is required for full removal or for reapplication in a controlled spray booth.
At this juncture, you may wonder how the assessment interfaces with the broader maintenance landscape. The answer lies in understanding that the bed liner is a single, integrated system whose durability depends on meticulous surface preparation, controlled application conditions, and disciplined curing. A robust assessment translates into a repair plan that respects those fundamentals. If the damage is minor and localized, a precise patch job performed under the right conditions can restore service quickly. If the damage is more widespread, a recoat or full removal followed by reapplication may be the most reliable route to a durable finish that resists moisture intrusion and mechanical wear. In either case, the assessment is the compass that keeps you aligned with long-term performance rather than short-term appearance.
For readers seeking broader maintenance guidance that informs the repair mindset beyond bed liner specifics, the MasterTruckRepairLLC blog offers additional coverage on vehicle maintenance and protective coatings. See the blog for more detailed discussions on surface prep, coating control, and best practices that translate well to spray-on bed liners.
External resource guidance is also valuable when you’re evaluating adhesion and long-term durability. A practical, field-tested reference contains step-by-step methods for assessing and repairing cured spray-on bed liners, along with safety tips and product considerations. For a detailed, professional-oriented perspective on removal and reapplication, explore the Truck Bed Liner Repair Guide from Truck Accessories USA. It provides a comprehensive sequence that complements the diagnostic framework outlined here and can help set expectations for the scope of work required when the job moves from assessment to execution.
Overall, the assessment phase is the strategic backbone of spray-on bed liner repair. It anchors decisions in observed conditions, measured data, and a reasoned understanding of how and why damage occurred. It prevents improvisation that could lead to repeat failures and ensures that any repair, whether patch, recoat, or full removal, begins from a solid, evidence-based plan. By treating the bed liner as a bonded system whose longevity depends on pristine preparation and controlled execution, you can restore protective performance and extend the life of the truck bed without sacrificing the job’s overall durability or appearance.
Internal link for further context: MasterTruckRepairLLC blog. It is a helpful resource for readers who want a broader perspective on maintenance practices that influence coating longevity and repair outcomes.
External resource: Truck Bed Liner Repair Guide – Truck Accessories USA
null
null
Restoring the Armor: A Cohesive Guide to Repairing Fully Cured Spray-On Truck Bed Liners
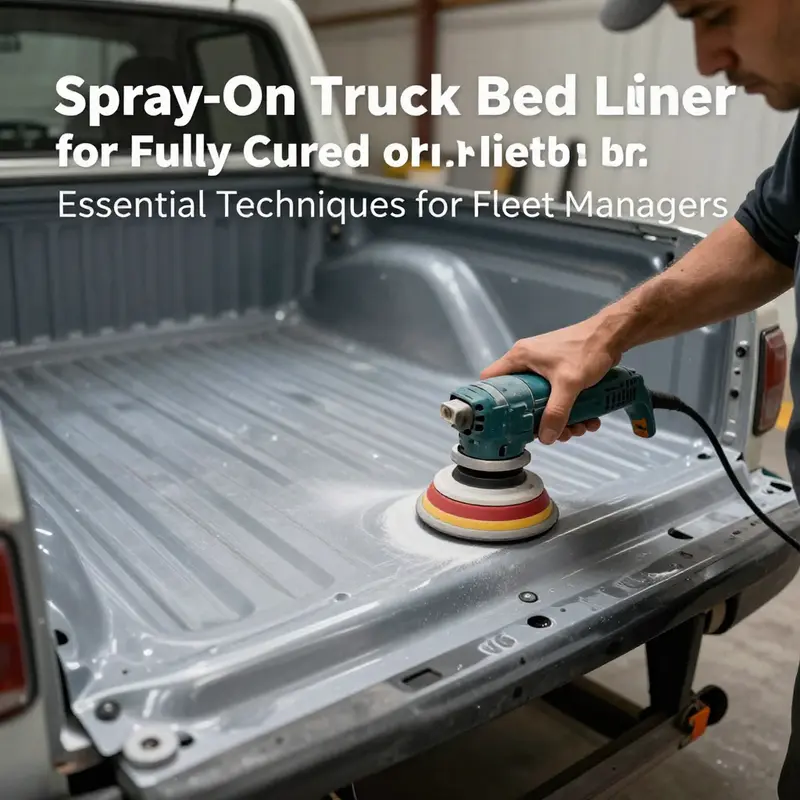
Fully cured spray-on bed liners form a tough, protective skin over metal. When flaws appear–blisters, runs, missing patches, or deep gouges–they challenge even seasoned DIYers. Yet with a unified approach that centers on surface prep, correct material choice, and disciplined layering, you can restore protection and appearance without a full re-spray in many cases. The aim is not just to hide damage but to rebuild the barrier that guards the bed from moisture, chemicals, and abrasion. This chapter threads together the practical methods that align with industry best practices while respecting the realities of a cured film. It treats the repair as a sequence rather than a single act, emphasizing how careful preparation and appropriate technique yield durable results that last through work days and weather cycles alike. By focusing on principles rather than quick fixes, you can achieve results that feel nearly professional, even when you’re working with a limited toolbox and a modest shop setup. The journey begins with how the surface is prepared, because adhesion starts at the edge of the repair and extends across the entire treated area.\n\nSurface preparation is the critical first step that often determines the repair’s success. Start with a thorough cleaning to remove dirt, grease, wax, and any residue that could prevent bonding. A degreaser or a dedicated bed liner cleaner works best when scrubbed in and then rinsed away completely. Allow the area to dry completely before you touch it again. Next comes roughening—the key to giving the new material something to grab onto. Lightly scuff the edges of the damaged area and a small surrounding halo with a coarse grit sandpaper in the 80–120 range. The goal is to create a microscopic tooth without removing too much of the cured film. Deep scratches must be avoided; you want enough bite to grip, not damage the surrounding liner. After scuffing, wipe away the dust with a tack cloth or a damp rag. Dust-free edges contribute to a cleaner blend and a stronger bond. The prep work may seem tedious, but it’s where most patch failures originate if neglected. The clean, rough, dust-free surface provides the foundation for reliable repair.\n\nWhen addressing small chips, cracks, or holes in a fully cured liner, the material choice matters as much as the technique. Opt for a flexible, urethane-based repair compound designed to bond with spray-on liners. The color match should be as close as possible, or you’ll face a patch that stands out and wears differently. Apply the repair material with a clean trowel or putty knife, pressing it firmly into the damaged region. For chips, a single thin fill can suffice if the edges are well prepared. For larger areas or cracks, apply in thin layers, letting each layer cure according to the manufacturer’s instructions before adding the next. Between passes, avoid trapping air; gentle pressure and steady, even pressure help create a smooth surface that blends with the surrounding film. Once the final layer is cured, begin the smoothing process with progressively finer sanding—starting at roughly 120 grit and working up to 320 grit. Sand evenly to blend the repair into the factory texture, then wipe away dust and inspect the blend. A light touch matters here; you’re seeking a seamless transition, not a polished but obvious repair line. If the color or texture still reads differently, a second light veil of material or a careful topcoat may be warranted, but resist over-building, which risk creates a raised patch.\n\nLarge areas or deep damage often require a more involved solution. When damage spans significant sections or penetrates through multiple layers of the liner, a full re-spray becomes the most durable and economical long-term option. The decision to re-spray should consider not just appearance but the integrity of the substrate and the still-pliable edges of surrounding cured film. The process begins with comprehensive bed preparation: clean the entire bed thoroughly, then lightly sand not just the damaged area but the entire surface to improve adhesion. Mask off everything you don’t want coated—wheel wells, openings, and surrounding trims—to protect other finishes. The re-spray should follow the manufacturer’s instructions for mixing and spray application. Apply multiple thin coats rather than one thick layer, maintaining a consistent distance, speed, and angle with the spray gun. Allow adequate flash time between coats, typically several minutes depending on temperature and humidity. The goal is to achieve uniform coverage, even color, and a consistent texture across the surface. After the final coat cures, you’ll need to cure the bed fully, which may take 24 to 72 hours depending on the product, film thickness, and environmental conditions. This patience pays off with a hard, durable surface that behaves like a single, continuous layer rather than a patchwork of films.\n\nIn some cases, a partial re-spray can be appropriate if the damage is confined and the surrounding liner is in good condition. The approach mirrors the full re-spray in spirit but scales to the scope of the repair. Begin again with surface prep: clean, degrease, and roughen the edges, ensuring the border between old and new is texturally compatible. Apply the repair material in incremental layers, allowing each to cure before the next. Sand and blend similarly to small patch work, checking the transition under lighting to confirm evenness. The color match remains crucial here; mismatches become more evident on larger interfaces and can undermine the repair’s perceived quality.\n\nIf the damage is truly extensive, a full re-spray process can restore not only appearance but the bed’s protective function. The steps begin with a meticulous, system-wide cleaning and surface conditioning. Lightly sand the entire bed to ensure new material bonds securely to aged edges and to promote cohesive texture. Mask with care to protect any areas that must remain uncoated. Follow the exact mixing ratios and pot life given by the product instructions, and apply several thin coats with a spray technique that emphasizes uniform overlap and consistent travel speed. The distance from the substrate should be controlled—typically within a range recommended for the specific gun and material—and the spray should be performed with steady, deliberate strokes. Allow proper cure times between coats, and finally let the entire bed cure fully in a controlled environment. While this option demands more time and a more disciplined workflow, it yields a boundary-free surface that behaves like new and resists future wear more effectively than a spot repair.\n\nThroughout these repair paths, one theme remains constant: the bond between old and new material. The surface’s texture and the chemistry of the repair compound must align with the cured liner. Mismatched chemistry, improper adhesion, or insufficient curing can lead to premature failure, blistering, or delamination. Color consistency also matters, especially if the batch variation between the old film and repair material is evident. If color matching proves difficult, consider tintable or adaptable repair compounds and apply color-matching techniques or topcoats that can tone down discrepancies while preserving the liner’s overall appearance. In practice, many technicians find that sticking with the same general family of liner products–urethane-based for repairs–offers the best chance at a natural blend. This reduces the risk of texture and chemical incompatibilities, which can be hard to remediate once painted on a large area.\n\nTo find practical guidance, many builders and DIY enthusiasts turn to trusted reference materials that discuss removal and reapplication of cured spray-on bed liners. A comprehensive resource on the subject helps consolidate steps, safety considerations, and product behavior across scenarios. For readers seeking an in-depth, structured approach with additional safety notes and product-agnostic tips, the Master Truck Repair blog offers a broad landscape of related maintenance topics, including bed liner considerations. You can explore the broader repair ecosystem there to complement the hands-on steps described here. Master Truck Repair blog.\n\nAs you finalize any repair, never underestimate the value of a conservative testing approach. Start with a small test area if you’re applying a new material or testing a color match. Allow full cure before making judgments on the final appearance. Lighting can reveal subtle shade differences that aren’t obvious under shop lights; inspect the repair during daylight if possible. If you notice micro-bubbles or slight texture changes after cure, revisit the edges and feather them with a light sanding and a very thin veil of material. Reassessing a repair after initial cure often saves a patchy finish from becoming a persistent flaw. If you’re unsure whether your repair plan will hold up under your truck’s daily use, consult a professional bed liner technician who can provide a hands-on assessment and offer guidance on whether spot repair or re-spray is the better route in your specific case.\n\nPreventative maintenance remains the best defense against future problems. Regular cleaning eliminates corrosive residues that can degrade the liner over time. Use mild soap and water after exposing the bed to road salt, fuels, or heavy soils. Avoid harsh abrasive cleaners or tools that could scratch or dull the surface. Protect the liner with a bed mat or durable liner cover when transporting sharp or abrasive items; such protection reduces the likelihood of edge lifting or punctures. Schedule periodic inspections to catch small issues before they expand into larger repairs. Early detection supports easier, faster, and more cost-effective maintenance. Keeping environmental conditions in mind also helps: work in a controlled space when possible, with temperatures roughly between 60–85°F (15–29°C) and humidity below 60%. Extreme heat or cold can alter cure times and the mechanical properties of the cured film, complicating repairs or causing warping during curing. By embedding these practices into routine maintenance, you extend the life of the bed liner and preserve the integrity of the coating across seasons.\n\nSafety is a throughline in every repair scenario. Wear appropriate gloves, eye protection, and a respirator or well-ventilated workspace when working with solvents or when sanding. Proper ventilation reduces exposure to fumes, while eye protection guards against airborne dust and splinters. When using masking tape and masking films, be mindful of skin contact with fresh coatings and solvents, as some formulations can irritate. If a spill occurs, clean it promptly and follow the manufacturer’s guidelines for disposal, keeping in mind local environmental regulations. The goal is to minimize risk while achieving a durable fix that stands up to the next heavy use or weather event.\n\nThe repair ecosystem around fully cured spray-on bed liners is nuanced. It intertwines meticulous prep, careful material selection, patient layering, and a disciplined approach to protection and testing. While the chapter above outlines practical paths for minor fixes, partial repairs, and full re-sprays, the underlying philosophy is consistent: treat each edge as a bond, each layer as a building block, and each cure as a verdict on durability. If a repair feels overwhelming, or if you’re balancing cost and risk, the choice between a targeted patch and a full re-spray should prioritize long-term performance over a quick cosmetic fix. This approach reduces the likelihood of recurring issues and supports the liner’s protective mission for the truck bed. For readers who want additional, in-depth guidance on removal and related repairs, The Spruce Crafts offers a structured, step-by-step reference that complements the methods discussed here. See their detailed guide at https://www.thesprucecrafts.com/how-to-remove-spray-on-bed-liner-4174696 for a broader perspective on curing and post-application considerations.\n
Final thoughts
Repairing a spray-on truck bed liner is vital for maintaining the quality and protection of your fleet’s vehicles. By understanding how to assess damage accurately and applying meticulous repair techniques, fleet managers can prevent costly replacements and ensure trucks are always ready for operational demands. Whether dealing with a wet application or cured mistakes, having a systematic approach allows teams to uphold the standards expected in the strenuous trucking industry. Focus on timely intervention and skilled practices for enduring results.

