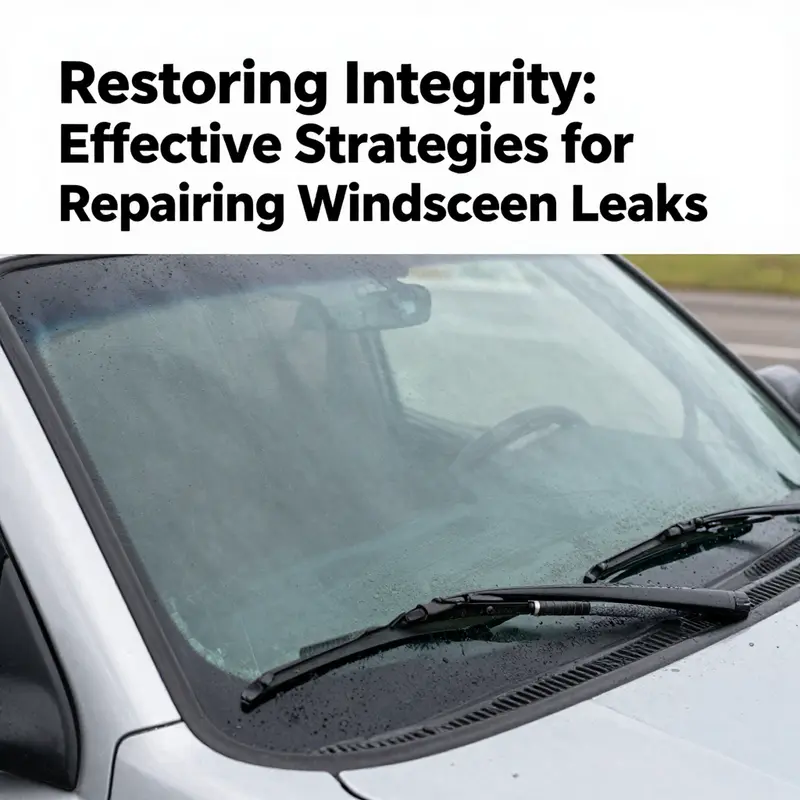
Windshield leaks can pose significant challenges for fleet managers and trucking company owners, leading to potential safety hazards and costly repairs. Understanding the mechanics behind these leaks, especially in older models like the 2008 Chevrolet truck, is crucial for maintaining vehicle integrity and protecting assets. This guide explores the entire process of diagnosing and repairing windshield leaks, equipping professionals with knowledge on identifying leak sources, employing both professional and temporary repair techniques, and validating those repairs through rigorous testing. Lastly, it underscores the importance of consulting experts when needed, ensuring that your fleet remains road-ready and compliant with operational standards.
Tracing the Wet Path: Diagnosing and Repairing a Windshield Leak on a 2008 Chevy Truck
Rain can arrive with sudden force, but what feels like a random drip inside a 2008 Chevrolet truck often begins with a slow, unseen process. The windshield, a crucial barrier between the cabin and the meter-wide world outside, can leak not only through a visible crack but through a network of weak points that channel water along metal frames, through seams, or around the edge where glass meets paint and urethane. Diagnosing such leaks requires patience and a careful, methodical eye. The most persistent leaks usually start at the boundary between the glass and the body, where the sealant can degrade with age or exposure to sun, temperature swings, and road grime. Yet the path water takes can be deceptive. A bead of moisture might appear several inches from the glass, or a damp trace can wind along a frame rail before finally dropping onto the dashboard or floor. This is why a comprehensive approach—one that examines more than the apparent drip spot—is essential for successfully repairing a leak in this particular chassis and body style.
In practice, the first clue often lies in the condition of the perimeter seal around the windshield. The sealant that bonds the glass to the metal frame acts as a barrier against wind and water. Over years, this sealant can crack, lift, or shrink. Heat and cold cycles cause it to become brittle or to retreat from corners and bends where the glass meets the curved body. A second common culprit is how the windshield was originally installed. If the glass was seated unevenly or if the sealant wasn’t properly applied during installation, small gaps may form at one or more corners that allow moisture to migrate inward. A third factor to consider is weatherstripping on adjacent panels. The roof, the pillars, and the fenders all carry weather seals that protect the interior from rain and splash. If any of these seals deteriorate, water may find a route into the cabin even when the windshield edge appears intact.
When you start the diagnostic process, you’ll notice that the leak’s behavior often tells a story. Water may travel along the metal frame, slip under a roof seam, then drip from an interior seam near the A-pillar. It can puddle not directly in front of the glass but beneath the dash, where it appears as a damp patch or a streak on the carpet after a heavy rain. For the 2008 Chevy truck, the framing around the windshield is integrated with several factory seams and joints that can trap moisture if any one part of the system is compromised. This broader view is essential because chasing a single drip without tracing its water trail can lead to a temporary, unsatisfying fix that fails again when the next storm arrives.
A practical starting point is a straightforward exterior inspection. Visually scan the entire windshield edge for fading, cracking, or missing sealant. Listen for any unusual noises when you press along the glass—soft squeaks or a faint give can indicate a loose bond. Pretend you are a water droplet and run your hand along the edge, feeling for gaps or a bead where the sealant has lifted. If you detect any irregularities, it’s time to widen the investigation: go inside the cab and look for staining at the headliner, which can point to a leak path that travels from the roof seam down the A-pillar. A damp spot on the roof or the corner of the dash is a hint that moisture is sneaking into the cabin somewhere along the glass-to-body interface, rather than dripping directly from the glass edge.
A crucial aspect of diagnosing is confirming whether the leak is isolated to the windshield area or part of a broader moisture problem. For instance, if the carpet near the kick panel remains dry but the headliner shows dampness, you are likely looking at a windshield-related breach rather than a leak from the door seals or a clogged sunroof opening. Conversely, a damp cabin that appears after a storm but leaves no obvious traces around the glass could indicate a secondary path, such as a compromised weatherstrip above the door vent or a torn cowl seal. This distinction matters because it directs the repair toward the actual source rather than chasing symptoms.
In the context of a 2008 Chevy truck, the age of the vehicle means the bond between glass and body has endured thousands of temperature swings and vibrations from road conditions. The chassis’ windshield framing threads through a complex network of sheet metal that can develop micro-cracks and crevices that collect moisture. The water’s route might also be influenced by the way the roof seals meet the windshield area, by the condition of the fender-to-body seals, and by any past body repairs that altered the original bonding surface. Therefore, the diagnostic mindset needs to be holistic: observe, test, and correlate findings across exterior edges, interior panels, and even beneath the carpet.
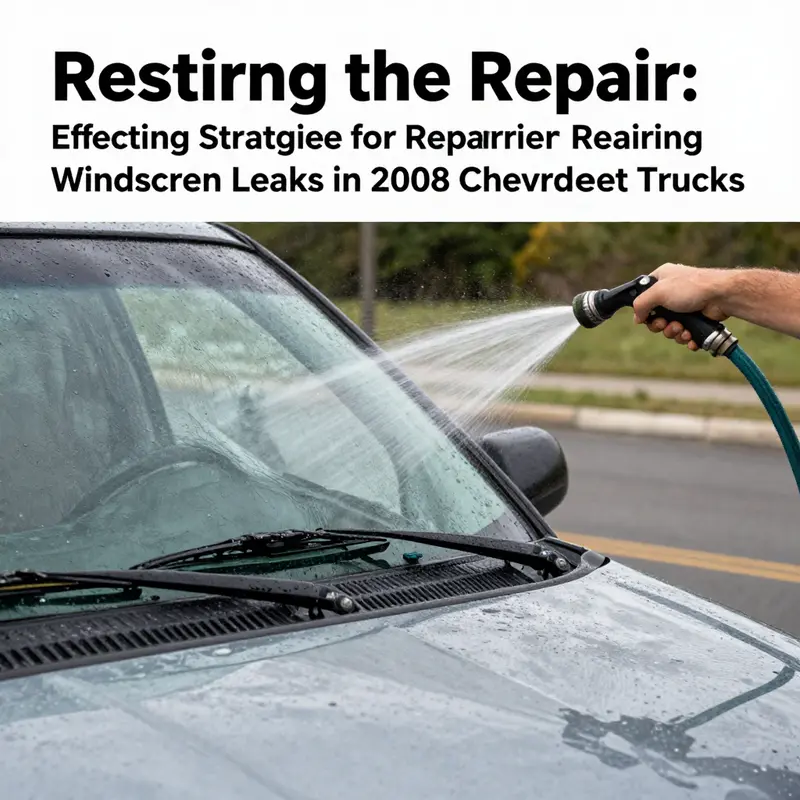
In some cases, the leak’s source becomes clearer after a controlled water test. A garden hose, used thoughtfully, can replicate rain without turning the interior into a swamp. The goal is to simulate rain from different angles—spraying along the glass edge, at the top of the A-pillar, and across the roof seam—and then watching inside for signs of moisture. If a drip appears under the dash or a damp patch shows up on a particular interior ceiling panel, you know you are tracing a path that water has found through the boundary between the windshield and the body. During this test, it helps to have a second pair of eyes inside the cab to note the exact location of any drips or stains.
As the investigation deepens, you may encounter signals that the problem is more than a simple sealant failure. A degraded or damaged sealant is the most common culprit, but an improper windshield installation that left gaps can be a sneaky offender. If the glass sits unevenly or if the rearmost edge is sitting higher or lower than the surrounding body, even a minute discrepancy can create a channel for water. The weatherstripping around the roof or the fenders may have hardened, torn, or compressed over time, allowing water to bypass the windshield’s primary barrier. All these possibilities must be weighed together to form a coherent diagnosis that informs the repair approach.
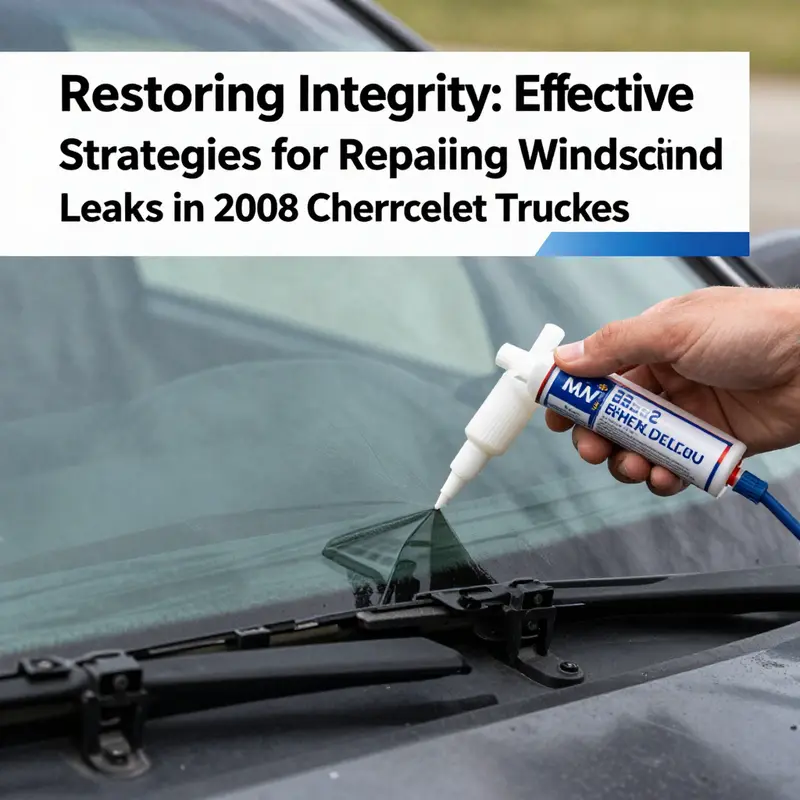
Once you have traced the water’s path to a probable source, the plan for a permanent fix centers on addressing the bonding surface with thoroughness. The recommended long-term solution calls for removing the entire windshield to expose the bonding surface, thoroughly cleaning the frame, and inspecting for corrosion or damage that may have been masked by the glass. Old sealant and debris must be removed so a fresh, continuous seal can bond the glass to the body. The adhesive of choice in professional practice is a robust urethane that provides both strong adhesion and a watertight seal. This process is meticulous and time-consuming, but it is essential for long-lasting reliability. Reinstallation must occur only after the bonding surface is properly prepared and the urethane has had sufficient curing time as specified by the manufacturer. While the idea of a quick re-seal around the glass might be tempting, it risks incomplete adhesion and recurring leaks in the near future.
For readers seeking model-specific, step-by-step guidance, a trusted DIY resource emphasizes a careful sequence: remove, inspect, clean, reapply, and cure. The emphasis is not on shortcuts but on restoring the integrity of the windshield bond as the primary defense against moisture intrusion. If you encounter corrosion on the frame or damage to the mounting area, professional service becomes not just advisable but necessary. The windshield is a critical safety component; ensuring its bond to the vehicle is as sound as possible helps protect occupants from unexpected water intrusion and, more importantly, from the risk of glass failure while driving.
In the broader narrative of windshield leaks, it’s important to recognize that a temporary sealant repair may seem to close a leak, but it does not resolve the fundamental failure mode. Those quick fixes can trap moisture behind the seal or mask a creeping corrosion problem, setting up the interior for mold, foul odors, or more extensive repairs later on. A durable fix requires addressing the root cause: degraded bonding, improper installation, or compromised weatherstripping. The aim is a trustable seal that remains resilient under rain, heat, and vibration. A careful diagnostic, followed by a proper, professional-grade repair, ensures the 2008 Chevy truck remains a sturdy, weather-resistant vehicle that can weather many seasons without a recurring leak.
If you want to extend your understanding beyond the diagnostic phase, an accessible internal guide offers practical, model-agnostic insights into windshield repair concepts, including the importance of a clean bonding surface and the functional role of urethane adhesives. This resource complements the hands-on approach described here and helps owners build confidence in communicating with technicians. You’ll find the information useful not just for the 2008 Chevy truck but for similar aging pickups where the windshield remains a critical seam between cabin and weather. For readers who prefer to see a broader, project-oriented walkthrough, an online guide dedicated to repairing leaking windshields in older vehicles provides a structured overview of the process—detailing how the bond, the glass, and the frame interact to keep water out and safety intact.
To deepen your knowledge with a practical reference, consider exploring this external resource that outlines comprehensive procedures and safety guidelines related to windshield replacement on older trucks like yours: https://www.carfixpro.com/repairing-leaking-windshield-2008-chevy-truck. While the path to a leak-free windshield centers on the root cause, this external guide reinforces the principle that a thorough, model-specific approach yields lasting results. Meanwhile, for ongoing maintenance ideas, a dedicated DIY Windshield Repair Guide for Truck Owners offers a clear, user-friendly roadmap that can complement the diagnostic insights shared here. If you’re planning a repair project, this internal link can serve as a handy companion: DIY Windshield Repair Guide for Truck Owners. By combining careful inspection, correct technique, and patient curing, you stand the best chance of restoring a truly watertight seal to your 2008 Chevy truck and preserving the integrity of both the glass and the body.
From Drips to Duty: How a Professional Fix Restores the Windshield Leak on a 2008 Chevy Truck
A leak around the windshield of a 2008 Chevy truck is more than a nuisance; it’s a signal that the bond between glass and body is failing and the vehicle’s interior is at risk. The first clue often comes from a slow accumulation of water along the firewall or at the base of the A-pillar, particularly after a heavy downpour or a run through a car wash. In most cases, the culprit is not a mysterious crack in the glass itself but a compromised sealant—often the weatherstrip or caulking that forms the critical join between the windshield and the metal frame. Over years of sun exposure, temperature cycling, and rough road debris, that sealant can crack, shrink, or lose adhesion. What starts as a small spot of dampness inside the cabin can, with time, widen into a steady stream that challenges even the best weather-stripping mindset of the truck’s design. Diagnosing the leak with precision is not a matter of guesswork; it hinges on controlled testing that recreates rain and wind in a controlled setting. A professional will typically perform a thorough inspection by spraying water around the joint area under modest pressure and observing exactly where the water enters. This approach helps distinguish gaps at the glass edge from seepage through adjacent seams or through a fogged interior channel behind the dash. In the 2008 Chevy, where the windshield sits in a dedicated pinch-weld channel, the most common leak path is the interface between the glass and the vehicle body. If the joint surface has any dirt, old sealant remnants, or a layer of corrosion on the metal edge, the new sealant may fail to bond properly, and the leak will persist even after an apparently successful reseal. The goal is to restore a clean, dry bonding surface and a seal that can resist the road’s vibrations, the sun’s UV rays, and the temperature swings that come with changing seasons. The professional path begins with a clean slate. Removal of the old, failed sealant is not a light scrape; it is a careful process that uses specialized tools to clear the entire joint. The objective is to expose a smooth, dry bonding surface with no interposing debris, paint, or corrosion. Any contaminant between glass and body undermines adhesion, and without thorough removal, even the most robust adhesive will struggle to achieve a lasting seal. Once the joint is pristine, a high-performance urethane sealant—engineered for automotive use and designed to endure the stresses of driving—applies a continuous, uniform bead that completely fills the gap. The application must be meticulous; gaps or voids can create microchannels that draw moisture behind the glass and create a weak, intermittent seal that worsens with vibration. After sealing, the windshield must be reinstalled with exacting attention to alignment. If the glass sits slightly out of position, the sealant’s load becomes uneven, which can compromise integrity and durability. The installer uses alignment tools and manufacturer specifications to ensure the glass is set in the correct plane and depth relative to the pinch weld, and that the gasket or weatherstrip remains properly seated. The cure time is a critical phase. The panel is held in place, but the surface cure requires a period during which the vehicle should not be exposed to heavy vibration or harsh conditions. It is common for the urethane to reach a robust, watertight bond within 24 to 48 hours, although some formulations demand longer. During this window, movement or external forces can disrupt the bond and invite leaks again. This is why many professionals advise keeping the vehicle stationary in a protected, clean area and avoiding washing or exposing the windshield to heavy spray during curing. Once the sealant cures, a second test is essential. The leak test is performed again to confirm that the repaired joint now blocks water effectively. The spray test should reveal no drips or seepage along the very edge where the glass meets the body. The peace of mind that follows a successful test comes from the awareness that the windshield now carries the strength of a bonded, uniform seal that can stand up to the truck’s daily demands. For readers who want to explore a guided, DIY pathway, there are reputable resources that walk truck owners through the basics of windshield care and leak repair. One such resource provides a step-by-step approach that highlights the importance of surface preparation, the selection of appropriate sealants, and the careful reseating of the glass. It is useful as a companion to professional work, offering insight into the sequence of operations and the checks a vehicle owner can perform after repairs. A careful reader may also find value in a broader look at the discipline of auto glass work, which emphasizes safety, thoroughness, and the discipline required to avoid quantity-over-quality shortcuts. Of course, a temporary sealant can seem appealing when the weather is uncooperative or a shop visit cannot be scheduled promptly. High-quality automotive-grade silicone sealant or RTV rubber may stop a visible drip in the immediate term, but this is not a permanent solution. Such sealants do not address the root cause—the compromised bond at the glass-to-body interface—and they can fail under the recurring thermal cycles and driving vibrations that the truck endures. Relying on a temporary fix can also mask deeper problems, such as moisture trapped behind the glass or subtle corrosion in the pinch weld that can worsen if moisture remains unchecked. The wisest path is to treat a windshield leak as a symptom of a larger need for a full inspection and, if necessary, a full reseal and realignment by a trained technician. An integrated approach—not just a new bead of glue, but a complete refresh of the bonding surface—offers the best long-term protection and the most reliable return to dry, comfortable driving. Some owners may wonder about the tradeoffs between a full windshield removal and a more limited repair. In the professional repair language, removing the entire windshield is often the most reliable method when the bond has deteriorated beyond the surface layer. This allows the technician to validate bond integrity around the entire perimeter, identify hidden corrosion on the pinch weld, and ensure the new sealant has a clean, continuous surface to bond with. The removal-and-reseal process can detect issues that would otherwise go unseen, such as corrosion under the old sealant that could compromise the historic integrity of the joint. When this work is performed carefully, the result is a reassembled windshield that not only keeps weather out but restores the structural integrity of the assembly. The operator’s knowledge and toolset matters here. Proper glass installation requires precise handling to avoid microcracks and misalignment. The glass is momentarily supported while the sealant cures and the bond gains strength. If the glass shifts during cure, the eventual bond could be compromised, and the leakage problem might reappear later. The vehicle owner’s role during this period is to observe the curing window and limit operations that would apply unexpected stress to the joint, such as high-pressure washing or aggressive road debris. Post-repair, the interior deserves a moment of attention as well. Any moisture that previously collected behind the glass can begin to dry, and it may be prudent to inspect for lingering signs of dampness on upholstery or carpeting. In some cases, moisture can appear as a mild mustiness that should dissipate once the area dries thoroughly. It is reasonable to expect that a well-executed repair will reduce or eliminate the symptoms of leakage and will not produce new signs of water intrusion around the windshield edge. If water shows up again after a repair, it is a signal to re-evaluate the entire bond and potentially recheck the alignment and curing conditions. The professional path is not about a single service call; it is about establishing a reliable, repeatable method that ensures the same outcome each time the truck faces rain or spray. For readers with a DIY inclination, the door remains open to learn and to participate in the process in a safe way. A practical route is to consult instructional materials that detail the steps and safety precautions—an approach that complements professional service while reinforcing best practices. If you’re exploring DIY routes, a practical guide tailored to truck owners can be a valuable resource to understand the sequence, the importance of curing times, and the means to verify success with a controlled leak test. The journey from a damp interior to a dry, confident cabin underscores a broader point: windshield leaks are solvable with care, precision, and patience. The 2008 Chevy truck is a sturdy platform, but like any vehicle of its era, it benefits from deliberate maintenance that recognizes the windshield as a critical barrier against the elements and a component that contributes to overall safety. When done correctly, the repair restores not only weatherproof performance but also the structural integrity of the windshield assembly, which enhances occupant protection and comfort. If you want to explore a more guided, step-by-step approach, you can consult a DIY windshield repair guide designed for truck owners, and you should always pair DIY efforts with professional validation when the seal shows any sign of compromise. For readers seeking professional support, specialists in windshields and body seals offer in-depth diagnostics, precise sealant removal, meticulous surface preparation, and controlled curing—each step chosen to ensure a lasting, watertight bond. This approach reflects the industry standard: comprehensive assessment, careful preparation, high-quality materials, correct installation, and proper curing, followed by rigorous testing. It is a process that treats the windshield not simply as a pane of glass but as a bonded element whose integrity protects the interior environment and contributes to driving safety. In the end, the goal is straightforward—prevent leaks, maintain clarity, and preserve the vehicle’s structural integrity for years to come. Internal link for further guidance: DIY windshield repair guide for truck owners. For readers who want to reference formal procedures and safety guidelines recognized by the professional community, consult the authoritative repair resources provided by the Auto Glass Association. External resource: https://www.autoglass.org/repair-replacement
Temporary Fixes, Lasting Value: Navigating a Windshield Leak on a 2008 Chevy Truck Until a Permanent Seal
A leak around the windshield is a quiet aside that can turn a routine drive into a soggy inconvenience on a 2008 Chevrolet truck. The problem almost always points to the bond between glass and sheet metal—the seal that once kept rain from sneaking in now wears, cracks, or collects debris over years of exposure. In the short term, a practical, methodical approach can buy you time and keep the interior dry while you plan a proper repair. This chapter follows a single, coherent thread: how to manage a windshield leak with temporary, responsible fixes that respect the vehicle’s safety and the realities of an older truck, without pretending a patch is a permanent cure. The goal is not to mask the leak forever, but to stabilize the interior and prevent further damage until you can pursue a proper seal replacement or windshield removal with fresh bonding material and a new urethane seal.
First, start with a careful diagnosis that stays close to boots-on-the-ground reality. A windshield in a vehicle of this age often leaks because the seal around the glass has degraded or because the surrounding area has accumulated dirt, leaves, or moisture that compromises the seal’s effectiveness. Look for small splits in the rubber around the glass, dark damp patches along the body seam at the base of the windshield, and any signs of moisture trapped behind the glass when you wipe the interior surface. This initial survey matters because it informs whether a temporary seal will even help or if the root problem is more complex. A cautious approach recognizes that temporary fixes are never a substitute for a proper bond between windshield glass and the vehicle’s body.
With the source of the leak identified, the next step is to prepare the surface for a temporary seal. The surface around the windshield must be dry and free of loose debris. Drying should be thorough but not harsh on aging rubber and paint. Lightly dampen the area with a clean cloth, and then wipe away any dust, sand, or leaves with a soft brush. Aggressive cleaners can dry out or crack rubber sealant, which defeats the purpose of a temporary fix. The cleaner you use should be gentle and purpose-driven for automotive rubber and glass mating surfaces. Proper preparation makes the temporary seal more likely to hold while you arrange a longer-term plan.
If you discover small gaps or a barely sealing edge, a layer of automotive-grade silicone sealant can provide a useful temporary barrier. The sealant should be silicone-based and designed for glass-to-rubber bonding, specifically formulated for automotive use. Apply a thin, even bead along the seam where water sneaks in, focusing on small gaps rather than large voids. Work in calm, dry weather and allow the material to cure fully according to the manufacturer’s guidance—typically a day or more—before exposing the area to rain or washing the truck. The curing time matters: rushing a cure can leave a weak bond that fails under pressure. The aim is a stable, curing layer that reduces the immediate ingress of water while you arrange a more durable, permanent approach.
Alongside sealing the glass edge, it’s essential to examine and clear the drainage paths that live beneath the windshield. The surface under the dash often channels rainwater to a drainage system that carries it away from the interior. If dirt, leaves, or sand clog these channels, water can back up and find its way into the cabin despite a sealed edge. Carefully clean these drainage slots using a soft, flexible tool and a gentle stream of compressed air or a thin wire. Do not force the tool into the channel with power or aggressive scrubbing, which could nick or poke through to unprotected areas. The goal is a free, straight path for water to exit rather than stagnate and spill into the footwell or behind the dash.
In the event that water has already reached the interior, respond quickly. Soak up any standing moisture with clean towels or absorbent cloths to prevent mold and interior damage. Do not leave damp upholstery or carpet untreated, as prolonged moisture accelerates deterioration. A good dry-out prevents odor buildup and reduces the chance of long-term damage to insulation and electronics near the window. If the leak persists despite the temporary seal and a cleared drainage path, it’s a signal that the root issue extends beyond a superficial gap. The seal may have failed to the point where moisture can bypass the temporary fix, or there may be a more complex path for water intrusion that warrants professional assessment.
One critical caveat bears repeating: temporary measures are just that—temporary. They address the symptom, not the cause. A windshield that leaks due to a compromised bond between glass and body, or due to advanced corrosion at the seal surface, cannot be made reliable with sealant alone for any length of time. The temporary seal can fail with pressure from wind, vibration, or temperature shifts as the vehicle is driven through varying weather. In this sense, every temporary fix should be treated as a stopgap that buys time to preserve the interior and plan a more robust solution. If you want a concise, practical overview of model-specific steps and safety considerations, you can explore a detailed diy windshield repair guide for truck owners, which distills many of these points into a structured, hands-on approach. That resource offers a clear, readable pathway for readers who want to understand the mechanics and the sequence of actions involved in a repair project.
As the conversation about a permanent repair begins, it’s important to understand what the long-term solution entails. The professional, enduring approach involves removing the windshield to access a clean bonding surface, inspect for hidden damage or corrosion, and reapply a fresh urethane adhesive before reinstalling the glass. This process ensures a watertight seal and structural integrity, which is especially important in a truck that carries loads, faces road spray, and withstands temperature swings. The removal-and-rebonding route is the most reliable fix when the original seal has failed or when moisture has traveled behind the glass and caused staining, rust, or compromised metal on the frame. The wisdom here is straightforward: if the leak originates from the bonding surface rather than a surface-level gap, a surface sealant will not hold over the long run, and the interior risk of damage rises with every heavy rain or car wash.
For readers who want to pursue the established, step-wise guidance, official service manuals and certified technicians offer the safest path. The manuals walk through model-specific cautions, the detection of corrosion on critical bonding areas, the handling of glass removal without damaging the pinch weld, and the precise application of urethane to restore a durable, water-tight bond. While this professional route can require investment, it prevents repeated interior leaks, reduces the risk of glass breakage during a future collision, and preserves the structural integrity of the windshield mounting system. Even when you’re keeping a close eye on the budget, recognizing the distinction between a credible temporary fix and a comprehensive replacement matters. It helps you avoid false economies that end up costing more in the long run and ensures safety on the road, especially for a vehicle that may serve as a work truck carrying equipment or passengers.
For readers seeking a practical, hands-on orientation that respects the realities of older trucks, a well-regarded route is to consult a DIY windshield repair guide for truck owners. This resource is designed to translate professional principles into approachable steps that a skilled hobbyist can perform with careful measurements, appropriate protective gear, and patience. The guide emphasizes the importance of quality materials, surface preparation, and a measured curing schedule while reinforcing the reality that some leaks require professional replacement to restore full reliability. The balance is clear: temporary measures can stabilize the situation, but a permanent seal requires a thorough, professional approach when the bond has deteriorated beyond quick fixes.
In the end, the goal is to keep interior moisture from turning into mold, odors, or electrical gremlins, while you plan the most effective path to a safe, long-lasting repair. If a temporary seal is your best immediate option, apply it with a steady hand, allow for full curing, and perform a controlled test to confirm that your fix holds under pressure. A garden-hose test conducted from outside, while someone watches for drips inside, is a practical way to validate the seal before you drive again in rain. If the test reveals any leaks, reassess the seal’s placement, the cleanliness of the edge, and the drainage integrity. And if you’re ready to explore model-specific steps and safety instructions, consider the linked practical guide for DIY windshield repairs in truck owners’ communities, which can provide a structured approach to learning and performing the work with care. For additional, formal guidance and best practices, consult the official resource on windshield repair and replacement, which consolidates industry standards and safety considerations for older trucks like the 2008 Chevy.
External resource: https://www.autoglass.org/repair-replacement
Beyond the Drip: Thoroughly Testing a Windshield Leak Repair on a 2008 Chevy Truck to Seal Out Leaks
When a windshield leak is diagnosed on a 2008 Chevrolet truck, the repair stage becomes a careful bottleneck between a hopeful fix and a stubborn leak that can return after a heavy rain. The work often centers on the seal between the glass and the vehicle’s frame, where weatherstripping can degrade or where the original urethane bond has failed. Once the replacement or reseal is in place, the next step is not a quick visual check and a shrug of the shoulders. It is a systematic test that simulates real-world conditions and proves the durability of the seal. The purpose is simple yet precise: ensure the repair holds up under pressure, in the heat of the sun, and through the long driving hours that a typical truck endures. A robust leak test goes beyond vanity to safeguard the interior and the electrical systems that ride behind the dash. A leak that persists can lead to mold, corrosion, or electrical faults that sneak in when you least expect them, and that consequence makes testing an essential part of the job rather than an optional afterthought.
The testing that follows a windshield repair should unfold as a cohesive sequence, not a loose constellation of do-this-or-do-that checks. It begins with a thorough dry inspection of the bond line and the glass edge. In daylight, the repair area is scanned for any signs of whitening, clouding, or uneven texture in the cured resin. The goal is a bond that looks smooth and transparent, with no visible distortions that might hint at micro-travel in the glass or a weak cure. Any defect found at this stage can mask deeper issues; it is better to address a suspicious area in daylight than to discover it later while driving through a storm. After the visual pass, the water test becomes the centerpiece of the practical evaluation. A garden hose—or, if you have it, a controlled rainfall simulator—is directed at the windshield edge and the seam where glass meets body. The inside is watched with unblinking attention while the hose is run at a simulated driving velocity, not a trickle. The ideal result is a clean, dry interior with no drips or damp patches, even at higher spray pressures. If water beads along the seal or spots the interior soaks through, the fix has not yet achieved watertight integrity, and further work is required.
To readers who want to understand the level of scrutiny professionals apply, the visual and water tests are just the initial gates. A critical enhancement is the use of specialized equipment that reveals what the eye may miss. UV lights become invaluable during the curing phase of resin repairs because they help confirm that the resin has set where it should and bonded to both glass and frame. This is not a decorative step; it is about confirming that the resin’s hardening is complete and that the material penetrates the micro-pores of the bonding surface. In some shops, pressure testers or leak-detection devices are used to pressurize the interior slightly or to measure the resistance of the bond to a controlled external load. These tools can detect micro-leaks that escape notice in a basic water spray, especially in situations where the vehicle sits in a shaded garage but endures a sunny afternoon later. The combination of visual checks, water testing, and pressure or UV-assisted verification forms a triad that AGSC-aligned professionals rely on to certify that a repair is genuinely sound and not merely cosmetically repaired.
A practical mindset governs every choice in this testing phase. It is tempting to assume that a perfectly clear resin implies a perfect bond, but resin clarity and bond strength do not always travel in lockstep. The resin may appear flawless yet fail under pressure if the bonding surface was not properly prepared, if there was moisture trapped before cure, or if the edge seal was not fully re-adhered to the factory substrate. For that reason, the test must include a careful inspection of the cure environment. Temperature, humidity, and surface cleanliness all influence the cure and long-term performance. A dry, well-cleaned bonding surface is essential, as is ensuring that the urethane or adhesive used to reseal the windshield has cured for the recommended period before subjecting the assembly to stress. Rushing through curing can create a false sense of security and leave a customer surprised when the next storm arrives.
Beyond the mechanics of testing, there is the broader responsibility to the vehicle’s integrity. A 2008 Chevy truck carries a diverse array of systems behind the windshield—wiring for defoggers, sensors in some trim levels, and the general cabin seal that protects against wind and road spray. A successful test must account for how the repaired seal interacts with these components. The sealant must not only block water but also accommodate the expansion and contraction that comes with seasonal temperature swings. The goal is a durable, long-term seal that remains flexible enough to absorb vibrations without cracking. In this sense, testing becomes a lived-time check rather than a one-off measure. It asks: Will this fix hold up over months of sun exposure, freezing nights, and the occasional pothole that jars the glass? The answer lies in the disciplined application of method and the patience to verify every variable that can influence performance.
To connect theory with practice, consider the practical guidance that professional technicians follow. The Auto Glass Safety Council emphasizes a multi-faceted evaluation that integrates visual inspection, water testing, and pressure checks. None of these measures alone is decisive; together, they provide a robust assurance that the repair is truly complete. When the three elements align—a clean, defect-free cure; no interior dampness; and no detectable leakage under simulated stress—the repair transitions from a temporary fix to a vehicle-grade solution. This framework is not merely about passing a test; it is about building lasting confidence for drivers who depend on their trucks for daily work, weekend projects, or long-haul journeys. The standard also underscores the importance of safety and proper procedure, reminding anyone undertaking windshield work that errors can have consequences far beyond a wet dashboard. Following these guidelines helps ensure that the repair stands up to the demanding reality of road exposure and weather.
For readers who are curious about how a typical home or small shop might approach this testing with accessible resources, the linked DIY guide offers a complementary, practical perspective. It presents a step-by-step approach tailored to truck owners who want to build hands-on capability without compromising safety or quality. You can explore those practical techniques here: DIY Windshield Repair Guide for Truck Owners. The guide aligns with the core ideas described above, focusing on preparing the bonding surface, applying the correct adhesive, and performing careful curing and testing before declaring the job complete. While the guide aims to demystify the process for enthusiasts, it never substitutes for the professional standards that guide commercial repair work, especially when a windshield removal and full reseal might be warranted for a persistent leak.
When the tests indicate success, the internal environment of the cab becomes a trustworthy sanctuary again. The dealer-like confidence that comes with a road-tested seal depends on the repeatability of the test results under different conditions. This is where the testing protocol doubles as a maintenance tool: it is a reminder that a seal is not a one-time purchase but a living component of the vehicle’s weather protection. Drivers should perform a quick post-test check after significant weather events, especially during the first few rainstorms following a repair. A gentle, but mindful, pull on the glass near the edges can sometimes reveal subtle movement that warrants re-evaluation. If any doubt remains about the integrity of the bond after testing, the prudent course is to re-clean the bonding surface and reapply the sealant under the guidance of a qualified technician. It is a small extra investment of time and care that pays off in long-term reliability.
In sum, testing the windshield repair on a 2008 Chevy truck is not a chore; it is a disciplined verification that translates into real-world safety and comfort. The process—careful visual inspection, controlled water exposure, and, where available, UV or pressure verification—embeds confidence in a repair that might otherwise be overshadowed by the urgency to finish. It respects the vehicle’s design, protects interior components, and honors the time of the owner who relies on dependable transportation. By embracing a thorough testing mindset, you convert a patch into a proven solution, ensuring that another storm won’t undermine the work you have already invested in protecting the truck and its occupants. For those who want to explore further, the linked internal resource provides a practical, home-friendly pathway to mastering the basics of windshield care, while the AGSC reference remains the authoritative compass for safety and quality in windshield repair and replacement.
From Drips to Drive: A Professional Path to Replacing the Windshield Seal on a 2008 Chevrolet Truck
Water creeping around a windshield on a 2008 Chevrolet truck is more than a nuisance; it’s a signal that the vehicle’s weather seal is failing and the interior, wiring, and structural elements could be compromised. The most reliable diagnosis begins with patience and a careful surface check. A common culprit is a degraded or failed sealant—the weatherstripping that sits between the glass and the vehicle’s body. When that bond weakens, rain pours in, often tracing a path that makes interior dampness appear far from the actual source. The task that follows is not merely a patch or a dab of sealant; it’s a deliberate restoration of the entire bonding surface, followed by the careful reinstallation of the glass. In other words, the goal is not a quick fix but a watertight, durable seal that will withstand seasonal humidity, road salt, and the flexing that comes with everyday driving.
The diagnostic phase is about more than locating a drip. It’s about following the water trail to its origin and looking for signs of settlement, corrosion, or moisture trapped behind the glass. A leaky windshield may seem to leak only during heavy rain, yet the underlayment of the frame can harbor rust or deteriorated mounting material that quietly invites renewed leaks after a repair. Hence the professional approach emphasizes a comprehensive assessment: is the problem purely adhesive failure, or are there frame imperfections, post-drill porosity, or pitting along the bonding surface? When professionals determine that the seal has reached the end of its life, they proceed to a method that, while more involved, provides lasting results. This is not a procedure to improvise in a driveway or garage. It requires careful handling and precise materials to ensure safety and durability in the years ahead.
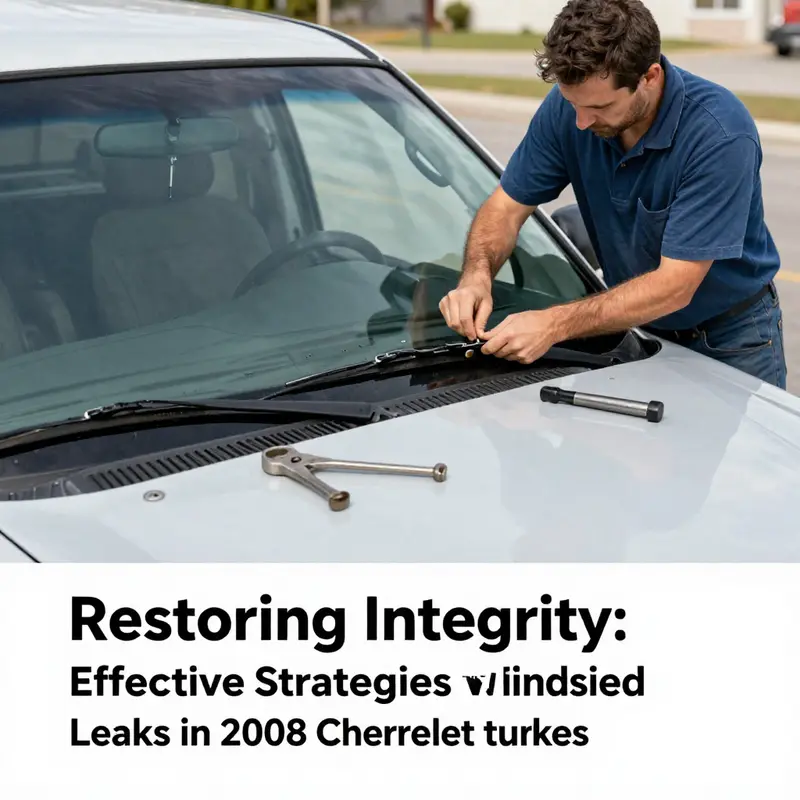
A certified technician will begin by removing the windshield with all due care. The glass is supported and stabilized to avoid chips or cracks during extraction, and any surrounding trim or retainers are detached in an orderly fashion to preserve the integrity of the body sheet metal. The objective is to expose a clean, flat bonding surface on the vehicle’s pinch-w weld and the edge of the glass. Once the windshield is out, the old adhesive is meticulously scraped away, and the frame is thoroughly cleaned. Dirt, old adhesive residue, and moisture must be eliminated so that the new sealant can cure properly. This is where a car’s structural considerations come into play: the edges near the A-pillars, the cowl, and the roofline must be free of contaminants that could undermine adhesion. The careful removal step is essential because it reveals any hidden damage—micro-cracks in the frame, corrosion in the pinch-weld, or pitting that might otherwise compromise the newly applied bond.
With the surface prepared, the technician selects a vehicle-specific urethane adhesive designed for automotive glass. The choice of adhesive is critical; it must provide a durable bond, integrate with the vehicle’s metal surface, and cure under controlled conditions to form a long-lasting seal. This is one of those moments in auto glass work where subpar materials or inconsistent application can show up quickly as leaks or wind noise after reassembly. The adhesive is carefully applied along the bonding surface, ensuring a continuous bead that fills any micro-imperfections and creates a uniform seal. The windshield is then aligned with dramatic precision. Alignment is not a cosmetic concern; it affects rain shedding, wind noise, and, in unfortunate circumstances, the vehicle’s overall structural integrity at high speeds. Once properly positioned, the glass is set in place, and tensioning and bonding are performed under the right climate conditions and with the correct clamping sequence to avoid shifting during cure.
Curing time is a critical phase that many owners underestimate. Vehicle manufacturers and professional guidelines typically require a substantial window—often between 24 and 72 hours—before the truck is driven, to allow the urethane adhesive to achieve its full strength. In that period, the seal cures to a robust, flexible bond that can accommodate thermal movement and minor framing flex without compromising the waterproof seal. Rushing the cure can lead to misalignment, incomplete adhesion, or a sheet of glass that feels insecure at highway speeds. The length of the cure depends on ambient temperature and humidity, but a disciplined schedule helps ensure the result lasts through many seasons. During this waiting period, technicians monitor the installation for any signs of misfit, unusual gaps, or unexpected moisture behind the windshield area once the chassis resumes its normal load and exposure to weather.
The professional route also emphasizes safety and standards. The windshield does more than keep rain out; it contributes to the structural rigidity of the vehicle, influences the airbag deployment dynamics, and affects overall occupant protection. An improper bond can lead to wind noise, micro-movements, or, in the worst case, detachment at speed. Consequently, certified technicians use OEM-approved materials and procedures to maintain the integrity of the installation and to preserve the vehicle’s safety ratings. For car owners who have questions about model-specific guidelines or who want to understand the broader industry standards surrounding windshield repair and replacement, it is helpful to review the guidance provided by professional associations that publish standardized practices and training resources. Those resources remind us that the best long-term fix for a failed seal is a complete windscreen removal, surface restoration, precise adhesive application, and controlled curing.
In the practical terms of a repair project, this process begins with a careful, controlled removal that minimizes risk to surrounding trim, paint, and wiring. The technician ensures that the glass area remains free of contamination during extraction, preserving the integrity of the frame and preventing accidental damage to the pinch-weld or the mounting surface. After the old sealant is removed and the bonding surface is clean, any signs of underlying frame damage are addressed before the new adhesive is applied. It is the combination of surface preparation and correct adhesive technology that ultimately determines whether the repair will hold through time and weather.
For readers who want to broaden their own knowledge and approach this topic with more confidence, there is a wealth of practical information accessible in DIY-focused resources. A dedicated guide for truck owners outlines the steps, cautions, and required safety considerations involved in do-it-yourself windshield work. While the professional route is recommended for the reasons described, a well-informed owner can gain valuable context by exploring a detailed, hands-on guide that explains alignment checks, the importance of a clean mounting surface, and the difference between temporary sealants and lasting urethane bonds. The guide advocates for caution and emphasizes that getting a proper seal often means turning to professional services when the project involves removing and resealing the entire windshield. You can explore that resource here: DIY windshield repair guide for truck owners.
Once the curing period has elapsed, the final phase involves a thorough leak test to verify the success of the repair. A common approach is to simulate rainfall by directing water around the windshield edges with a careful spray while an observer inside the cabin monitors for any drips or damp patches. A well-executed installation will show no leaks, no interior pooling, and no signs of moisture behind the instrument cluster or dash. In contrast, any residual seepage indicates that the bonding surface may not have achieved full adhesion or that the alignment requires adjustment or rework. The test is a simple, practical check—accessible to a diligent owner or a service technician—and it often serves as the definitive confirmation that the professional repair has met its goal.
For vehicle owners navigating the decision between DIY attempts and professional service, the cost, time, and risk calculus will tilt toward professional repair when a windshield must be removed and re-sealed. The long-term payoff is a robust, moisture-proof seal that persists through weather, highway speed, and the daily flex of a truck chassis. The guidance from the professional community also emphasizes using OEM or equivalent quality materials, following established safety guidelines, and undergoing proper training. In other words, the best path from leak to confidence lies in the combination of meticulous surface preparation, careful adhesive selection, precise installation, and a fully controlled cure period. Documentation and adherence to industry standards—from reputable professional associations—help ensure that a repair on a 2008 Chevrolet truck not only ends the current leak but also prevents the recurrence of leaks in the years ahead.
If you’re seeking deeper context on official installation and sealing techniques, consult the broader industry guidance from recognized professional bodies, which provide model-specific recommendations and training resources for windshield repairs and replacements on older vehicles like this truck. For authoritative, model-specific procedures and safety guidelines related to windshield replacement on older trucks like your 2008 Chevy, visit: https://www.nga.org. This external resource consolidates the latest best practices and instructional materials that professionals rely on when performing repairs of this nature.
In sum, the path from leak diagnosis to a durable, long-lasting seal is a disciplined sequence that begins with recognizing the seal’s degradation and ends with a cured, properly aligned windshield bonded to a clean, corrosion-free frame. The value of a professional repair lies not only in sealing out rain but in restoring the vehicle’s structural integrity and safeguarding the occupants. The learning that comes from studying industry guidelines and hands-on, surface-focused preparation reinforces a single truth: when a windshield’s bond has failed, the only reliable remedy is a complete, carefully executed reinstallation using correct materials and a full cure period. For readers who want to take a proactive step toward informed decisions, exploring the DIY guide can offer practical insights while recognizing the limits of home repair and the advantages of professional service for this critical component of vehicle safety.
Final thoughts
Repairing leaks in the windshield of a 2008 Chevrolet truck is not merely a task but a critical component of vehicle management that impacts safety and operational efficiency. Fleet managers and trucking company owners must adopt both effective identification techniques and reliable repair methods to maintain vehicle performance and protect investments. Whether implementing professional solutions or employing quick fixes, the key remains in thorough testing and the readiness to consult with experts when necessary. By adhering to these guidelines, you can foster a safer, more reliable fleet.

