Introduction
Aftermarket fairings are a familiar headache for repair shops and riders alike. You order a replacement, expect a quick bolt-on fix, and end up spending hours fighting gaps, rattles, and mismatched panels. The shape of the plastic is rarely the problem. The trouble usually starts in two places.
Why Mounting Tabs Crack
Mounting tabs crack because aftermarket makers often use thinner, more brittle plastic than the original equipment manufacturer. Those tabs carry the full weight and vibration of the fairing, so weak material fails fast. Over-tightening bolts and missing rubber grommets speed up the damage, and once a tab snaps, the panel never sits right again.
Why Paint Colors Do Not Match
Paint is the same story: a factory color code is only a starting point. Sun fading, a different paint brand, and the wrong primer shade all shift the final tone. Even skilled technicians find color work tricky, and getting scratch and paint repair right depends on careful surface prep and a test panel before the final coat.
What This Article Covers
The causes behind poor aftermarket fitment are predictable, and so are the fixes. The sections below explain why mounting tabs crack and why paint colors miss, then run through what shops and owners can do about both before the fairing goes back on the bike.
Why Mounting Tabs Crack on Aftermarket Fairings
Aftermarket bodywork is affordable and easy to source, but its weak point is nearly always the same: the small plastic tabs that bolt the shell to the bike. Once a mounting tab cracks, the panel starts to flap, panel gaps open up, and a costly repair is usually next. Understanding the mechanics helps a shop explain the failure to an owner and set realistic expectations.
Thin or low-grade ABS plastic. Many budget kits are molded from recycled or poorly mixed ABS that is thinner than the original panels. Less thickness means less stiffness and load capacity, so a tab that would simply flex on a factory shell can snap under the same working load.
Poor injection-molding tolerances. A worn mold or a rushed cycle time leaves tabs slightly warped, undersized, or full of internal voids. Those hidden flaws act as crack starters long before the part ever sees a wrench.
Stress at pre-drilled tab holes. Every drilled hole concentrates force at its edges. If a hole is molded rather than cleanly drilled, or never gets a proper chamfer, the sharp rim is where a mounting tab cracks first.
Vibration and thermal expansion. A running motorcycle vibrates constantly, and the fairing heats and cools with the engine and the sun. Plastic expands and contracts at a different rate than the metal frame, so each cycle tugs at the tab until fatigue finally wins.
Over-tightened fasteners. A bolt driven past spec crushes the plastic around the hole and pre-loads the tab with tension. The lesson behind the consequences of ignoring torque specifications applies here too: plastic needs a gentle, measured torque rather than a heavy hand.
A shell that does not fit. When panel gaps are uneven, installers often force the shell into alignment and cinch it down. That stored tension keeps the tab under constant load, so it can fail the first time the bike hits a rough patch.
Together, these factors explain most of the practical difference between OEM vs aftermarket fairings. Factory panels are engineered with consistent wall thickness, tight molding control, and steel or rubber-mounted attachment points that absorb vibration. The fixes follow the same logic: add reinforcement, enlarge and chamfer the holes, use rubber washers, and torque gently.
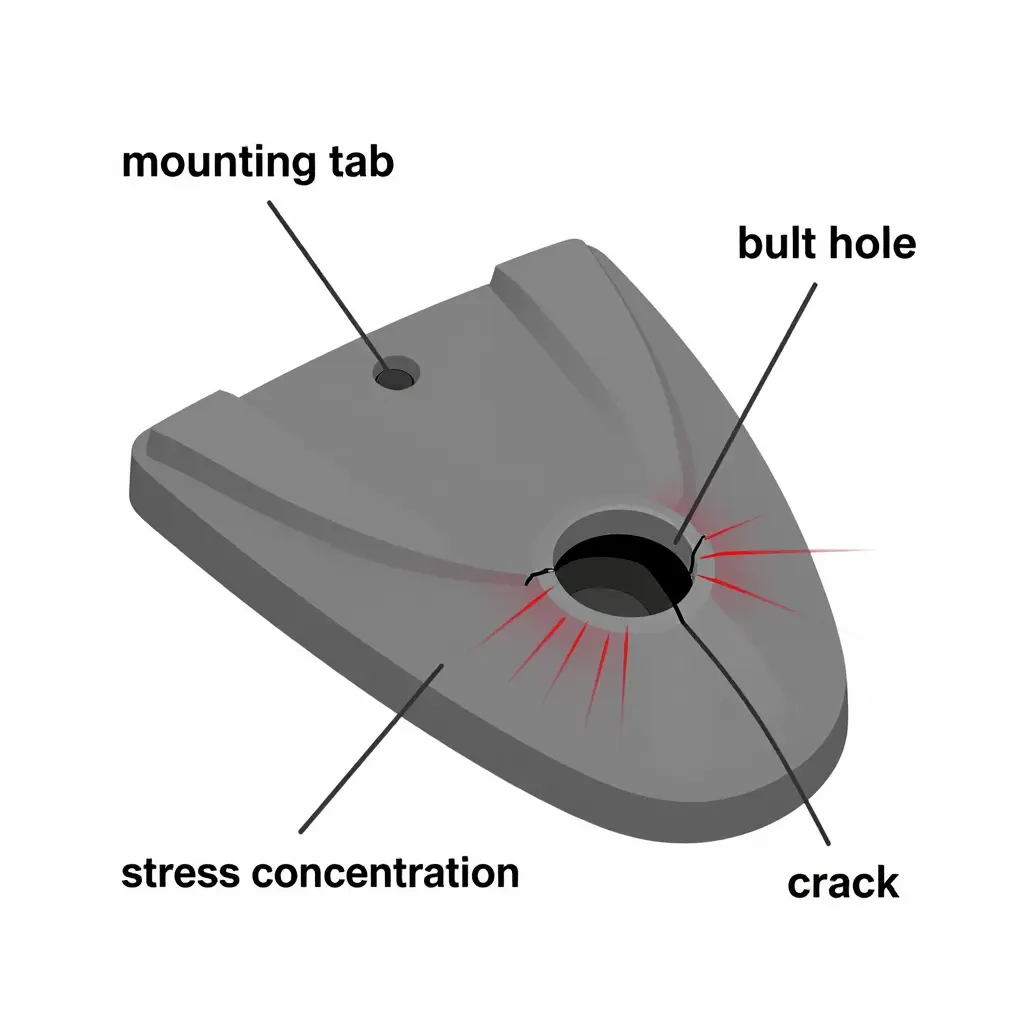
Where the Cracks Begin: Mounting Tab Stress Points
The diagram above shows a simplified fairing panel and its mounting tabs. The arrows point to the two spots where trouble almost always starts: the tab-to-panel joint, where the material is thinnest, and the fastener hole, where every vibration pulse and bolt load concentrates into a tiny area. When an aftermarket panel does not sit exactly where the original did, both get worse: the tabs flex further, the holes elongate, and a hairline crack opens into a snapped tab.
The Most Common Causes of Tab Cracking
Even a carefully planned installation can end with a sickening snap and a cracked tab. The cause is rarely one huge mistake. Most of the time, tabs crack because small stresses pile up over weeks of normal riding. A few millimeters of misalignment, or one over-tightened bolt, is often enough to start a hairline crack that spreads fast.
The usual culprits:
- Material flexibility differences. Aftermarket panels often use a harder, less forgiving plastic than OEM, so they crack instead of flexing with the frame.
- Missing rubber grommets. Those small isolators soak up vibration. Leave them out and engine buzz reaches the tab directly, slowly fatiguing it.
- Incorrect torque on fasteners. Over-tightening crushes the tab, while under-tightening lets it rattle, so follow the correct torque specifications every time.
- Cold-weather installation. Plastic turns brittle in low temperatures, so a panel that flexes easily in summer can split the moment you push it into place on a winter morning.
- Shipping damage. Tabs are the thinnest part of any fairing, and a rough delivery can leave invisible cracks that open up once the panel is bolted down.
- Mounting holes that do not line up. Imperfect aftermarket fairing fitment forces you to bend the panel to reach a bolt hole, and that constant tension eventually tears the tab.
- Worn or wrong fasteners. Reusing stretched push-clips, mismatched bolts, or zip ties instead of proper hardware lets the panel shift and load the tabs unevenly.
None of these problems show up on a spec sheet, yet together they explain the vast majority of cracked tabs we replace. The fix is usually simple: test-fit the panel before final assembly, install it in warm conditions when you can, use fresh rubber isolators, and tighten every fastener to the correct value. Treat each tab as a stress point rather than just a mounting hole, and the fairing will hold up far longer, no matter how many miles you log.
Why Aftermarket Fairing Paint Colors Do Not Match
The fitment issues usually grab all the attention, but the paint is what people notice first. You unwrap a panel expecting a factory-fresh finish, hold it beside the tank or a side cover, and the shade is just… off. It is one of the most common complaints in motorcycle bodywork, and the reasons behind it are more complicated than a wrong mix at the paint counter.
Faded original paint. The paint that came on your bike is not the paint that left the factory. Years of sun, washing, and road grime slowly shift the tone. A new aftermarket fairing is fresh out of the booth, so even a perfect formula can look darker or more saturated beside a faded original panel. The mismatch is often about the old part, not the new one.
Differences in paint code interpretation. Manufacturers assign color codes, but a code describes a range, not one absolute recipe. Two paint suppliers can read the same code and mix slightly different toners, and model-year variations make it worse. A reliable paint color match starts with a physical sample from your bike, not just the code on the sticker.
Base coat and clear coat variations. The base coat controls the hue, while the clear coat controls depth and gloss. Different clear products, different film thicknesses, and different cure times all change how the final color reads under light. A thin clear over the same base will not look identical to a factory-heavy clear.
Pearl and metallic flake size differences. Pearls and metallics are what make so many factory colors dynamic. If the flake size, orientation, or concentration differs, the panel flashes differently in sunlight even when the base hue is close. This is a big reason three-stage pearl whites and candy colors are so hard to reproduce.
Spray technique and number of coats. Air pressure, gun distance, overlap, and coat count all affect how pigment and flake lie on the surface. Two painters using the same can of mixed paint can produce two visibly different panels, so consistency matters as much as the formula itself.
Environmental factors like UV exposure. UV light degrades pigment and clear over time, pushing colors toward yellow, chalky, or washed-out tones. Because a bike’s panels age at different rates depending on how they are parked and how much sun they catch, even original factory panels on the same bike can drift apart. Good paint finish care slows that drift, but it cannot reverse it.
A close-but-not-perfect aftermarket fairing is normal. A true match usually means blending to the specific bike in front of you rather than trusting a code on paper.
What Makes Fairing Tabs Snap?
A cracked tab on a fresh set of aftermarket fairings rarely comes down to one dramatic event. It is usually a quiet combination of small compromises made before the panels ever went on. The chart below ranks the most common culprits by relative frequency.
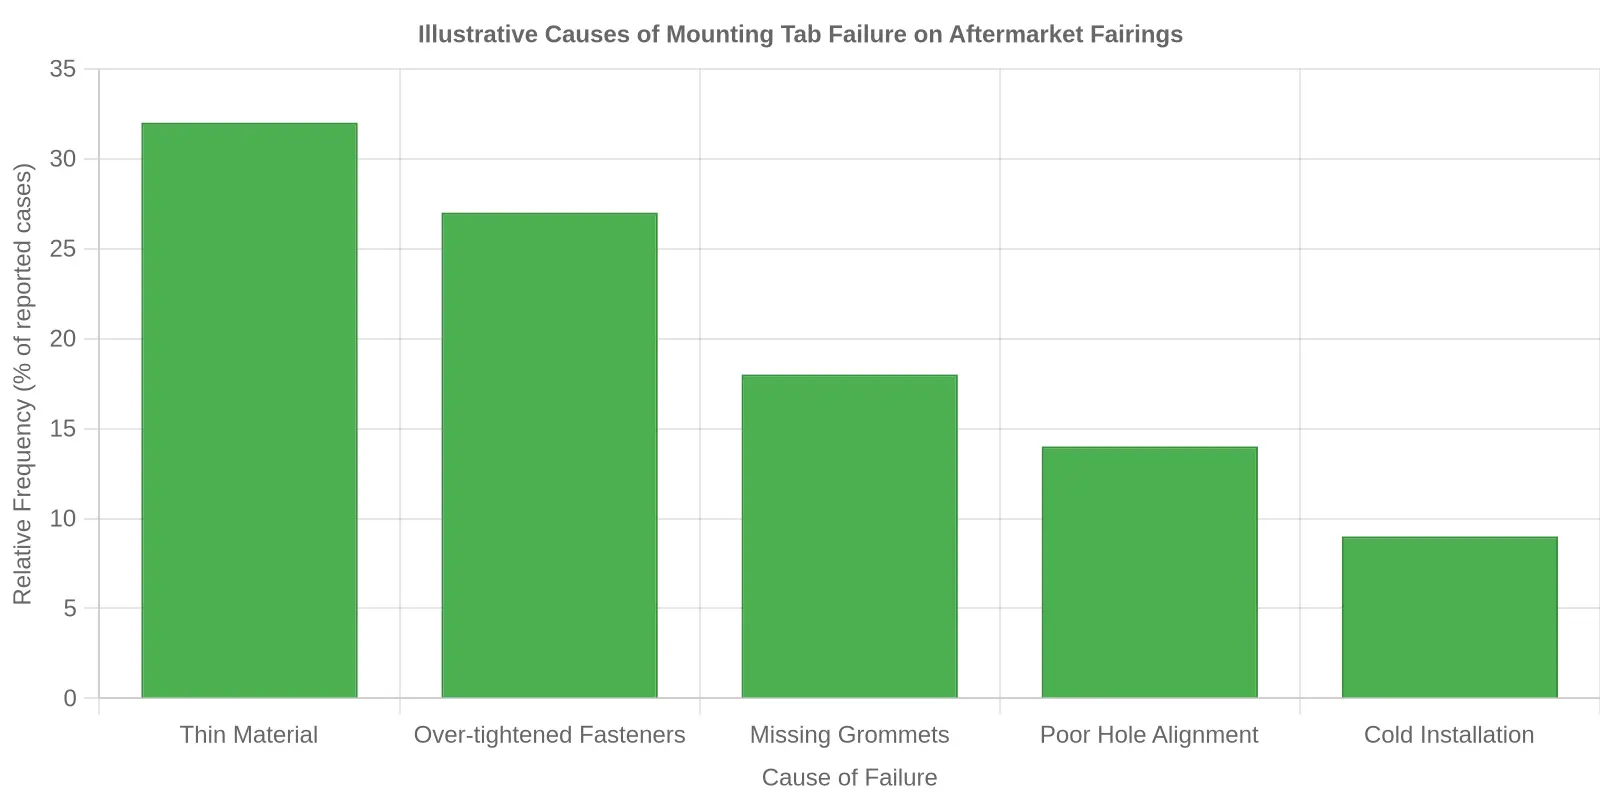
Illustrative sample values – not real research data.
Reading the Bars
| Cause | Relative Frequency (Illustrative) | Why It Matters |
|---|---|---|
| Thin Material | 32% | Under-thick ABS or fiberglass flexes under vibration and stress-cracks at the bend radius of the tab. |
| Over-tightened Fasteners | 27% | Crushes the grommet or pulls the tab flat, leaving no room for thermal expansion. |
| Missing Grommets | 18% | Without an isolator, every vibration transfers straight into the plastic instead of being absorbed. |
| Poor Hole Alignment | 14% | Forcing a bolt through a misaligned hole pre-loads the tab before the bike even moves. |
| Cold Installation | 9% | Brittle plastic at low temperatures snaps easily when panels are torqued into place. |
In this illustrative breakdown, the top two causes together account for nearly six in ten tab failures, and both are installation-side problems you can control. Check panel thickness at the tab, use a torque wrench set to a gentle spec, and let fairings warm up before fitting; each one cuts the odds of a comeback. If you want to build broader habits around planned, prevention-first servicing, it helps to understand how to budget for routine truck maintenance so that small fitment checks never get skipped in the rush.
Factors That Affect Motorcycle Paint Color Match
A new aftermarket motorcycle fairing can bolt on perfectly and still look wrong the moment the sun hits it. Fitment is one battle; paint color match is another. Even a panel that arrives in the right shade can stand out as an obvious replacement, depending on a handful of variables.
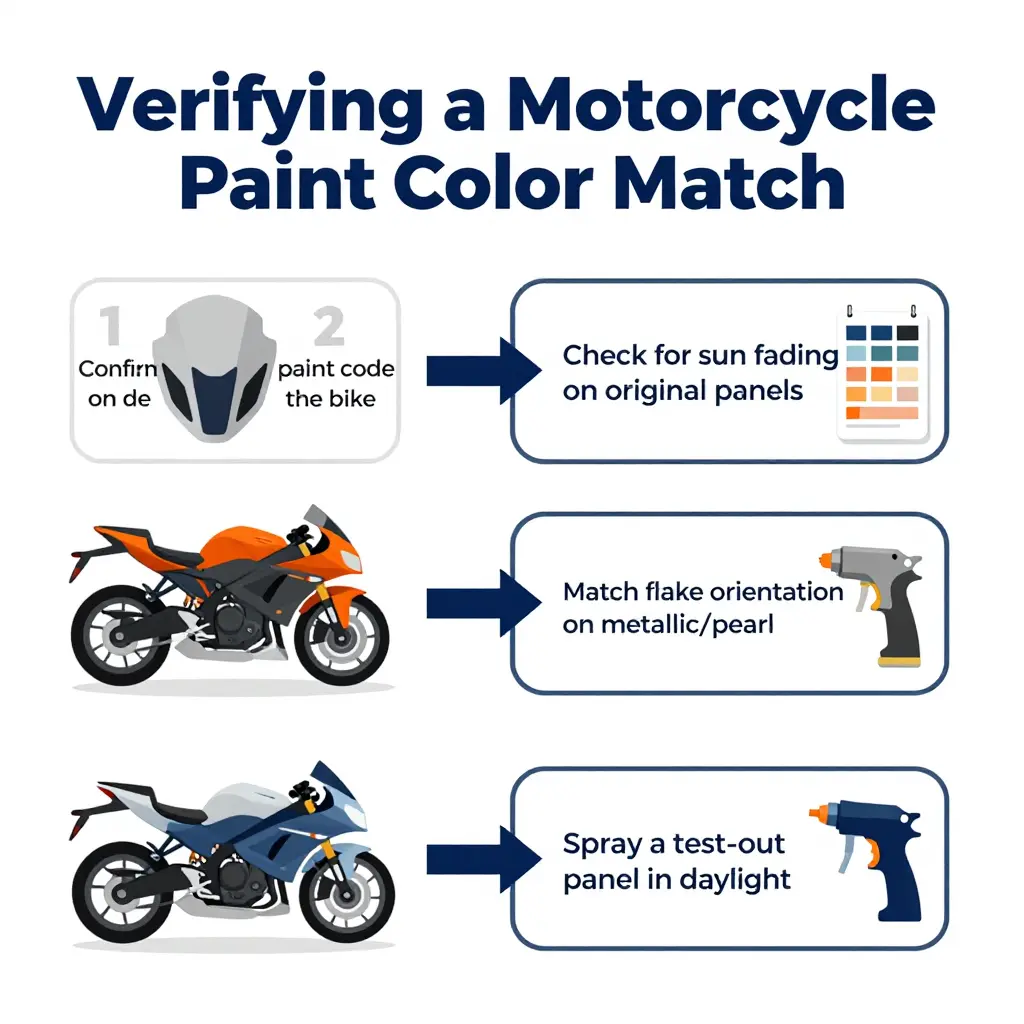
The Paint Code Is a Starting Point, Not a Guarantee
A paint code is the foundation of any match, but codes drift. Manufacturers revise formulas, change suppliers, and run several shades under one code across model years. Never trust the code printed in a parts catalog alone; check it against the vehicle’s own identification sticker or service data.
Check the Code on the Bike, Not Just the Listing
The most reliable code is on the bike itself, usually under the seat, on the frame, or inside the fairing. Aftermarket listings often group several model years under one “universal” code, which is exactly when paint colors do not match. Cross-check the physical bike’s code before ordering.
Sun Fading Quietly Shifts the Original Shade
A factory panel that has spent years in the sun is no longer the color it left the plant. UV exposure fades pigments, dulls reds, and yellows whites. A fresh fairing can match the factory formula perfectly and still look darker or brighter beside a faded original, because now you are matching the bike, not the code.
The Clear Coat Decides the Final Look
Clear coat is not only protection. It sets gloss, depth, and how light reflects off the surface. A thinner or thicker coat, or a different product, changes how the base coat reads, and rushing or skipping it is one of the fastest ways to make a clean paint job look flat and mismatched.
Flake Orientation in Metallic and Pearl Finishes
Metallics and pearls hide their true color in the flake. How those flakes lie down determines whether a panel looks light, dark, or “flopped” next to its neighbor. Spray distance, gun angle, and air pressure all influence flake alignment, so a perfect mix sprayed the wrong way will still miss.
Never Skip the Test Spray-Out Panel
Before touching the motorcycle fairing, spray a test card and compare it in natural daylight at several angles. This one step reveals fading, flake, and clear coat problems while the panel is still easy to redo, saving material, labor, and a frustrated customer.
Owners who handle light cosmetic fixes themselves get better results from careful finish repair. Our DIY scratch removal guide for trucks covers the same surface-prep routine that makes a color match stick.
The Paint Color Matching Process, Step by Step
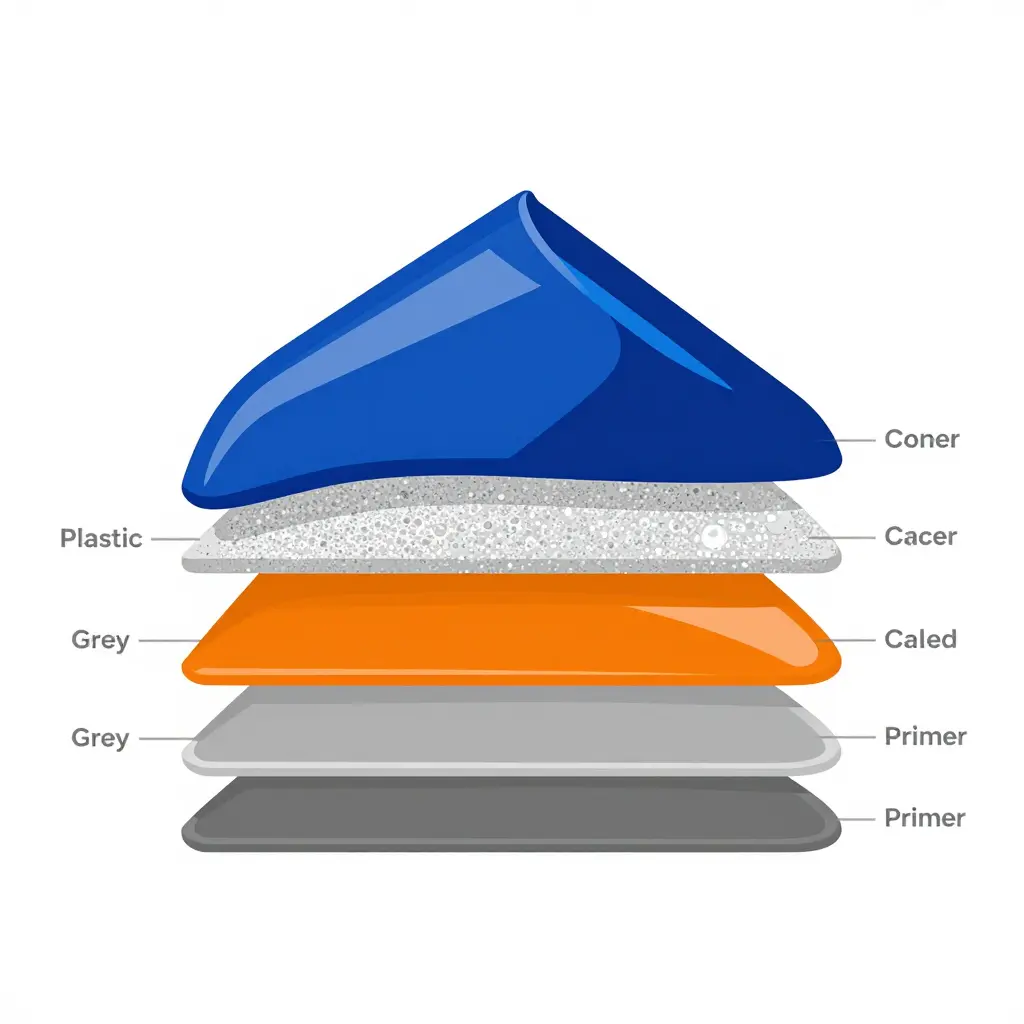
Matching an aftermarket fairing to a factory finish is a repeatable sequence, not guesswork. Each stage builds on the last, and rushing any one of them is why so many “matched” panels end up looking off under real daylight. The diagram below walks through the flow from paint code lookup to final color comparison.
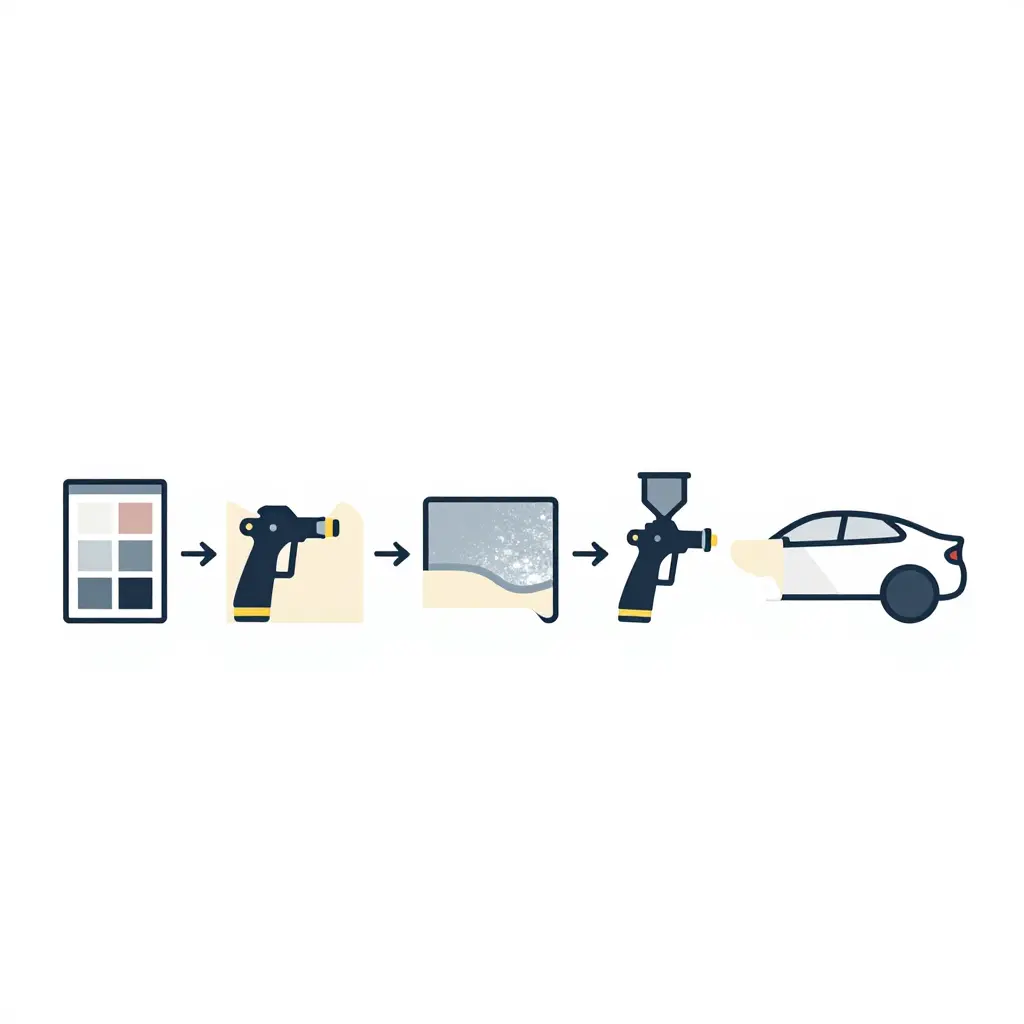
What each step contributes:
- Paint code lookup – The code is only a starting point. Sun fade, batch variance, and factory application differences mean the on-panel color rarely equals the code straight out of the can.
- Base coat application – The base establishes the actual hue. Coverage, gun distance, and reducer ratios all shift the outcome slightly.
- Pearl or metallic layer – Metallics and pearls are the hardest layer to match. Flake orientation and density change how light reflects, which is why two panels can read identical head-on but split apart at an angle.
- Clear coat – The clear adds gloss and UV protection, and it subtly deepens the final tone.
- Final color comparison – Compare the finished panel against the original under the same lighting angle, not in a dark booth.
If you are chasing small imperfections rather than a full respray, address the light surface damage first. This guide on DIY scratch removal for trucks covers it before you commit to a full color-match job.
Steps to Improve Fitment and Paint Matching
A tidy fit and a true color come down to process. Work through these steps in order the next time you install or refinish aftermarket plastic.
- Inspect the panel on arrival. Check every inch for warping, thin edges, and rough mounting tabs before you touch paint. Catching flaws early saves hours of rework later.
- Test-fit before painting. Mount the bare fairing on the bike and note every gap or misalignment. This dry run exposes aftermarket fairing fitment problems that fresh paint would only hide.
- Document the mounting points. Photograph each tab, grommet, and bolt location as you remove parts. These references speed up reassembly and flag spots where mounting tabs crack.
- Ream the mounting holes slightly. Open each hole by a millimeter or two with a round file. A little play absorbs vibration instead of letting stress build at the tab.
- Install rubber grommets and washers. Cushion every contact point between plastic and metal. Isolation is the cheapest defense against cracks and squeaks.
- Torque every fastener to spec. Snug bolts by feel and you invite cracks and stripped threads. Follow the manual, because ignoring torque specifications often leads to costly failures.
- Apply flexible sealant at high-stress points. Dab a small bead where tabs meet the panel. This spreads load and dampens flex on rough roads.
- Prep the surface properly. Sand, clean, and prime with a product matched to the plastic type. Poor prep is the number one reason a paint color match fails.
- Request a spray-out sample. Ask your supplier for a test card sprayed in your exact code. Compare it under daylight and shop lights before committing to the full panel.
- Blend across adjacent panels. Feather the new paint into surrounding areas rather than stopping at a hard edge. Blending hides subtle shade shifts that a panel-to-panel match would expose.
- Cure and store correctly. Let finished parts rest flat in a dust-free, moderate space. Rushing assembly on soft paint leads to scratches, scuffs, and a second round of repairs.
Follow the sequence and you will spend less time fighting gaps and mismatched shades, and more time handing back a bike that looks factory-fresh.
What Causes Aftermarket Fairing Paint Mismatch?
A cracked fairing and a mismatched fairing are two very different headaches. Owners buying an aftermarket panel often expect a simple bolt-on and spray job. In practice, a mismatch usually comes down to a handful of repeat offenders, and knowing which one you are dealing with saves hours of repainting.
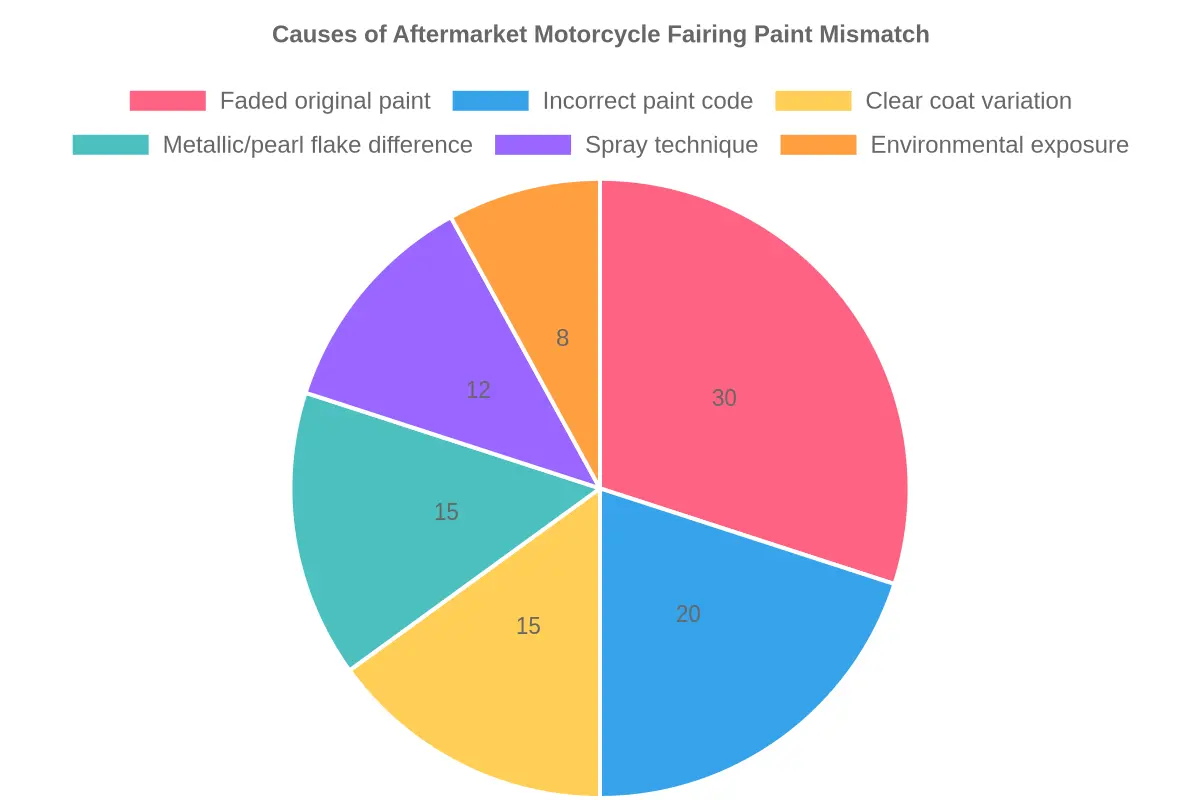
The pie chart below breaks down the most common culprits behind a color that just will not blend. These figures are illustrative examples meant to show relative weight, not results from a formal study.
Reading the Chart
The largest single factor is faded original paint (30 percent). Even a garage-kept bike shifts color over time, so a fresh panel sprayed with the factory code can look instantly “off” next to weathered neighbors. Second is the incorrect paint code (20 percent): OEM build sheets are not always accurate, and some bikes left the line with special-order or mid-year shades.
Clear coat variation and metallic or pearl flake differences each account for 15 percent, which is why two panels of the “same” silver can look completely different under sunlight. Spray technique (12 percent) and environmental exposure (8 percent) close out the pie with smaller but still meaningful shares.
Quick Takeaways for Shops and Riders
- Blend, do not just match. Spraying into adjacent panels hides small shifts from fading and flake orientation.
- Verify the code in person. Confirm the shade with a spray-out card before committing to a full panel.
- Control the booth. Consistent temperature, airflow, and technique keep clear coat and metallic flake predictable.
- Expect some drift on older bikes. A ten-year-old factory finish rarely matches a same-code fresh mix.
The same advice applies to paint and bodywork: fix small surface defects early, before they force a full respray. If you handle minor cosmetic damage yourself, a little DIY scratch removal for trucks keeps the original finish, faded color and all, intact a bit longer.
Buying and Installing Aftermarket Fairings: Best Practices
Cracked tabs and mismatched paint rarely happen by accident. They are usually the result of a rushed purchase and a careless install, not bad luck. A few habits up front can save a weekend of frustration, plus a refund fight you probably will not win.
Choose a supplier with wide model coverage. A supplier that carries a broad catalog is far more likely to have a mold that genuinely fits your bike, and the volume spreads its tooling costs, so a complete aftermarket fairing set usually costs less than buying panels one at a time. Wide coverage is a good early signal that the mounting points will line up with your factory ones.
Ask about color-match support before you order. Most cases where paint colors do not match trace back to a supplier spraying a generic “candy red” instead of your OEM code. Give them your factory color code, confirm they use it, and ask whether they offer a touch-up pen for small chips.
Request real photos of installed fairings. Studio shots hide gaps and warped edges. Ask for photos of the exact kit mounted on your model, ideally from a few angles, so you can judge the panel lines before you pay.
Read the return and warranty policy first. Know the return window, who pays return shipping, and how they handle cracked-in-transit panels. A no-questions replacement policy on tabs is a good sign.
Inspect every panel the day it arrives. Lay the kit out, check each tab for hairline cracks, test-fit before painting, and photograph any damage immediately. This pairs well with planning your maintenance and parts budget so a surprise replacement does not wreck your month.
Do these five things and you will avoid most of the trouble that gives aftermarket fairings a bad name.
Frequently Asked Questions About Aftermarket Fairing Fitment
Can cracked mounting tabs be repaired?
Yes, in many cases they can. Small cracks can be welded with a plastic welder or reinforced on the back side with fiberglass and epoxy. If a tab is completely missing or the surrounding plastic has gone brittle, replacement panels are usually more reliable than a patch. A good repair restores most of the strength, but the repaired area often stays a weak point.
Why does my new fairing not match my bike’s color?
The most common cause is paint fade on your original bodywork, so a fresh factory-match coat looks different next to aged panels. Aftermarket suppliers also sometimes use approximate shades rather than your bike’s exact formula, which is why paint colors do not match even when the listed code is technically correct. Lighting and metallic flake direction shift the appearance further, so compare a spray-out card against the bike in daylight before judging the match.
Do all aftermarket fairings crack?
No, they do not. Quality and fit vary widely, and mounting tabs crack mainly on thin, brittle, or poorly molded panels. Sets built from thicker ABS with reinforced tabs hold up far better over time. The real failure rate depends on the material, the installation, and how well the panels align with your frame.
How do I check a paint code?
Look for a sticker under the seat, on the frame, or inside the fairing; most manufacturers list a color code there. If the sticker is missing, a dealer can pull the original code from your VIN. Confirm it against your exact model year, because makers reuse names for different shades.
Should I pre-fit before painting?
Yes, always. Pre-fitting lets you trim, adjust, and confirm that every mounting point lines up before a single coat of paint goes on. Correcting fitment on painted panels risks scratches and wasted finish. A quick dry fit saves both time and money.
How do I prevent tab cracking during installation?
Start every bolt by hand and tighten gradually, working from the center outward. Use rubber washers or grommets to absorb vibration, and never force a panel into position. If a hole will not line up, enlarge it slightly instead of bending the tab. Consistent aftermarket fairing fitment comes down to patience, not force.