
What a Derate Under Load Actually Means for a Heavy-Duty Truck
A derate under load happens when a heavy-duty diesel’s engine control module decides to cut power as soon as the truck is actually working – pulling a grade, merging onto the highway, hauling a loaded trailer. It senses that something is wrong and caps torque, RPM, or road speed to protect the engine, so the driver notices sluggish acceleration, a lower top speed, or a limp-mode warning. For an owner or a fleet manager that is more than a dashboard light. A truck derate costs money, and it is why a mobile truck repair call is so often the first thing they reach for.
The engine may still start and idle, and plenty of operators take that as a sign they can keep going. Usually they cannot. A technician who drives to the truck can read active and pending fault codes, check the charge air system, and find the cause on site before downtime piles up. Waiting is what turns a repairable fault into a roadside tow.
Paying for that visit is easier when the money is already set aside. An emergency repair fund lets an owner or a small fleet authorize the right fix on the spot instead of guessing under pressure.
The problem here is simple. A derate under load together with suspected charge air leak symptoms is often written off as a failed turbocharger. Both produce low boost, heavy black smoke, power loss, and high exhaust gas temperatures, so a rushed diagnosis tends to skip the cheaper and more common cause. What follows separates the two, so you can name the real fault before anyone orders parts.
How a Diesel Engine Derate Under Load Actually Happens
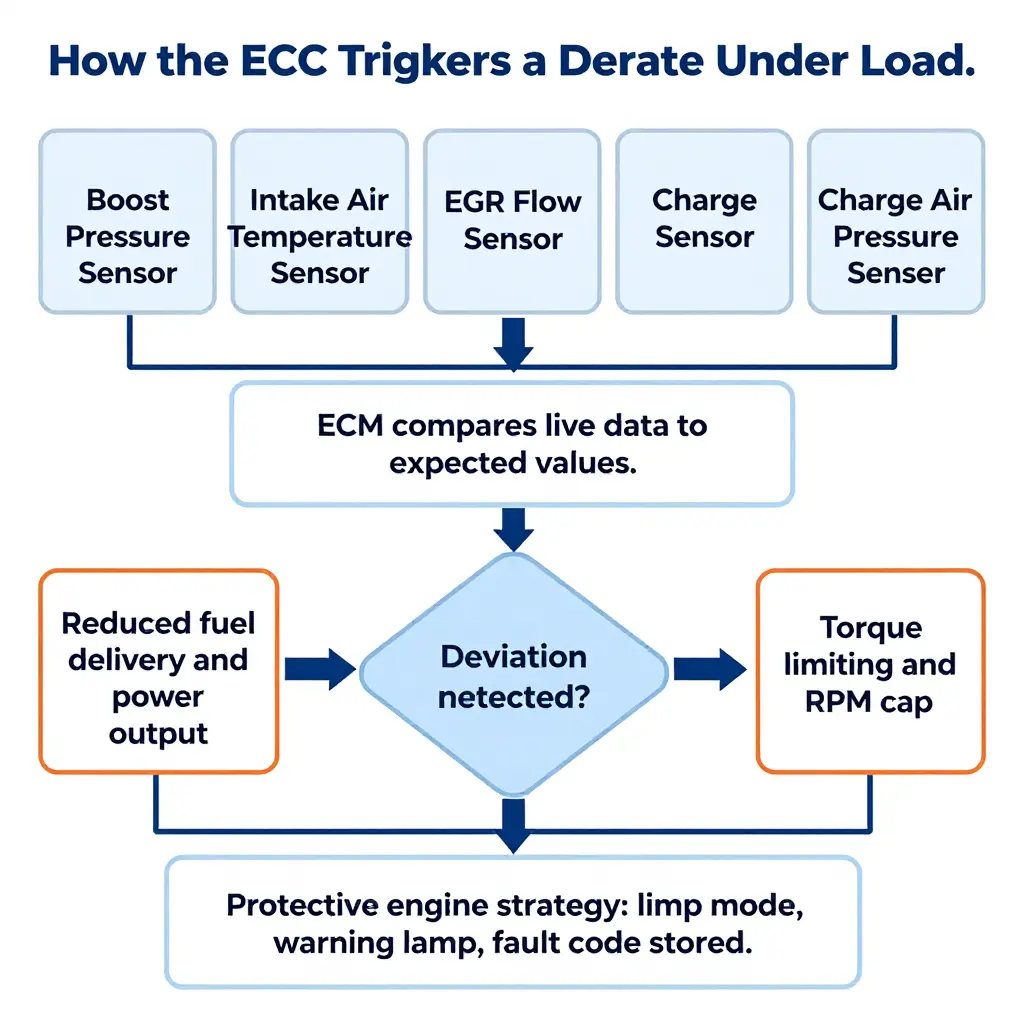
The engine control module (ECM) constantly compares what it commands with what the engine actually does. Climbing a grade, pulling a loaded trailer, or running a PTO, it expects specific values for fuel delivery, intake air volume, and boost pressure. When those values drift past the acceptable window, the program assumes a part is failing and moves to protect the hardware.
That is what a diesel engine derate is: protection. Instead of running at full output while a fault quietly grows, the ECM pulls power back in layers. Knowing the layers is what lets a driver or a shop catch a derate before it strands the truck.
Reduced Power and Torque Limiting
The first response is usually fuel limiting: the ECM shortens injector pulse width, which cuts both the fuel burned and the power available. Torque limiting caps the total torque the engine may deliver, often holding RPM below a preset threshold so the driveline and exhaust are not overloaded. On many trucks it feels like a ceiling that drops on acceleration just when you need power most.
Common Derate Triggers
- Boost pressure deviation – the turbocharger is not producing the pressure the ECM expects, so the computer assumes a leak, a sticking VGT, or a failed sensor.
- Intake restriction – a clogged air filter or collapsed intake hose starves the engine of air.
- EGR faults – a stuck, plugged, or leaking exhaust gas recirculation valve changes the air/fuel balance and triggers protection.
- Charge air leakage – a split boot, loose clamp, or cracked charge pipe bleeds off pressurized air before it reaches the intake manifold.
- Hard limits – over-temperature, low oil pressure, or low coolant level, which protect bearings and pistons immediately.
Because boost pressure and charge air integrity are monitored so tightly, a small leak on the cold side of the turbo can look exactly like a failing turbocharger on a scan tool. Diagnosis should confirm and repair the leak before anyone quotes a turbo.
Catching these faults early keeps repair costs predictable. Treating inspection and leak testing as part of budgeting for routine truck maintenance keeps a fleet away from emergency-rate labor and parts it did not need.
Where the Derate Really Comes From: Charge Air Leaks vs. Turbo Failure
When a truck derates under load, the instinct is to blame the turbocharger. The data points elsewhere. The chart below ranks the most common failure points behind a derate with a suspected charge air leak, and leaks in the charge air system outrank turbo failure by a wide margin.

What the numbers show
Boost hose or boot failure leads at roughly 38% of cases. Charge air cooler cracks (22%) and loose or corroded clamps (18%) come next, so those three leak points account for most of the events shown. Turbocharger actuator faults sit at 9%, EGR cooler issues at 7%, and sensor or wiring faults at 6%. Replacing a turbo before confirming the charge air circuit holds pressure is an expensive way to fix the wrong part.
Why this matters for your diagnosis
A derate under load tells you the ECM has detected a boost shortfall. That shortfall is far more likely to be a split boot, a cracked cooler, or a loose clamp than a worn turbo. A boost leak test and a visual check of the charge air piping can save thousands before you authorize a turbo replacement. For a shop juggling bay time and parts budgets, that kind of targeted diagnosis is also just better maintenance planning.
Note: This chart is a simplified illustration of typical incidence rates for educational purposes, not a statistical study. Actual results vary by engine, age, and operating conditions.
Charge Air Leaks and the Charge Air Cooler System
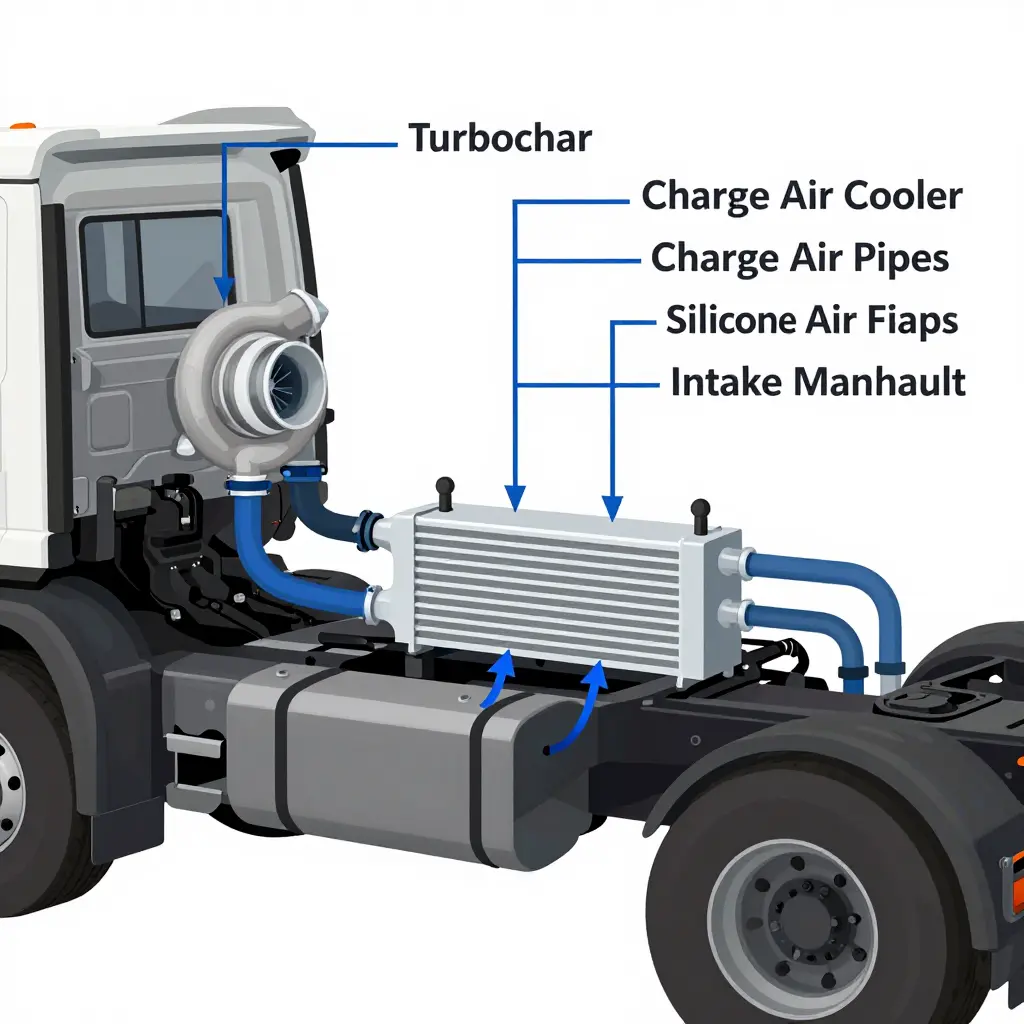
A charge air leak is any loss of pressurized air from the intake path between the turbocharger’s compressor outlet and the engine’s intake manifold. The turbo compresses air before it enters the engine, so every part of that path has to hold pressure. When one fails, boost escapes before it can do any work.
The charge air cooler sits at the center of the system: a heat exchanger, usually mounted in front of the radiator, that cools the hot compressed air leaving the turbo. Cooler air is denser, so it carries more oxygen into the cylinders and supports more complete combustion. From the cooler, air travels through charge air pipes joined end to end by flexible silicone boots and secured with clamps. Together they form a sealed, pressurized intake path, and losing that seal is the same as losing power.
How Leaks Develop
Leaks rarely appear all at once. They build over time through ordinary service:
- Heat cycling expands and contracts pipes, boots, and clamps thousands of times, weakening the material and loosening connections.
- Oil exposure from a failing turbo seal or a crankcase vent softens silicone boots until they swell, crack, and lose their grip.
- Abrasion wears through pipes and boots where they rub against brackets, hoses, or the frame under constant vibration.
- Pressure spikes during hard acceleration or a turbo surge can blow a weakened boot off its pipe or split a seam that was already stressed.
Why It Matters Under Load
Even a small charge air leak cuts the boost reaching the engine, so the truck feels sluggish and burns more fuel. The ECM compares actual boost against its target, and when the gap grows too wide, especially under load on a grade, it can derate to protect the engine and turbo. That is when a driver loses speed and power, usually at the worst possible time. A mobile truck repair service can pressure-test the intake path on site, find the leak, and get the truck back to work without a tow.
Most Vulnerable Leak Points
- Silicone boots at the charge air cooler inlet and outlet
- Pipe-to-boot joints where clamps slowly lose torque
- Clamps themselves, especially corroded or over-tightened ones
- The charge air cooler core, from stone damage or internal corrosion
- Turbo compressor outlet connections
- Intercooler mounting brackets that rub through nearby pipes
- Sensor ports and MAP sensor seals along the intake path
A quick visual inspection and a pressure test often catch these weak spots before a weeping joint becomes a full derate on the highway.
When a truck loses power, blows smoke, or throws boost codes, the knee-jerk reaction is often “the turbo is gone.” In reality, many of these symptoms trace back to a simple charge air leak in the intake tract. The table below maps common symptoms to their likely causes and the check that confirms each one, so you can rule out a leaking boot, clamp, or charge pipe before committing to an expensive turbo replacement.
| Symptom | Likely Cause | Confirming Check |
|---|---|---|
| Power loss under load | Charge air leak or a failing turbocharger | Pressure-test the intake tract; compare measured boost to spec |
| Black smoke on acceleration | Charge air leak (low air density, over-fueling) | Smoke opacity test plus logged boost pressure |
| Whistle or hissing noise | Charge air leak at a hose, boot, or clamp | Spray soapy water on charge pipes and watch for bubbles |
| High boost deviation codes | Charge air leak or sticking VGT vanes | Compare actual vs. desired boost; inspect actuator travel |
| Oily residue near intake joints | Weeping charge air leak or turbo seal leak | Wipe-test the joint, then run a boost leak check |
| Intermittent derate under load | Charge air leak triggering derate under load, or overboost | Scan active and history derate codes; log boost over a drive cycle |
How to read this table: A cluster of symptoms pointing to the same intake joint – hissing, oily residue, and boost deviation – almost always signals a charge air leak, and a pressure test will confirm it in minutes. Suspect the turbo itself only once the intake tract holds pressure cleanly.
Charge Air Leak vs. Turbocharger Failure: Separating Two Similar Complaints
A truck that suddenly loses power and derates under load is often assumed to need a turbo replacement. That conclusion is expensive and frequently premature. A charge air leak and a failing turbocharger overlap in symptoms, but the evidence usually points one way.
The table below contrasts the most reliable indicators so shops and owners can confirm a diagnosis before authorizing parts.
Comparison of Indicators
Charge air leak
- Boost pressure: Low or unstable; commanded boost is never reached at high load, and pressure rises slowly. A pressure or smoke test exposes air escaping at couplers, boots, or the intercooler.
- Fault code audit trail: Underboost codes such as P0299 appear, often alongside intake air temperature irregularities. Codes may clear and return depending on load and heat.
- Oil consumption: Normally unchanged. Any oil present usually originates from the compressor seal, not the charge path.
- Shaft play: None. The turbo shaft spins freely with normal clearance and no wheel contact.
- Noise: Hissing, whistling, or whooshing from the charge circuit that shifts with throttle position.
Turbocharger failure
- Boost pressure: Erratic; may spike into overboost, then collapse. Power loss persists regardless of load.
- Fault code audit trail: Overboost, wastegate or actuator codes, and repeated underboost codes that recur without a load trigger.
- Oil consumption: Elevated, with blue exhaust smoke and oil pooling in the intercooler and intake.
- Shaft play: Radial or axial movement, wheel-to-housing contact, and damaged compressor vanes.
- Noise: Grinding, scraping, or a siren-like whine that tracks engine rpm rather than throttle.
What to Conclude
Stable oil consumption and tight shaft play argue against a turbo replacement and toward a charge air leak. Confirm with a pressure test and a visual inspection of the whole charge circuit before ordering parts. A written fault code history also shows whether symptoms track load or rpm, which is the single most useful clue.
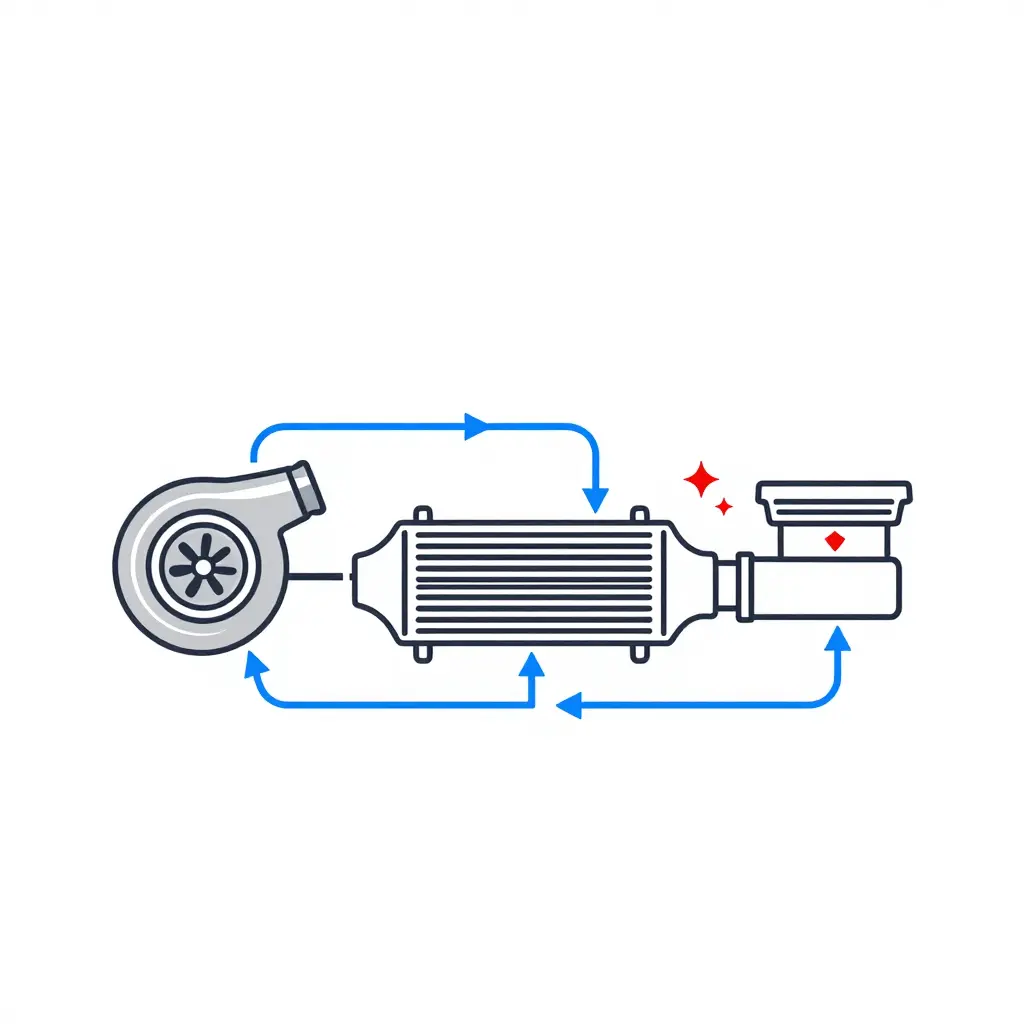
This schematic traces the charge air path from the turbocharger, through the charge air cooler, and along the intake piping into the engine. The arrows show how compressed air travels, and the marked symbols highlight the joints where leaks most often develop. Seen this way, it is easier to understand why a charge air leak can trigger a derate under load and still look like a failing turbo.
Mobile Diagnostic Process for a Derate Under Load with Suspected Charge Air Leaks
When a truck loses power and drops into a derate under load, the quickest assumption is a failed turbocharger, and jumping there leads to an unnecessary replacement. A structured mobile diagnostic process isolates a charge air leak first, confirms the real cause, and only then considers the turbo.
On a typical call, the tech works through the same sequence every time. That consistency is what separates a guess from a diagnosis.
Step 1: Confirm Boost Pressure Deviation
The technician connects a scan tool and compares commanded boost against actual manifold pressure while the engine is under load. A consistent gap between the two, paired with low power and a derate, points toward a charge air leak rather than a failing turbo. Recording the deviation at several RPM points gives a clear baseline.
Step 2: Smoke or Pressure Test the Charge Air System
With the deviation confirmed, the next step is a smoke or pressure test of the charge air system. Introducing low-pressure smoke or compressed air reveals where pressurized air escapes between the turbo outlet and the intake manifold. This test turns a vague symptom into a specific location.
Step 3: Check Clamps and Boots
The technician then checks every clamp, boot, and joint along the charge pipes. Loose clamps, cracked boots, and chafed couplers are the most common sources of a charge air leak, and they are inexpensive fixes that restore boost without touching the turbo.
Step 4: Inspect the Charge Air Cooler
Next comes the charge air cooler. The tech inspects the core and end tanks for cracks, pinholes, road debris damage, and oil residue that marks a leak path. A damaged cooler leaks boost just like a bad boot and must be repaired or replaced before any turbo decision is made.
Step 5: Review Fault Codes Before Recommending a Turbo
Finally, the technician reviews stored and pending fault codes in context. Overboost or underboost codes can mimic turbo failure, so the codes have to line up with the physical test results. Only when the charge air system is proven sound and the turbo itself shows mechanical faults is a replacement justified.
Planning Ahead Pays Off
A mobile truck repair call for a derate feels disruptive, but the cost is far lower when the diagnostic process is disciplined. Fleet managers who plan for these moments stay ahead of surprises: they budget for routine maintenance and keep an emergency repair fund for the truck owners they answer to. Preparation turns a roadside emergency into a manageable event rather than a budget-breaking one.
That discipline protects owners from paying for a turbocharger they never needed, and it gets the truck back to work faster.
Diagnostic Checklist: Derate Under Load and Charge Air Leak
A derate under load usually means the engine is reacting to a boost problem it can sense but cannot fully explain. Before anyone pulls a turbo, work through this checklist in order. It applies in the shop bay and on mobile truck repair callouts alike, and it keeps you from replacing parts that were never the cause. Fleet managers can fold this routine into a broader schedule of fleet maintenance tips so early checks stay ahead of breakdowns.
- Scan the ECM for boost and derate fault codes first, because stored codes reveal whether the engine is limiting power on purpose or chasing a genuine pressure loss tied to a charge air leak.
- Pressure-test the entire charge air system from the turbo outlet to the intake manifold, since a controlled pressure test exposes leaks that only show up once real boost builds.
- Inspect the charge air cooler for cracks, bent fins, and rubbed-through end tanks, because a cooler that weeps under heat and pressure starves the engine of air exactly when demand is highest.
- Check every silicone boot and clamp for oil residue, since an oily film on a joint is a reliable sign that pressurized air is escaping past a loose or degraded connection.
- Verify turbocharger actuator movement with a commanded sweep, because a sticky or lazy actuator mimics a boost leak by failing to hold the pressure the calibration expects.
- Compare live boost data against the manufacturer’s specification under load, as actual-versus-expected readings confirm whether you have found the fault or are still guessing.
- Confirm the air filter and intake path are unrestricted, because a plugged filter can drop boost and trigger a derate that looks identical to a charge air leak.
- Document pressures, codes, and findings before starting repairs, since a clear record helps fleet managers justify the fix and spot repeat failures early.
Working top to bottom keeps the diagnosis honest: you either confirm a leak with pressure and data, or you rule one out and move on with confidence.
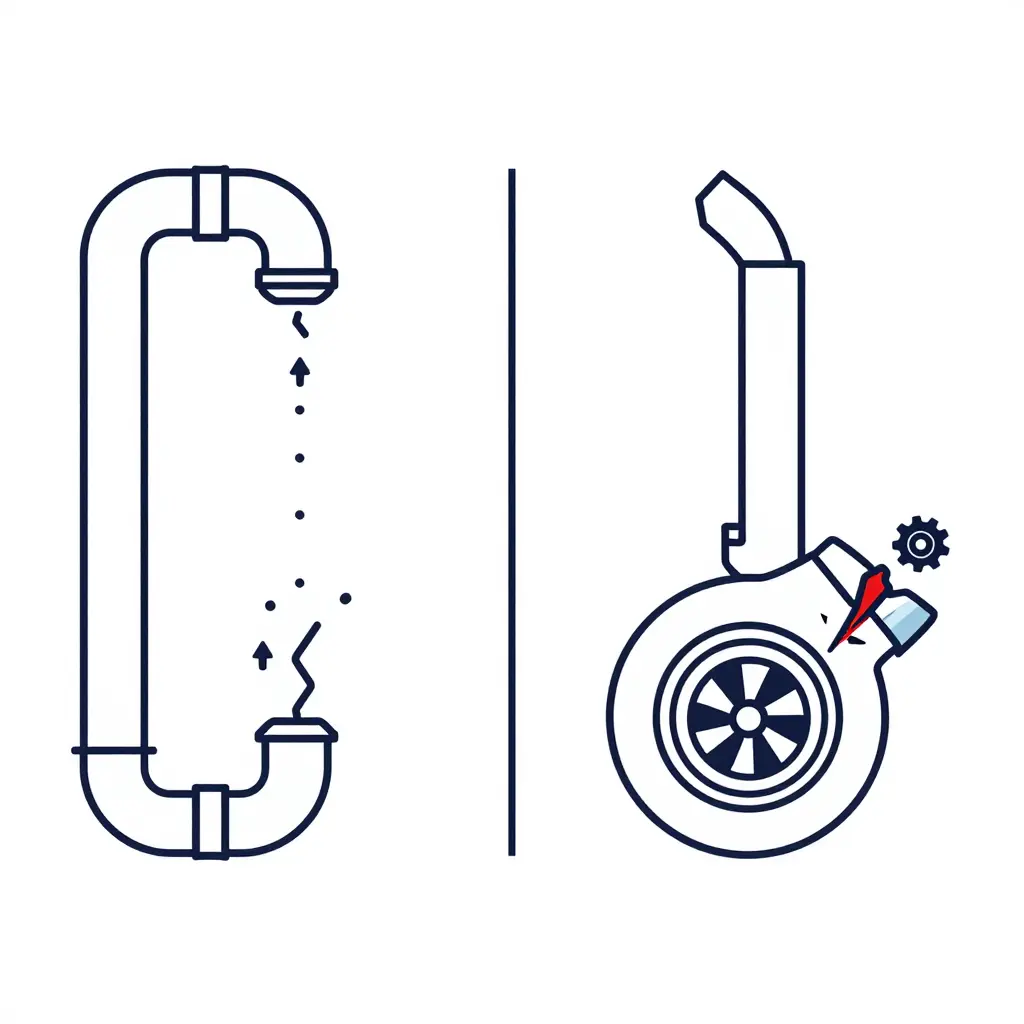
Reading the diagram: the diagnostic difference
When a truck derates under load, the dash looks nearly identical whether the cause is a charge air leak or a genuinely failed turbo, which is why so many owners jump to the most expensive conclusion. The diagram isolates the one thing that separates the two: where the fault physically lives.
- Left panel – leak in the charge air path: The pressurized intake is intact as a system, but a crack or loose joint lets boost escape into the atmosphere. Air still flows and the turbo still spins, but delivered pressure never reaches the engine. The escaping arrows are the “invisible” loss inside an otherwise normal-looking engine bay.
- Right panel – mechanical turbo failure: The compressor or turbine itself is damaged. The spinning assembly can no longer build pressure at all, so there is nothing to leak and nothing to deliver. Only a real turbo replacement fixes this.
Air escaping a healthy system versus a component that can no longer do its job: that fork should drive the repair decision. A proper boost-leak test before condemning the turbo routinely saves owners thousands of dollars in unnecessary replacement.
If a fault like this lands in your budget, it helps to have planned ahead. There is practical guidance on building an emergency repair fund as a truck owner.
When Is a Turbo Replacement Truly Necessary?
A turbocharger is one of the most expensive components on a modern diesel engine, so the decision to replace it should rest on measurements, not a guess. Plenty of trucks that look like they need a turbo replacement are actually fighting a charge air leak. A split boot, a cracked charge pipe, or a leaking intercooler starves the engine of air, skews boost, and triggers a derate under load that drivers blame on the turbo.
Diagnosis comes before parts. Before anyone quotes a new turbocharger, the charge air system should be pressure-tested and inspected end to end, from the air cleaner to the intake manifold. If a leak turns up, repairing it often restores full boost, clears the fault code, and saves thousands of dollars. Replacing a healthy turbo while an unfixed charge air leak remains just pays for the same repair twice.
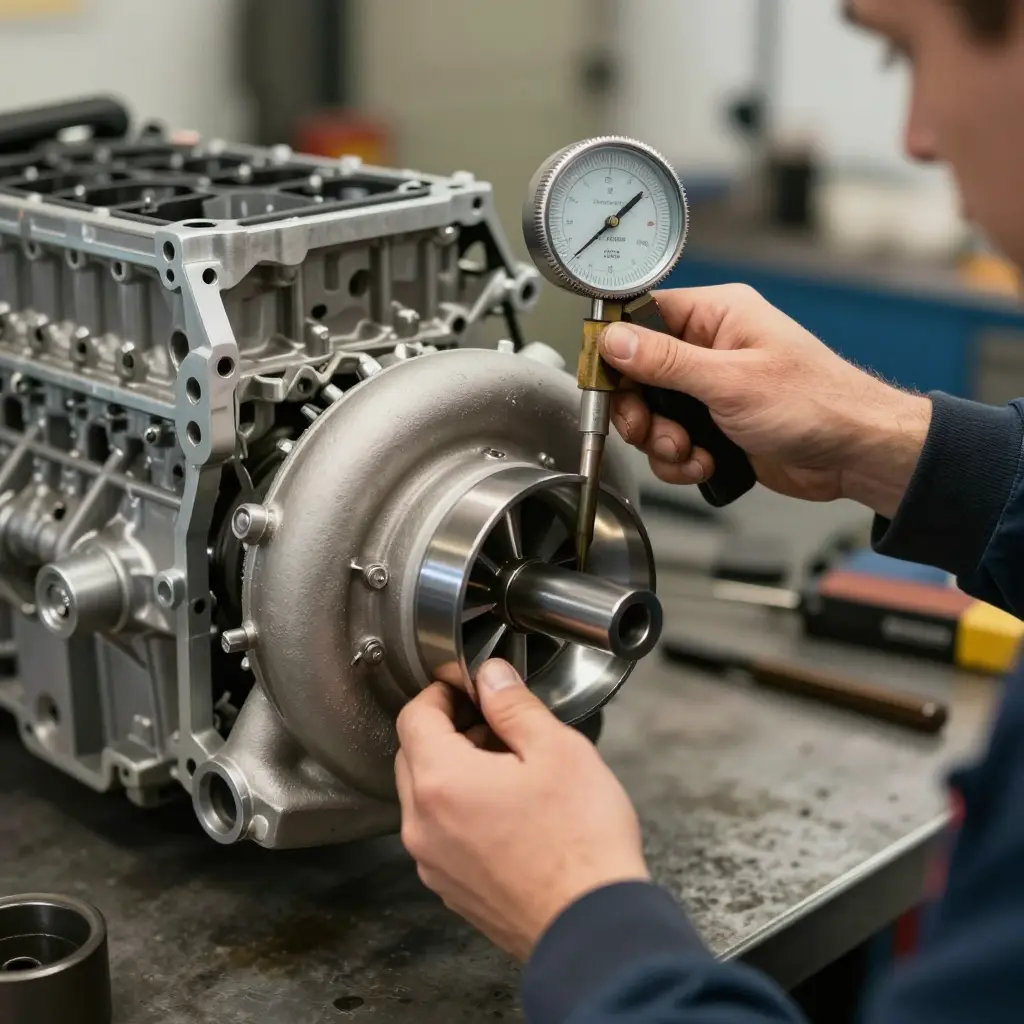
Once charge air leaks are ruled out, a genuine failure is usually obvious. These conditions justify a turbo replacement:
- Confirmed shaft play. Radial or axial movement at the compressor or turbine shaft exceeds the manufacturer’s specification, or the wheel contacts the housing.
- Oil seal failure. Oil is present in the compressor or turbine housing, oil consumption climbs, and blue smoke appears from the exhaust.
- Compressor or turbine wheel damage. Blades are bent, chipped, cracked, or eroded by foreign object debris, which also throws the rotating assembly out of balance.
- Actuator failure. A variable-geometry vane, wastegate, or electronic actuator no longer responds, leaving the vanes stuck open or closed with no way to command boost.
- Boost performance outside specification after charge air leaks are ruled out. Recorded boost stays low or erratic even though the charge air system holds pressure and passes inspection.
The order matters. Air leaks are cheap and quick to fix; turbochargers are not. Confirming the failure with real measurements protects your budget, which is one reason an emergency repair fund belongs in the plan for any owner or fleet.
If your rig is losing power on a climb and you suspect the turbo, diagnose the charge air system first. A proper inspection tells you whether you need a simple repair or a full turbo replacement, and it keeps you from paying for a part your truck never needed.
A charge air leak and a dying turbocharger can both trigger a derate under load, yet their price tags are worlds apart. The table below breaks down the typical cost, downtime, and parts involved so truck owners, fleet managers, and repair shops can see exactly why an accurate diagnosis matters before anyone orders a turbo replacement. Whether the job happens in a bay or through mobile truck repair, knowing these numbers protects your bottom line.
| Repair Type | Typical Parts | Relative Cost | Typical Downtime |
|---|---|---|---|
| Charge air leak repair | Clamps, boots, hoses, gaskets | $150 – $1,200 | 2 – 6 hours |
| Turbo replacement | Turbocharger, gaskets, oil lines, fasteners | $2,000 – $7,000 | 6 – 24 hours |
Even the priciest charge air leak fix usually costs a fraction of a full turbo replacement – cash that is far easier to absorb when you are budgeting for routine truck maintenance. Confirm the leak first, then spend with confidence.
Frequently Asked Questions About Derate, Charge Air Leaks, and Turbo Replacement
Boost-related faults stop a truck cold whether you run one tractor or manage a fleet. These are the questions we hear most often from truck owners, fleet managers, and auto repair shops.
Can a charge air leak cause a derate under load?
Yes. When a charge air leak lets pressurized intake air escape between the turbocharger and the intake manifold, the engine control module (ECM) sees boost pressure lower than commanded. To protect the engine from over-fueling and high exhaust temperatures, the ECM triggers a derate under load, typically limiting power and sometimes capping vehicle speed. The fault often appears only during heavy throttle, not while idling.
How can I tell a charge air leak from a bad turbocharger?
A charge air leak usually shows up as a boost-pressure drop with intake noise – hissing or whooshing – while a failing turbo often adds a whine, siren, or grinding sound, plus oil in the intake. Check for split boots, loose clamps, cracked pipes, and a leaking charge air cooler. If the turbo spins freely with minimal shaft play, the leak is more likely elsewhere in the charge air system.
Can a mobile truck repair call diagnose a charge air cooler leak on site?
Yes. A mobile truck repair technician can pressure-test the charge air system, spray connections with soapy water to find bubbles, and use a boost-leak tester to locate leaks without towing the truck. Some units also use ultrasonic detectors for hard-to-reach spots. That allows many charge air leaks to be pinpointed and repaired in the yard or on the roadside.
How long does a turbo replacement last?
A properly installed turbo replacement commonly lasts 150,000 to 250,000 miles or more, depending on duty cycle, oil quality, and maintenance. Stop-and-go urban routes and neglected oil changes shorten that life, while highway miles with clean oil and correct oil-change intervals help it reach the upper range.
Does ignoring a charge air leak lead to turbo damage?
Yes. An uncorrected charge air leak makes the turbo work harder to reach target boost, which raises exhaust gas temperatures and shaft speed. Over time this overheats the turbo, accelerates bearing wear, and can push oil past the seals. What starts as an inexpensive clamp or boot repair can grow into a full turbo replacement.
What symptoms help me separate the two problems?
| Symptom | Charge Air Leak | Failing Turbocharger |
|---|---|---|
| Power loss under load | Common | Common |
| Whining or siren noise | Rare | Common |
| Oil in intake piping | Rare | Common |
| Boost below commanded | Common | Common |
| Loose or split hoses | Common | Not related |
When should I schedule service?
If a derate under load returns after codes are cleared, or if boost pressure stays low, book a diagnostic before the problem spreads. Fixing a charge air leak early is far cheaper than a turbo replacement.
Diagnose the Charge Air System Before You Buy a Turbo
When a truck throws a derate under load, the turbocharger is the easiest scapegoat. In reality, a charge air leak is the more common and far cheaper culprit. A cracked charge pipe, a loosened clamp, or a porous intercooler bleeds off the boost your engine needs, and the ECM responds by derating power to protect the engine. Authorizing a turbo replacement without fixing that leak simply repeats the problem at a premium price.
The sequence is proven:
- Pull fault codes and live boost data to see how far actual pressure falls below commanded.
- Pressure-test the entire charge air system to expose leaks you cannot catch by eye.
- Inspect boots, clamps, pipes, and the intercooler for cracks, oil residue, and loose connections.
- Evaluate the turbo itself for shaft play or seal failure only after the intake path is sealed.
- Confirm the fix with a road test under the same load that triggered the derate.
Accurate diagnosis keeps money in your pocket. A charge air leak repair typically costs a fraction of a full turbo replacement, and a mobile truck repair visit resolves the issue at your yard instead of tying up a service bay for days, which means less downtime, faster dispatch, and no wasted parts spend. Solid planning pays off here too – read these tips on budgeting for routine truck maintenance to fold repair costs into your operating budget instead of absorbing surprise bills.
Confirm the root cause, fix the leak, and reserve turbo replacement for genuine turbo failure. If you are not sure which one you are dealing with, schedule a mobile inspection and let us confirm what is really causing your derate under load before you authorize any major repair.